Agentic Data Engineering in Microsoft Fabric with Claude Code

Status check, verified October 2026. The Fabric Core MCP Server is generally available since the September 2026 Fabric update, but the pieces around it move fast. The Fabric skills are open source and get new versions often, the Fabric CLI ships regularly, and the VS Code extension changes its UI from time to time. If something here doesn’t behave the way I describe, check the Microsoft Learn docs before assuming your setup is broken. I date-stamp every post in this series and update them when things move.
Most of a data engineer’s day in Fabric goes into notebooks and pipelines. And most of the AI help I see people using for that work stops at a chat window: copy the code out, ask a question, paste the answer back into the notebook, run it, repeat. It works. Kind of. But it’s a long way from an agent that can open your notebook, change it, run it and tell you what broke.
In this post I’ll go through the full Data Engineering flow in Microsoft Fabric the way I actually work: notebooks, Fabric skills, pipelines, Dataflow Gen2, and committing all of it to Git at the end.
Two prerequisites. The tool setup from Agentic Development in Microsoft Fabric, Part 1: Setup, and the workspace we built in the infrastructure post, One Prompt, One Workspace: Agentic Microsoft Fabric Admin. If you haven’t done them yet, go there first.
The core of my setup is Visual Studio Code with the Fabric Data Engineering extension. It connects you to your Fabric notebooks, sure. More importantly, it lets your LLM (in my case Claude Code) see and edit those notebooks, and run and test them before the code goes back to the workspace.
Which tool does what
Same as in the infrastructure post, the agent switches between tools depending on the job. This time there’s a fourth one in play: the VS Code extension. Quick map, so the rest of the post makes sense:
| Work | Tool | Why this one |
|---|---|---|
| Edit, run and publish notebooks | Fabric Data Engineering VS Code extension | Puts the notebook on your disk as a real file, so any LLM can edit it. It has its own sign-in, separate from the MCP and both CLIs. |
Notebook code and runs via the spark-authoring-cli skill | Azure CLI (az rest) | The skill calls the Fabric REST API directly, so it works for every endpoint, MCP or not. |
Warehouse / SQL DB via sqldw-authoring-cli | sqlcmd + Azure CLI | T-SQL runs over a SQL connection, not REST. az login provides the identity. |
| Create a pipeline from a prompt | Fabric MCP | Built-in create item tool, nothing to install. |
| Export, edit and re-import a pipeline, schedules | Fabric CLI (fab) | Repeatable, file-based, works with service principals. |
Dataflow Gen2 via dataflows-cli | Azure CLI (az rest) | Definitions and M preview (executeQuery) are REST endpoints the MCP doesn’t expose. |
| Publish an environment | az rest / fab api | Staging and publish are separate API calls the MCP doesn’t have. |
| Commit to Git | git-integration-operations-cli → fab api (falls back to az rest) | No Git tools in the MCP. |
The rule of thumb hasn’t changed: MCP when there’s a ready-made tool for it, fab for repeatable work, az whenever a skill needs a REST endpoint the MCP doesn’t cover. In practice that means you want all three logged in before you start. /mcp shows the MCP, fab auth status shows fab, and az account show shows az.
Notebooks in VS Code
🔧 VS Code extension, not MCP and not a CLI. This whole notebook section runs through the extension and its own sign-in.
Signing in to the extension
First, authorize yourself in the Fabric Data Engineering extension:
- Open VS Code
- Open the Command Palette (usually Ctrl+Shift+P, or Cmd+Shift+P on macOS)
- Type “Fabric Data Engineering” and select the Sign In option:
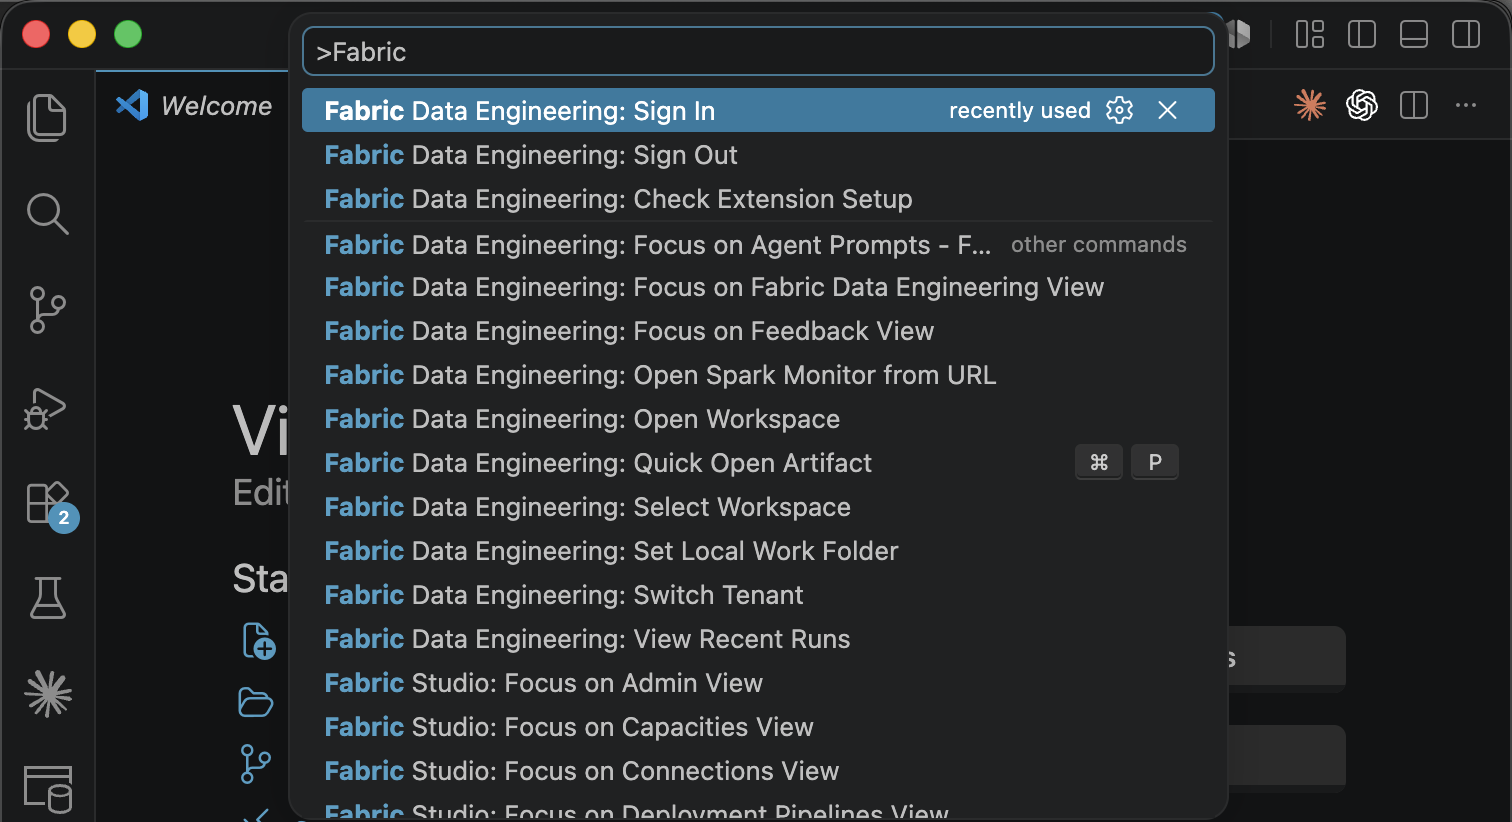
Your default browser opens with the standard Microsoft login window. Enter your credentials and sign in. After that, the extension can connect to your workspaces and items:
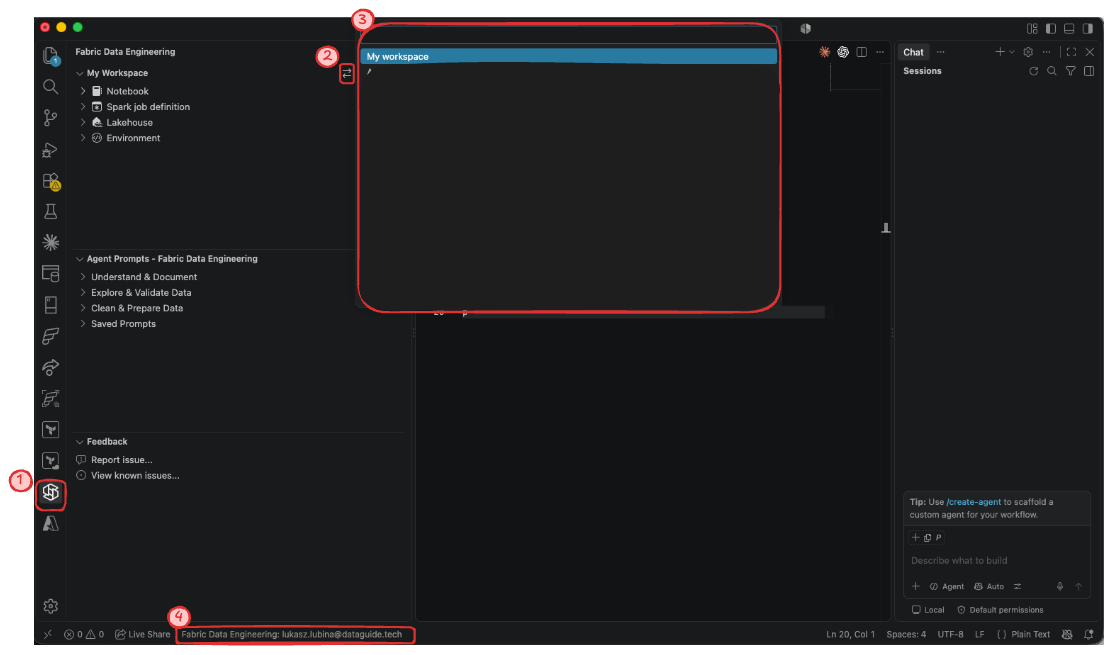
- Choose the extension
- Click the select workspace icon
- Pick your workspace from the list
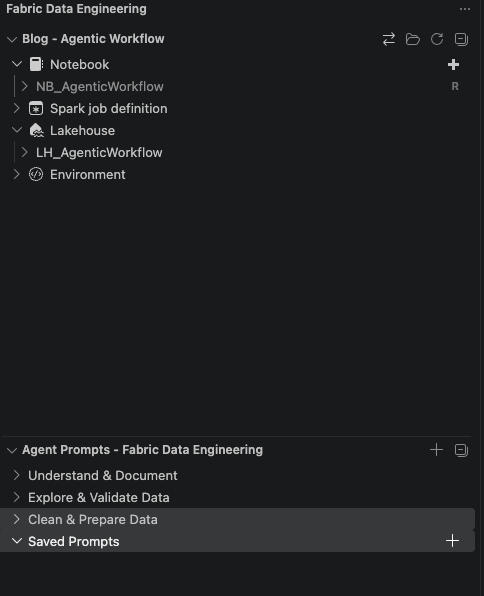
At the bottom (point 4 in the picture) you can check which account is currently logged in to the extension. Once you’re connected to a workspace, the left-hand menu shows all its Data Engineering items: notebooks, Spark job definitions, lakehouses and environments. There’s also a section where you can save your prompts, so you don’t have to type the same thing twice (skills can do something similar).
Live or local?
Expand Notebooks and you’ll see every notebook in the workspace. You can open one in two ways:
- Live connection – you work directly against the workspace, so every change shows up in the portal immediately. The catch: since it all happens online, Claude Code can’t see or edit the notebook. Claude works on local files.
- Local mode – my preferred one. You download the notebook, make your changes locally, and still run it from VS Code on a Spark cluster in Fabric. When you’re done, you publish the updated version back to Fabric.
Live connection
To open a notebook live, click the “Open notebook folder” icon:

The notebook opens in exactly the state it’s in online. Here’s mine:
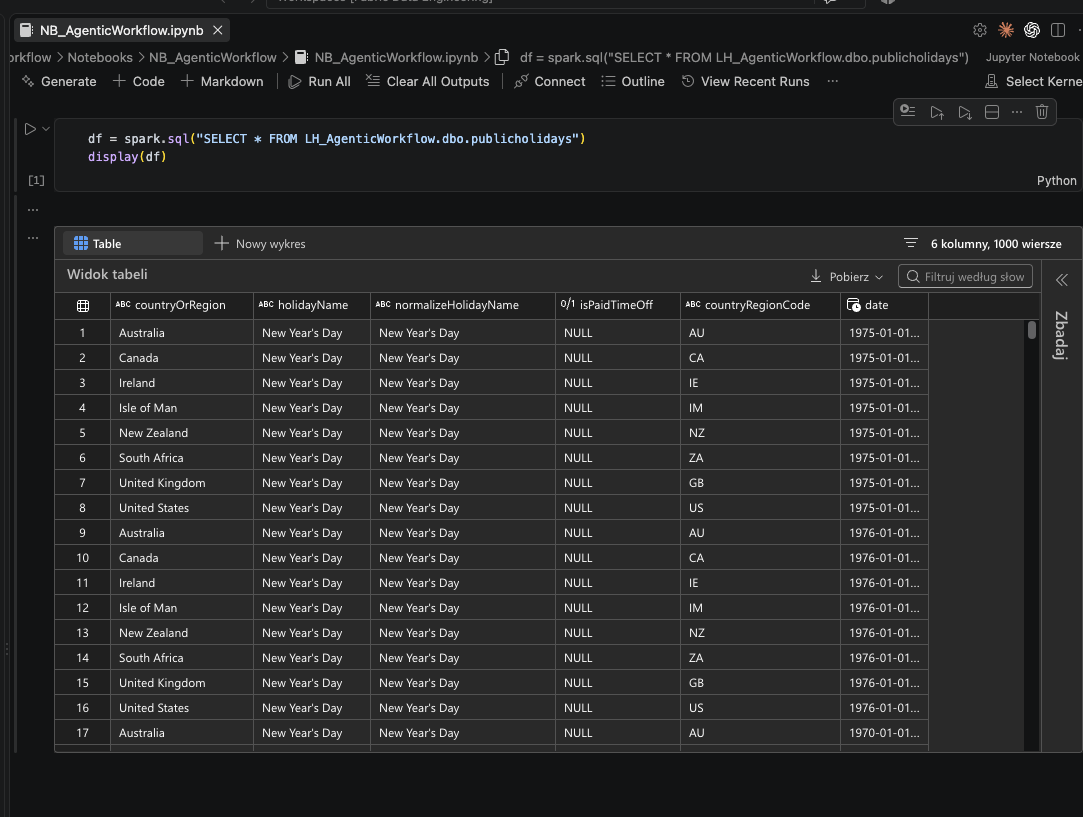
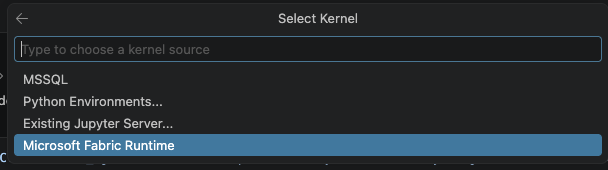
I changed the script to display only US holidays and ran it. When you run it, VS Code asks you to pick a kernel. Choose Microsoft Fabric Runtime, otherwise it won’t connect to Fabric:
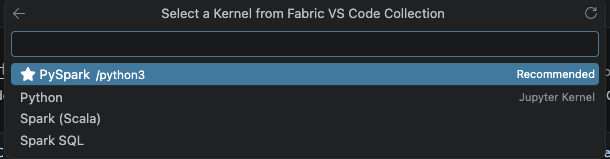
Then pick the language, PySpark in my case:
The notebook runs, and for me it produced this output:
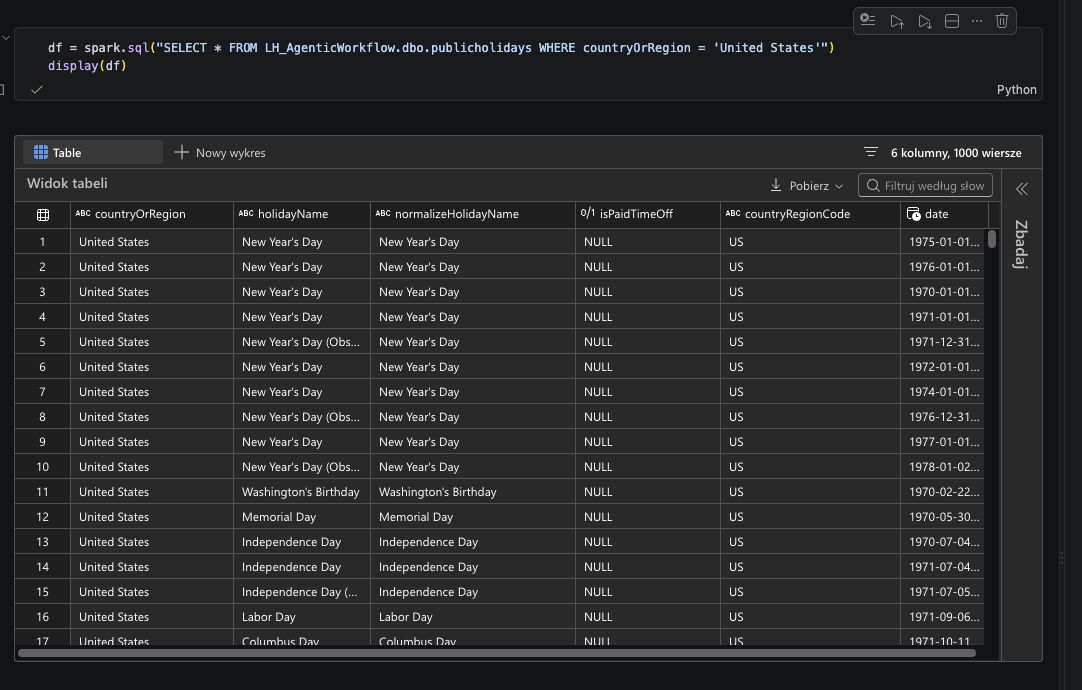
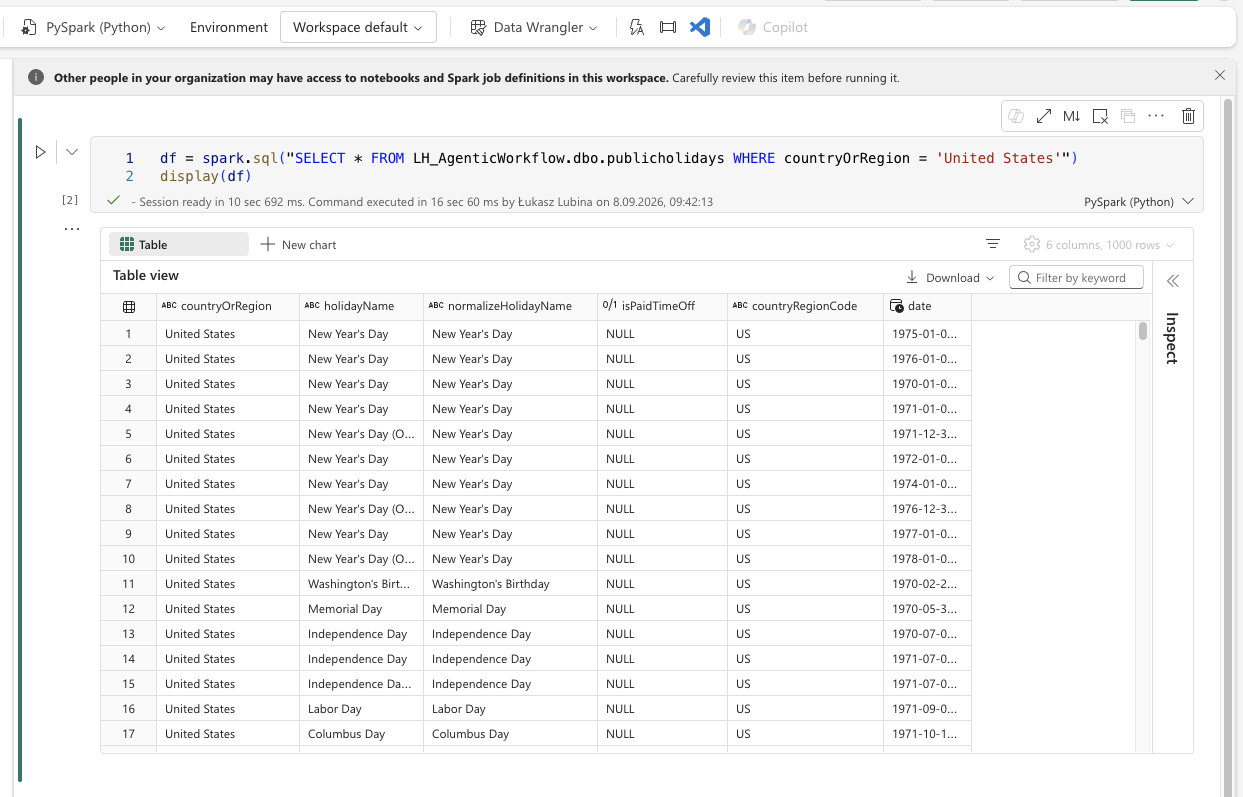
Save the notebook and the changes are immediately visible in Fabric:
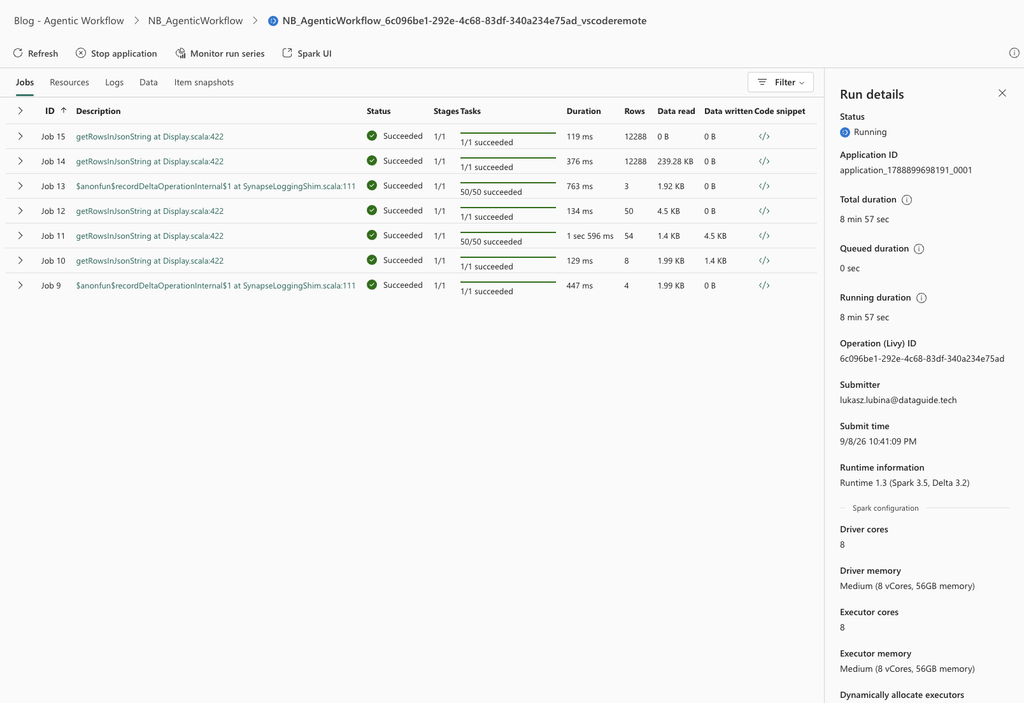
And since the script actually executes in Fabric, the run shows up in the Monitoring tab:
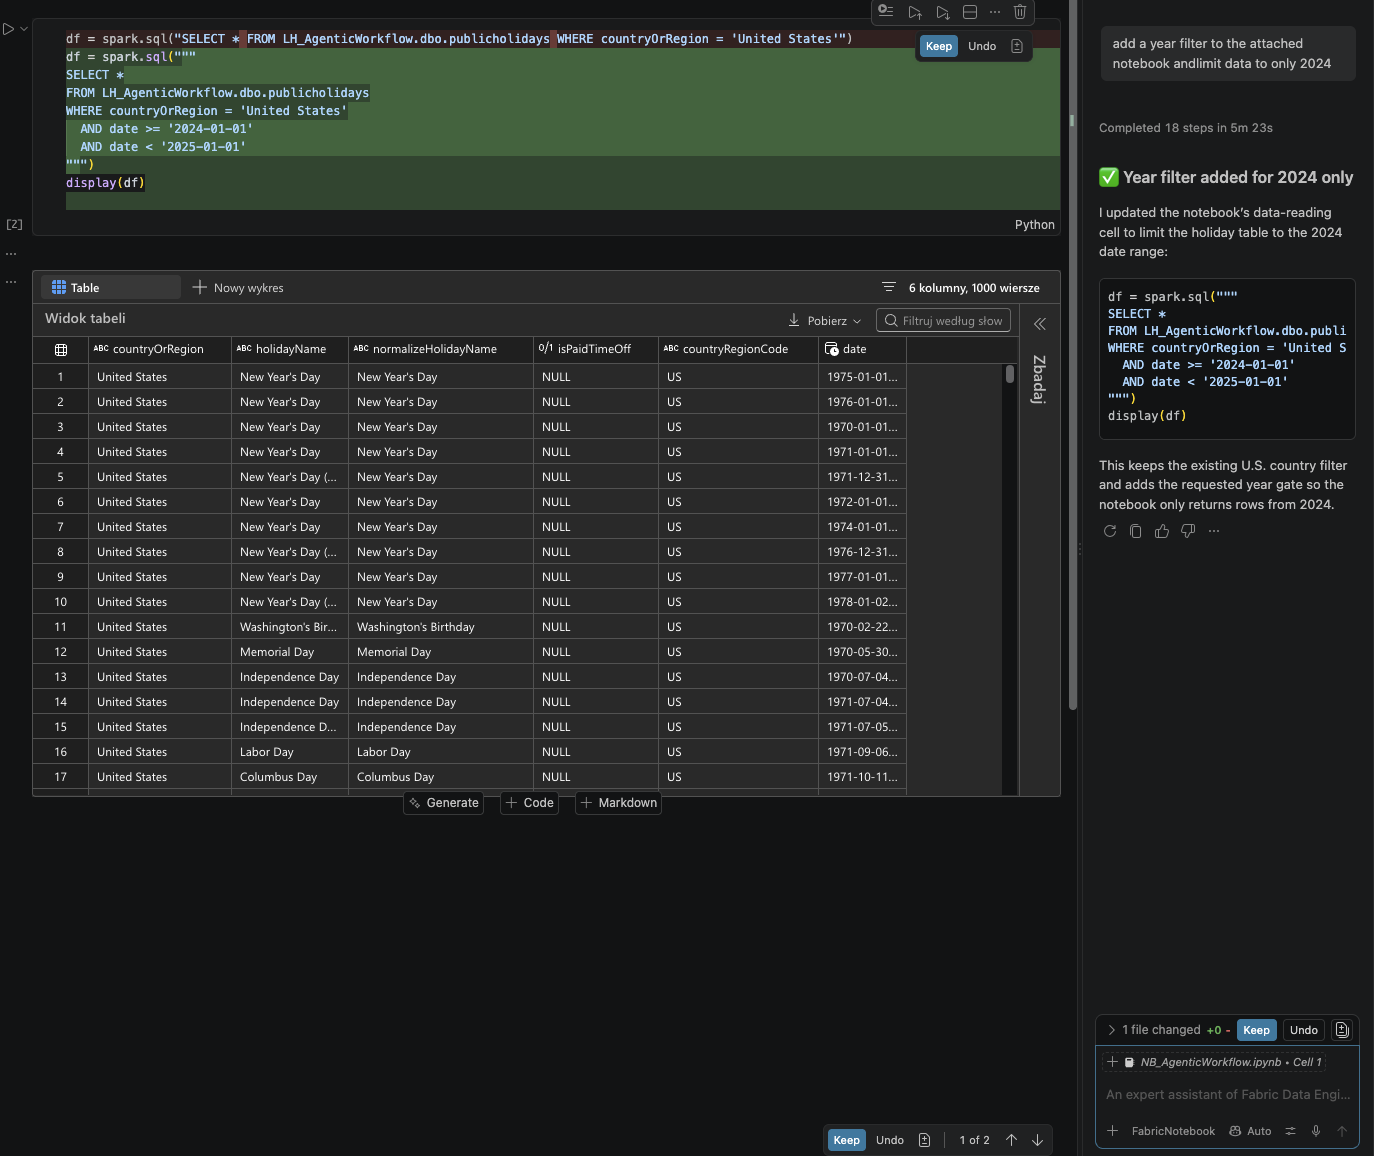
Now the big caveat of this mode. The only AI that can edit your notebook here is the one native to VS Code notebooks: GitHub Copilot. If that’s what you use, you’re fine. Open the chat window on the right and ask it for whatever you need:
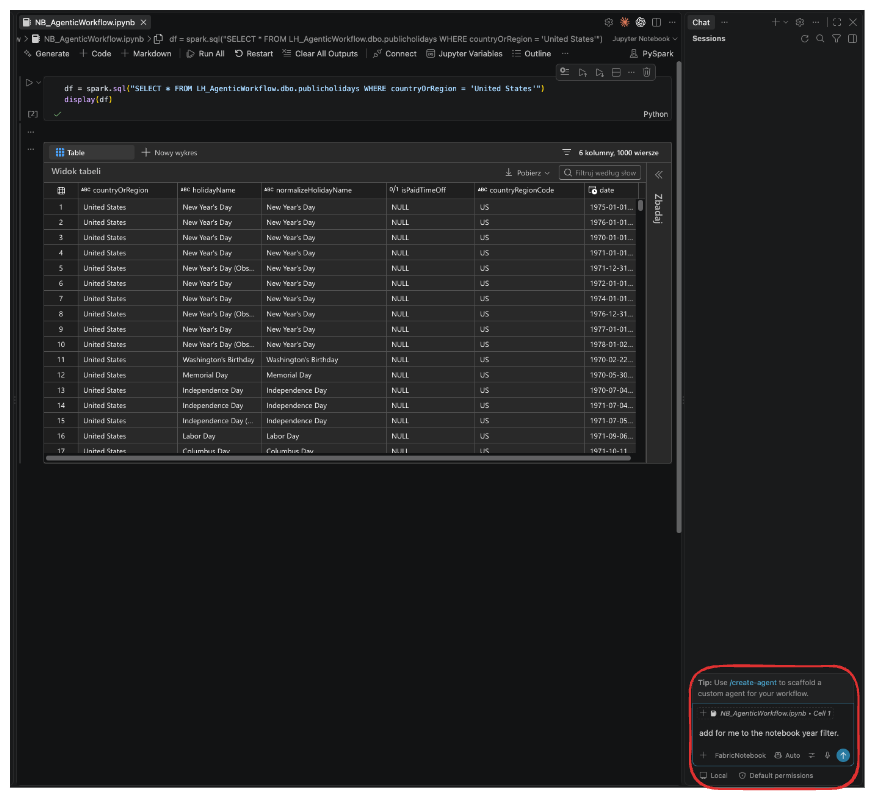
Copilot updates the notebook, and you’re all set for an agentic data engineering workflow:
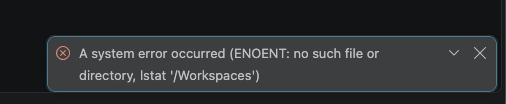
Using a different AI? That’s where it gets complicated. Other LLMs, even ones installed as VS Code extensions, can’t see that directory, and you might get an error like this:
Local mode
The workaround is the extension’s second mode. In local mode the extension physically copies the notebook to your disk, which means any LLM can get to it. When you’re done, you sync it back to the Fabric workspace.
Start by clicking a different button on the notebook, Download notebook:
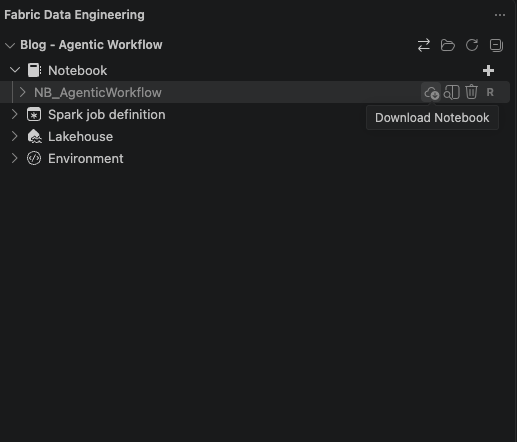
The icon turns green, meaning your local copy matches the one in the Fabric workspace. A new icon appears too, Publish resource folder, which uploads all the files and subfolders under the builtin folder to the notebook resources:

To open the downloaded notebook, use the same “Open notebook folder” icon as before. This time it asks which mode you want:
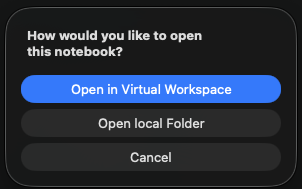
- Virtual workspace – the live connection from the previous section
- Local folder – the downloaded copy (pick this one)
The notebook opens just like last time:
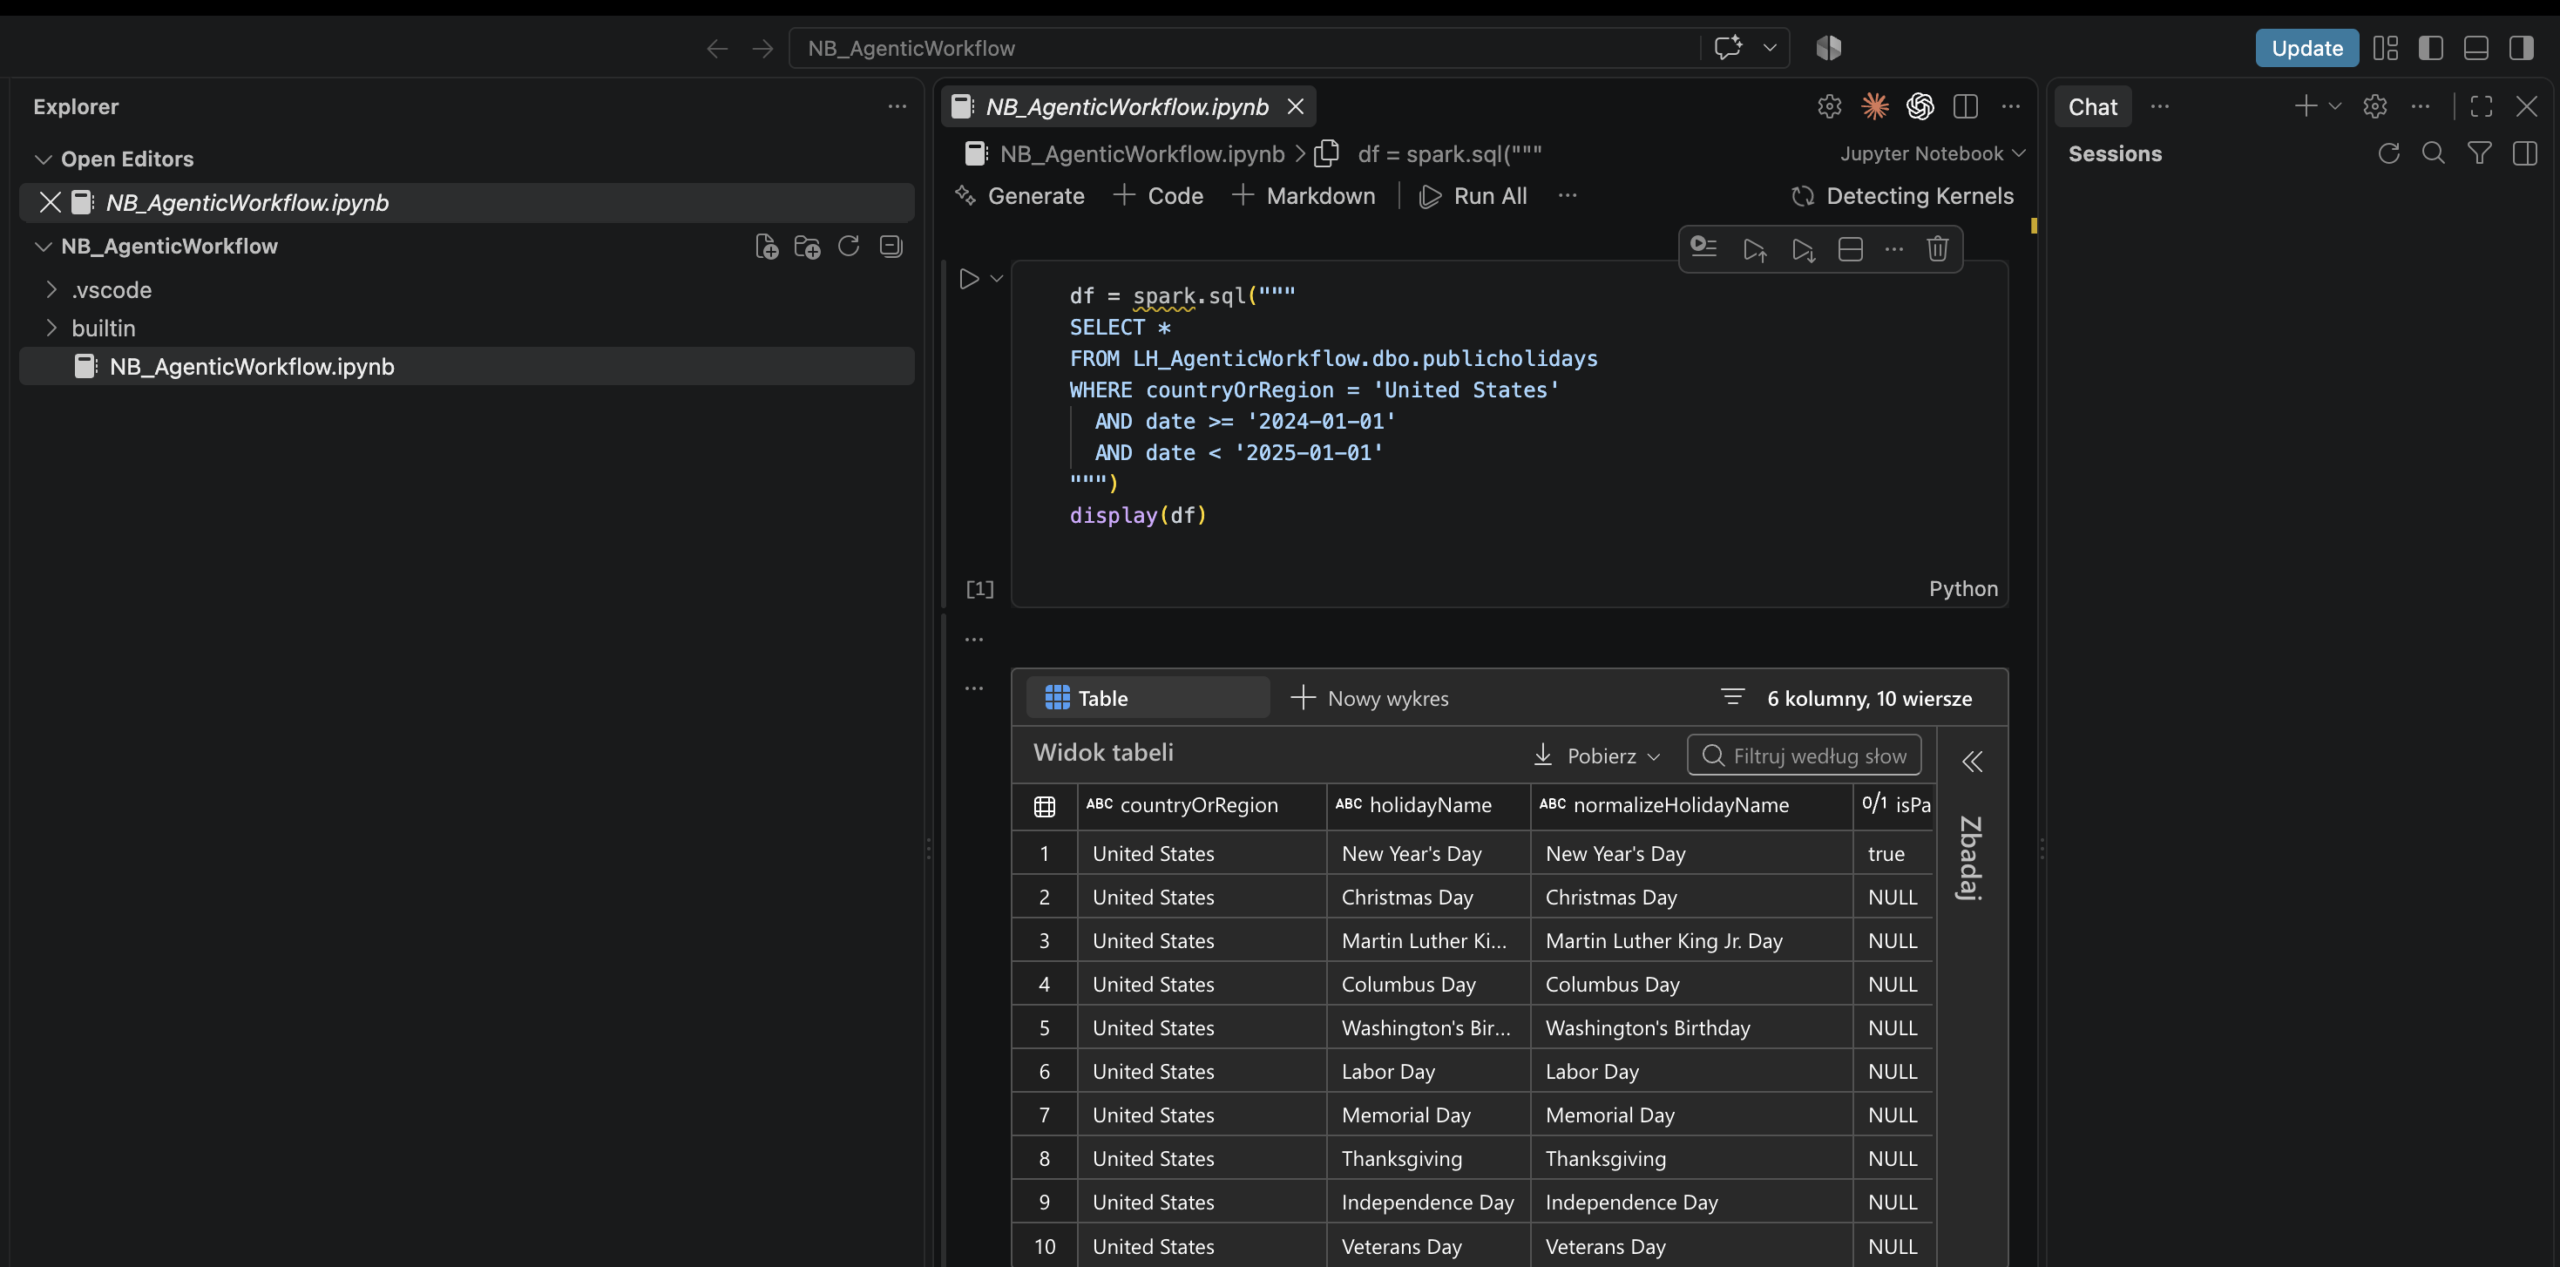
One difference: changes don’t sync to the workspace automatically. You push them with a button. But the file is now on your disk, so any LLM can help you write the notebook, including external ones like Claude Code or Codex.
From the Claude Code extension
The easiest route is the Claude Code extension in VS Code. Open it and it sees the notebook context straight away:
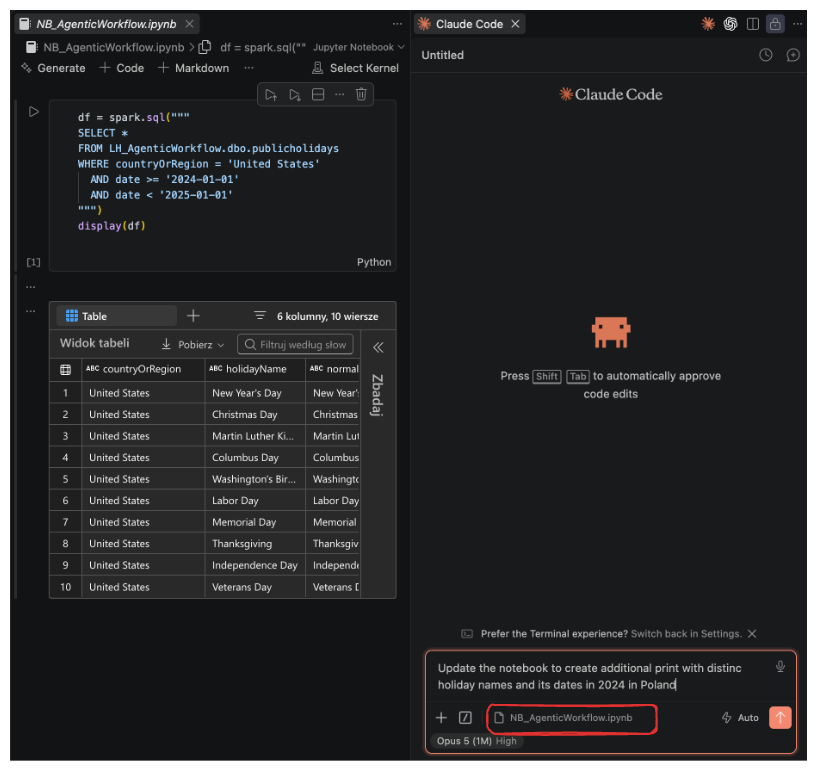
And it worked:
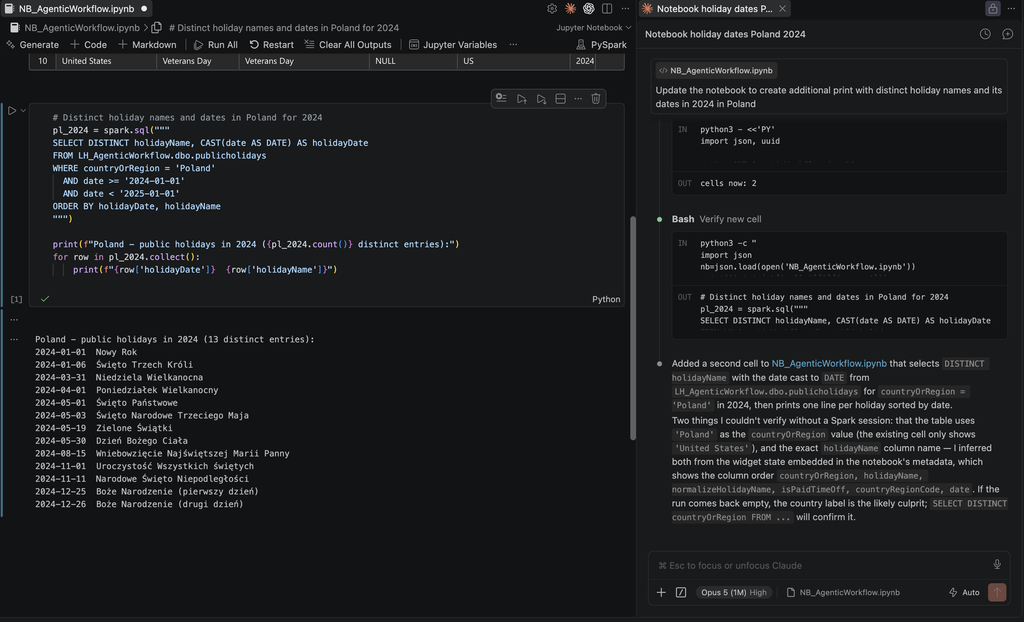
I like this approach a lot. The notebook is right there, so you can correct things, execute cells and check the output as you go. One thing to remember: notebooks don’t save automatically while you edit them. Hit save. The LLM only sees the last saved version.
From the terminal
Running the LLM from a terminal works too. First, find where the notebook is stored. Easiest way: right-click the notebook in the VS Code menu and choose Reveal in Finder (or File Explorer, depending on your OS):
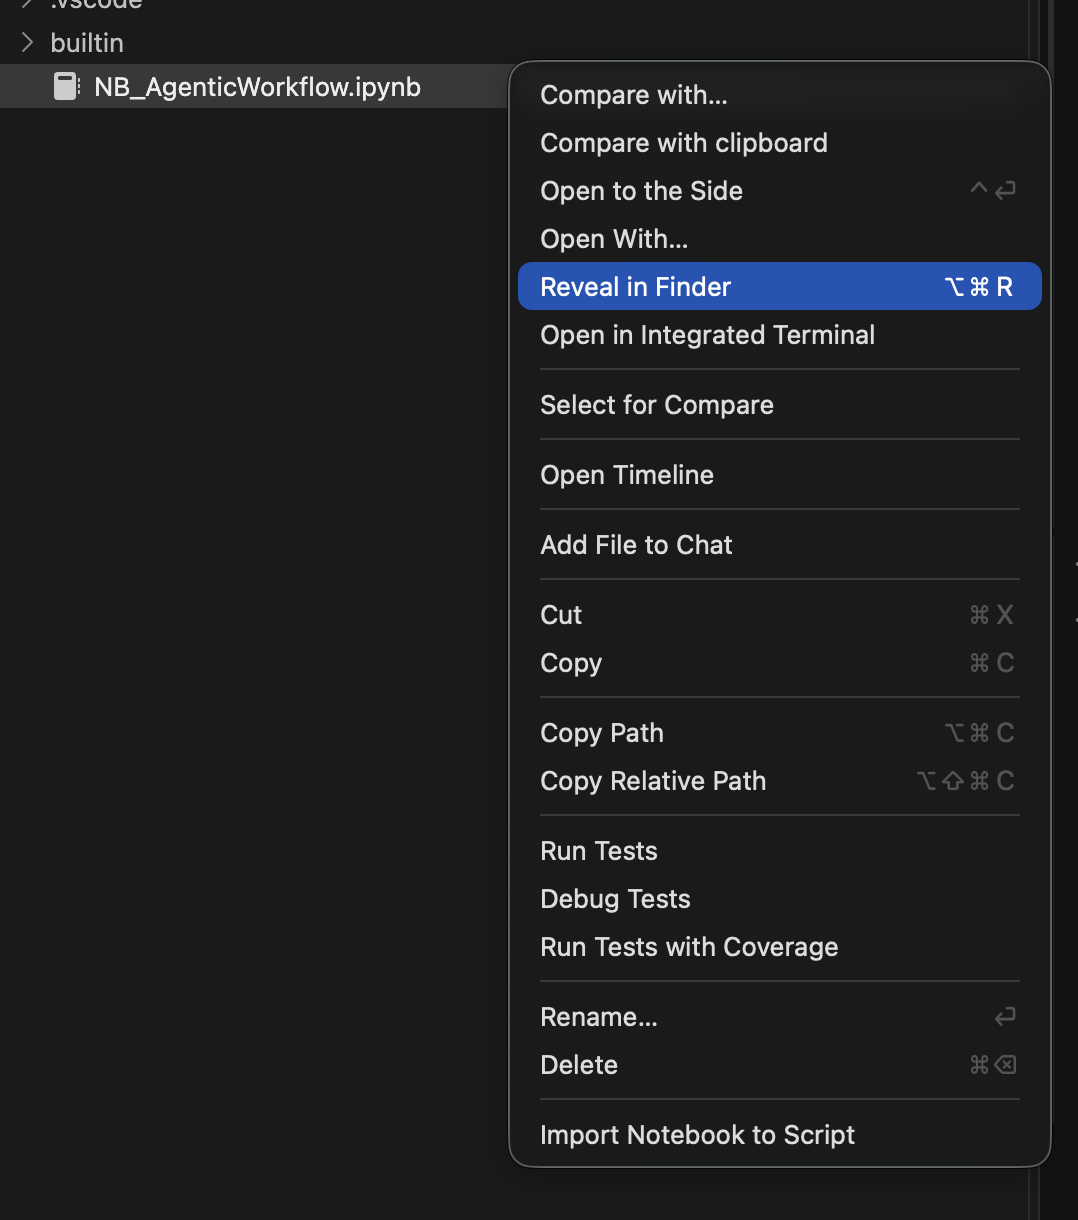
This is the path to my file: ~/50be2564-b12a-419d-93e8-fce57529a5b2/SynapseNotebook/c6be7bf2-3f60-4be6-a573-ffca78078b7f/NB_AgenticWorkflow/NB_AgenticWorkflow.ipynb
Which translates to: /<WorkspaceID>/<Item Type>/<ItemID>/<ItemName>/<items>
Other items land under the same main folder (unless you change that in the extension settings), so with the workspace and item IDs you can find anything quickly. The structure is similar to what you see in the code repository when it’s linked to your Fabric workspace.
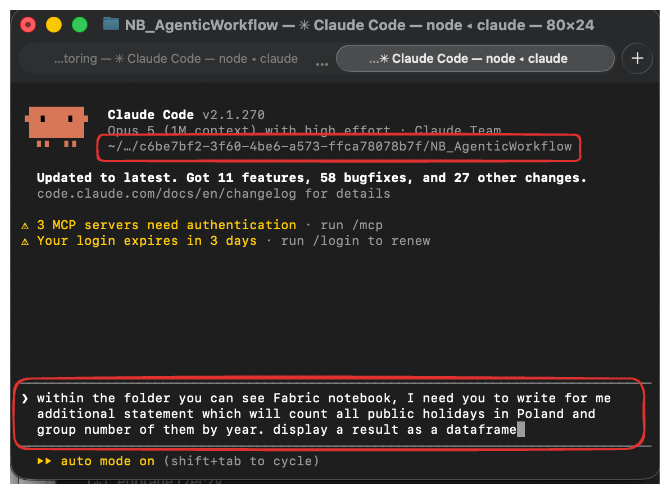
From there it’s simple. Open a terminal, navigate to the folder, and tell the LLM what to do:
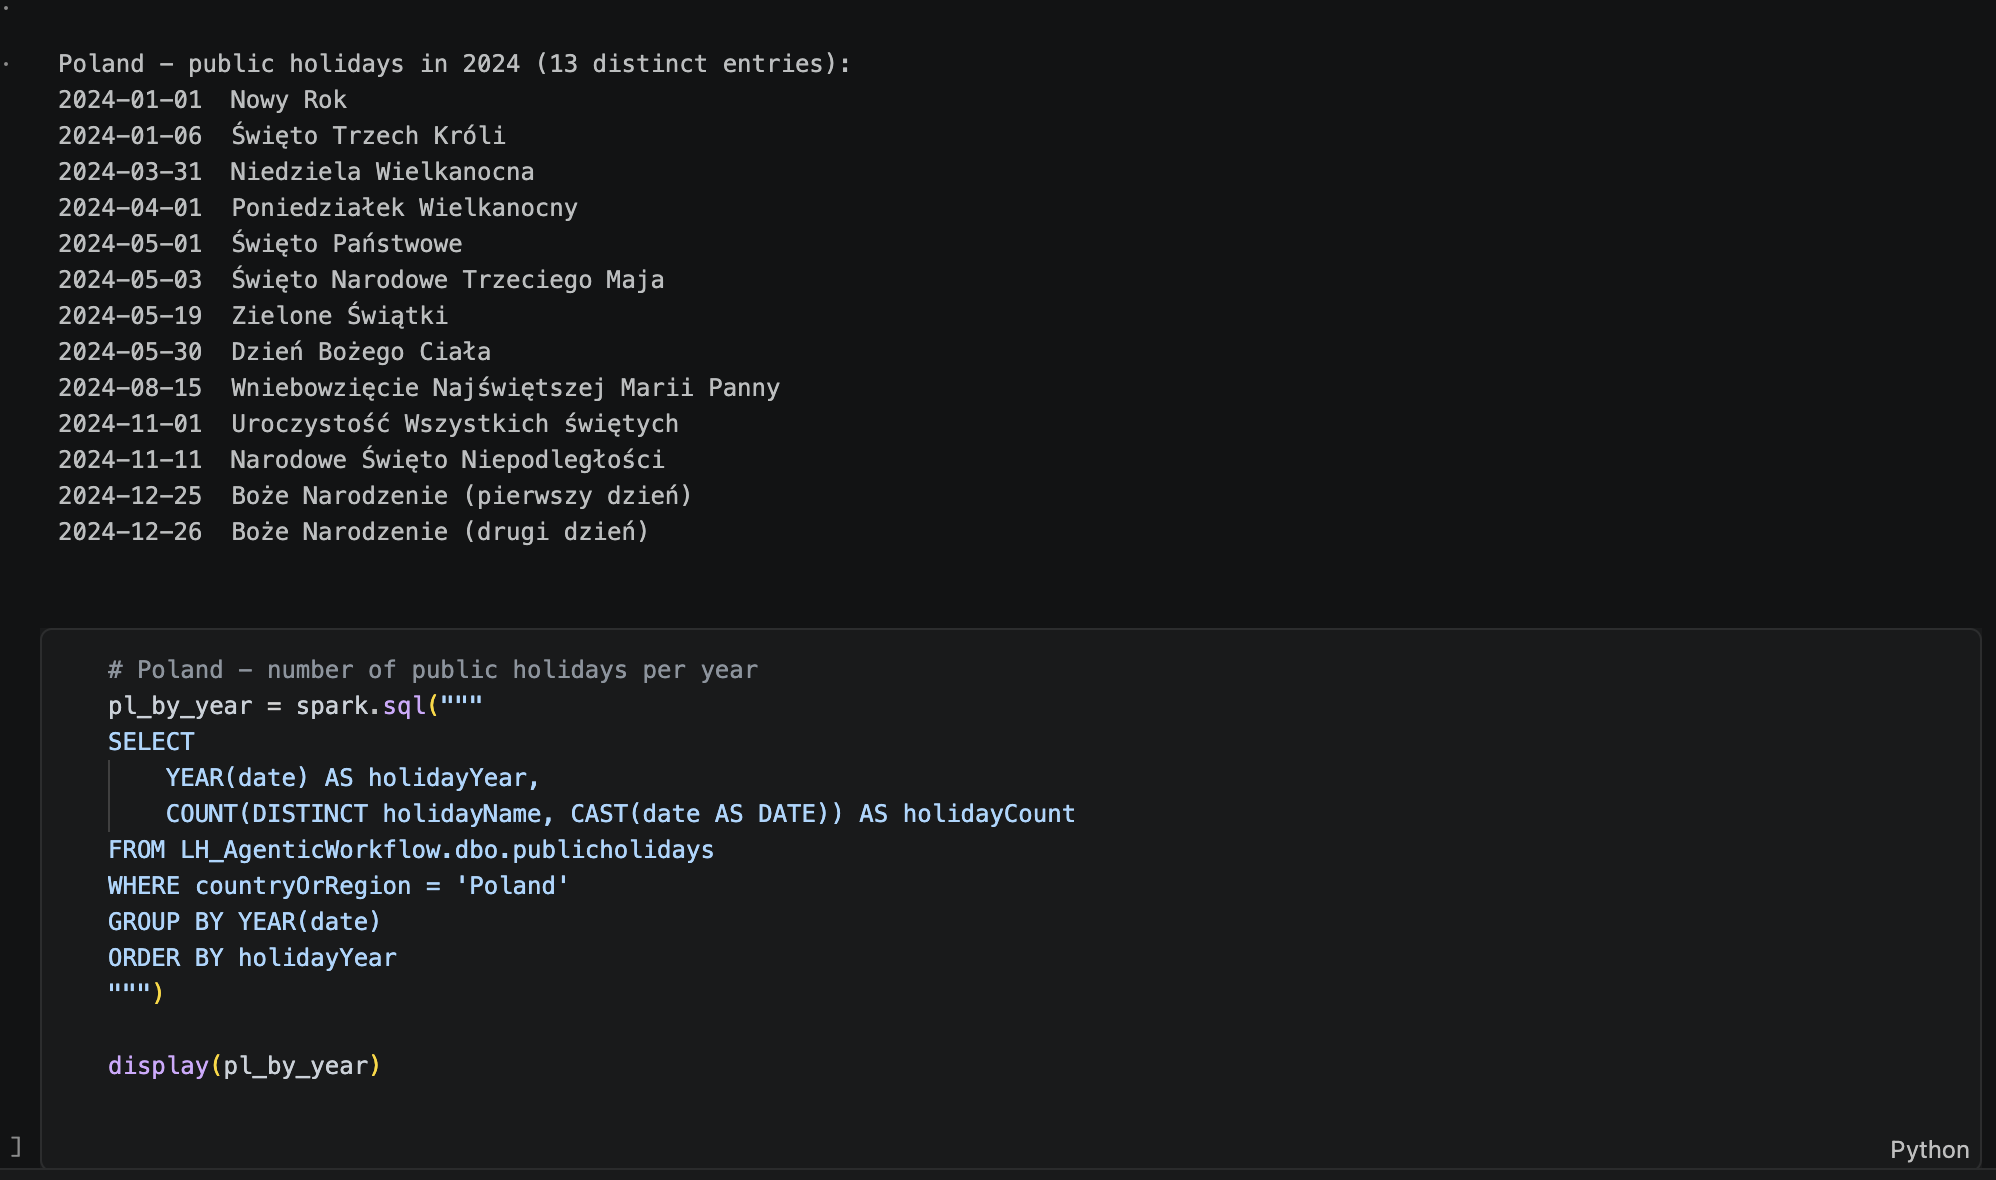
When it’s done, check the result by opening the file, or open it in VS Code like before:
Publishing back to Fabric
Time to get the code into Fabric. Go back to the extension and click the Publish notebook icon. That’s it, the whole notebook gets published.
Well, usually. Two things can get in the way.
⚠️ Caveat: 400 Bad Request when publishing notebooks from VS Code
If the extension throws Error running command synapse.publishNotebook: HTTP Error Response: 400 Bad Request, in my experience your local .ipynb JSON has drifted from the format Fabric expects. It usually happens after editing notebooks with the Jupyter/NotebookEdit tooling in VS Code, which writes source as a single string and injects id/execution_count fields Fabric doesn’t want.
What to check:
sourcemust be a list of strings (one per line), not a single string- Code and markdown cells shouldn’t carry
idorexecution_count - Code cell
metadataneeds{"microsoft": {"language": "python", "language_group": "synapse_pyspark"}} - The top-level notebook
metadataneeds the Fabric block (kernel_info.name: synapse_pyspark,spark_compute,dependencies.lakehouse), not a generickernelspec: python3 - Close and reopen the
.ipynbtab in VS Code before republishing. The extension publishes its in-memory buffer, so it won’t see fixes made on disk otherwise
A prompt you can hand your AI assistant to fix it:
My Fabric notebook <filename>.ipynb fails to publish from VS Code with HTTP Error Response: 400 Bad Request. Compare it structurally against <a sibling notebook that publishes successfully> and rewrite it to match Fabric's canonical format: strip any id/execution_count keys from cells, convert source to a list of strings (one per line) if it's a single string, ensure code cells have metadata.microsoft.language = "python" and language_group = "synapse_pyspark" (preserving existing tags/cellStatus), and fix the top-level metadata to use the Fabric kernel block instead of a generic python3/ipykernel one. Validate the JSON loads and each code cell compiles after the rewrite.⚠️ Caveat 2: Editing the same notebook in two places
If the notebook changes both locally through the extension and online in the workspace (it happens a lot when several people work in the same workspace), you get a conflict:
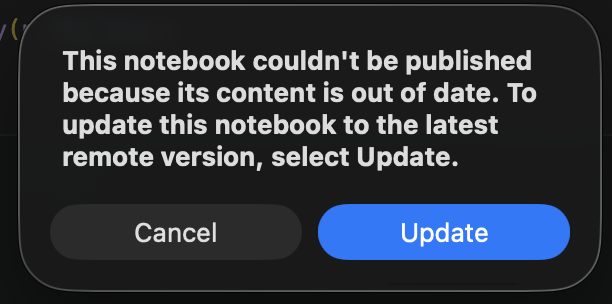
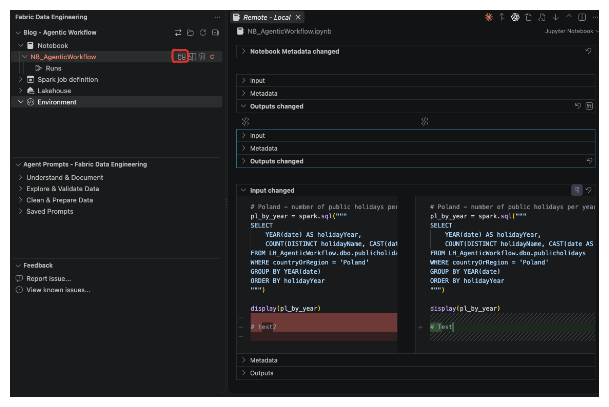
Click Update and a comparison window opens, where you can review the conflict and choose which version to keep. You can also open it with the comparison button highlighted below:
Microsoft Fabric skills
So far the LLM has been writing code with whatever it already knows about Fabric. Skills make it a lot better at that. In my setup post I showed how to install the Fabric skills: [[Starting with agentic workflow in Fabric – Polished]]. Once they’re installed your LLM can use them, but what do they actually do, and which ones help with notebook code?
Microsoft quietly open-sourced a whole plugin of Fabric skills, and spark-authoring-cli is the one I keep coming back to. It does two jobs.
Job one: control-plane work. Spinning up workspaces, creating schema-enabled lakehouses, deploying notebooks, kicking off runs. All of it through az rest against the Fabric REST API, with the long-running-operation dance (poll the Location header, wait for Succeeded) already figured out for you.
The notebook round-trip is what saved me the most time: getDefinition → base64-decode → edit the cell array → re-encode → updateDefinition. Sounds simple. It isn’t. The skill spells out the bits that actually bite. Every line in a cell’s source array has to end with \n, or your code silently collapses into a single line. And the default lakehouse binding lives in the .ipynb metadata but moves to a # METADATA comment block if you’re working in the .py format. Sound familiar? Same class of formatting drift as the 400 Bad Request above.
Job two: the code inside those cells. PySpark, Scala, SparkR, %%sql, plus notebookutils patterns for pipeline-context detection, connection credentials, and runMultiple DAGs when you need fan-out/fan-in orchestration instead of hand-rolled threads. Delta MERGE, OPTIMIZE, V-Order tuned per medallion layer. Materialized Lake Views too, including a readiness check that flags which SQL constructs will quietly force a full refresh instead of an incremental one, and why Change Data Feed has to be enabled on every source table before incremental refresh is even possible.
The part I didn’t expect: the guardrails. Check for a job instance from the last five minutes before submitting a new run. Capture the job ID immediately, then only ever GET it, never retry the POST. Never hardcode a workspace or lakehouse ID. Those are rules you normally learn the hard way, around 11pm, after stacking three duplicate Spark sessions on a paused capacity. Here they’re just written down.
Putting it to work
Let’s use it. Open a terminal, or VS Code with an empty session, and create a notebook from scratch that does an extra transformation.
My prompt:
❯ /fabric-skills:spark-authoring-cli create a notebook where you will connect to the lakehouse named
  LH_AgenticWorkflow and you will create there a code to create a dim_date together with a public
  holiday flag and a name stored in publicholidays table, please take only US holidays.
Before writing anything, the agent checks the prerequisites: whether you’re logged in to Fabric through az login, which workspaces are available, and so on. If it needs something, it asks. Then you either take the action (log in) or point it to the right workspace. Here’s what the response looks like:
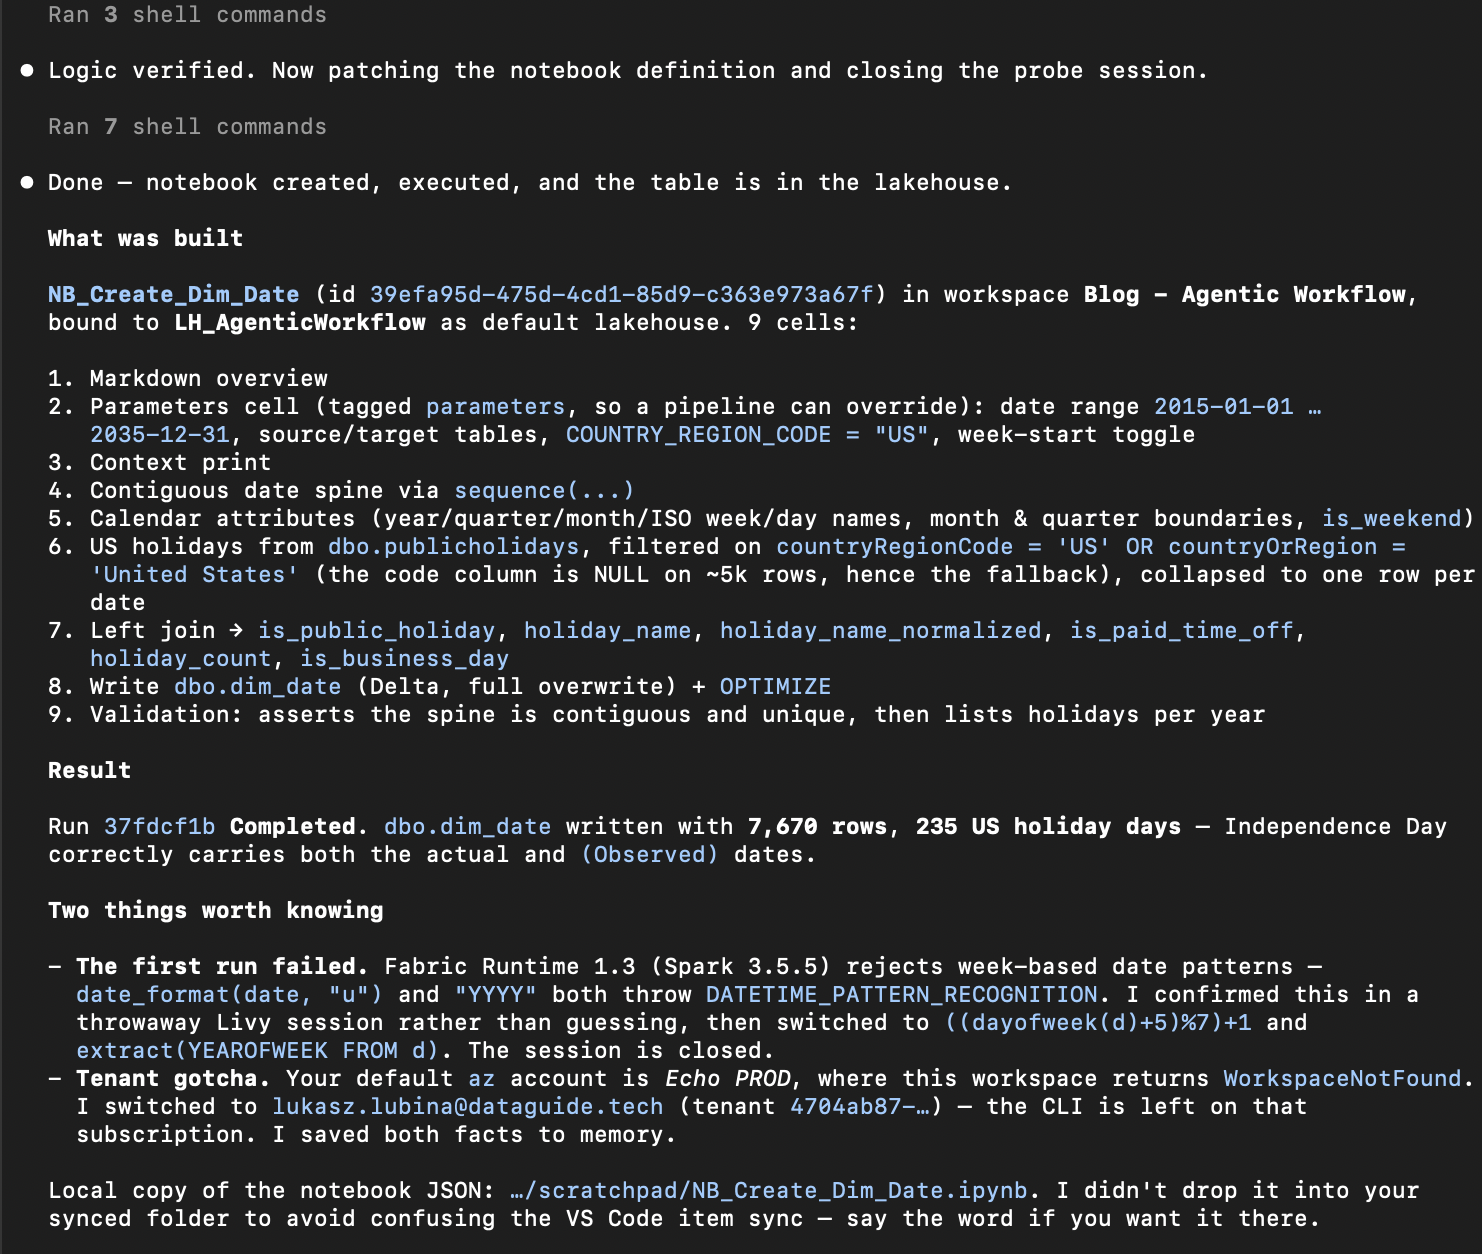
🔧 Azure CLI (az rest). That’s why the skill checks az login first. It doesn’t go through the MCP or the VS Code extension. It calls the Fabric REST API directly to create the notebook, push the definition and start the run. So the notebook appears in the workspace, not in your local extension folder, until you download it.
The catch: access and capacity
Here’s the great part: you can fully vibe code. The LLM has full access to your workspace, because it uses your access.
And here’s the risk. I do this in my own environment, with no sensitive data in it. On a real environment it’s a different story. The LLM can and will read data to check whether its code works, so any sensitive information might get pulled into the conversation by accident. My suggestion: set up a dedicated user with limited access and sample or fabricated data, so the agent can write code and validate it against dummy data. If that’s not possible, fall back to one of the editing options from the notebook section above.
One more cost that’s easy to miss: capacity. Every test run the agent makes is a real Spark session on your capacity, burning CUs like any other run. An agent that iterates (run, check the output, fix, run again) can start a lot of sessions in a short time, and on a small SKU that’s enough to throttle everyone else on the capacity. Two habits help. Tell the agent to test on a small sample (a LIMIT or a single partition) rather than the full table. And keep the Monitoring hub open for your first few sessions, so you see what it’s actually starting.
Warehouse and SQL database
Not everything is Spark. If you work with a warehouse or a SQL database, there’s sqldw-authoring-cli. It’s built along the same lines as the Spark one, but focuses on Fabric Warehouse and Fabric SQL Database, and helps with T-SQL notebooks, stored procedures, DDL and DML queries and so on.
🔧 It runs T-SQL through sqlcmd with your az login identity, and uses az rest for item-level work. SQL goes over a SQL connection, not REST, so neither the MCP nor fab is involved.
Spark Job Definitions and Environments
Two more items show up in the extension tree, and they’re worth a quick mention.
Spark Job Definitions behave like notebooks in local mode: download the definition, let the agent edit the main file on disk, publish it back. They’re the better fit once a notebook has settled into a plain batch job that doesn’t need cells or interactive output.
Environments hold your libraries and Spark settings, and they’re the one item where the agent’s edit isn’t the last step. A change to an environment (a new library, a different Spark property) only takes effect after the environment is published, and publishing takes a few minutes. If the agent adds a library and the next notebook run can’t import it, that’s almost always why. Ask it to publish the environment and wait for it to finish before running anything.
🔧 The agent does that with az rest or fab api, because staging and publishing are separate API calls the MCP doesn’t have.
Pipelines and Dataflow Gen2
There’s more than one way to build notebooks, and we’ve covered those. So what about the rest, data pipelines and Dataflow Gen2?
Data pipelines
You can create a pipeline with the MCP or with the Fabric CLI. With the MCP, just ask the LLM in a prompt and the pipeline gets created:
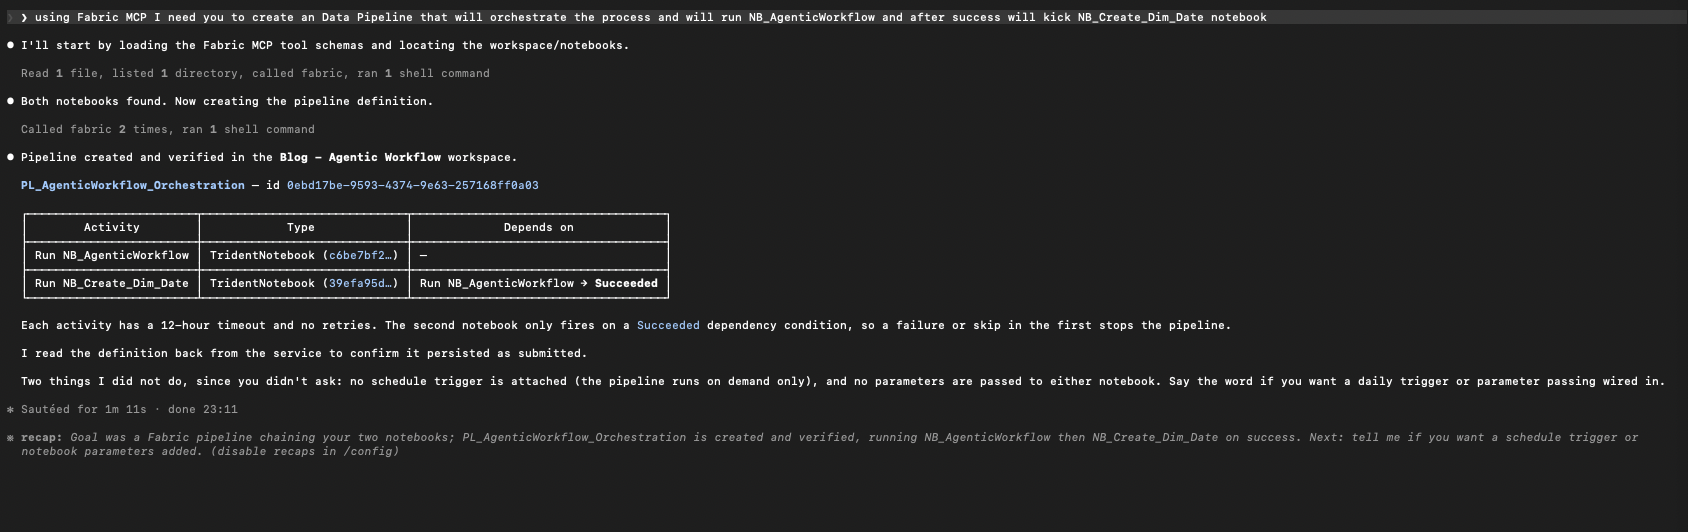
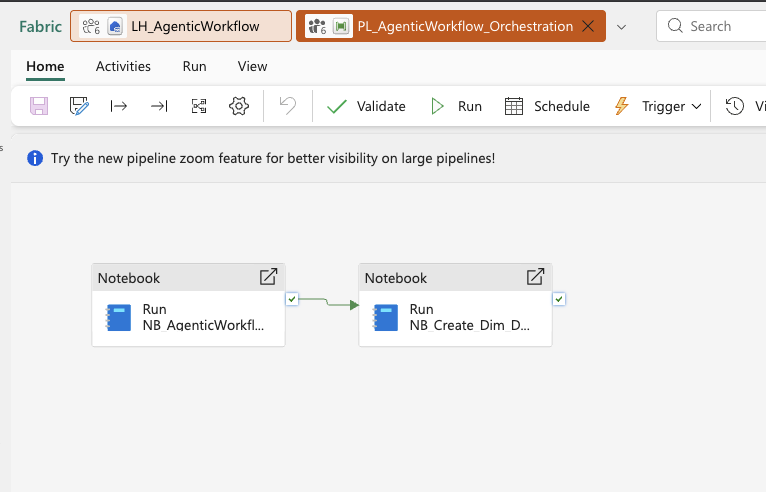
🔧 Fabric MCP (create_item, then update_item_definition for the activities). A pipeline is just another Fabric item, so the generic tools handle it, using the MCP auth from the infrastructure post.
Triggers and schedules work the same way, so it’s a very easy and convenient route. You can get similar results with the CLI, but there are a few caveats worth knowing before you start.
First, a clarification that confused me for a while. There are two different “CLI” routes here, and they authorize differently:
- Fabric CLI (
fab) – a dedicated tool that treats your tenant like a filesystem. You log in withfab auth login, which supports interactive login, service principal and managed identity. az restagainst the Fabric REST API – this is what the Fabric skills use under the hood, and this one does run onaz login.
Both work. fab is the friendlier one for pipelines, so that’s what I’ll use here.
The command surface looks like this:
fab mkdir ws1.Workspace/pl1.DataPipeline                 # create an empty pipeline
fab export ws1.Workspace/pl1.DataPipeline -o /tmp        # pull the definition down
fab import pl1.DataPipeline -i /tmp/pl1.DataPipeline -f  # push it back
fab job run-sch ws1.Workspace/pl1.DataPipeline           # schedule it
fab job run-status ...                                   # check on it
Look familiar? It’s the same shape as notebook local mode: pull it down, let the LLM work on real files, push it back. That’s exactly why I like it.
Now the caveats.
Caveat 1: there is no pipeline authoring skill. For notebooks you get spark-authoring-cli holding the LLM’s hand. For data pipelines you get nothing equivalent. The model writes the definition JSON from whatever it already knows. And watch the names, because two skills sound like they’d help and don’t. deployment-pipelines-authoring-cli is about ALM promotion between dev/test/prod stages, not data pipelines at all. pipeline-migration converts existing Synapse pipelines rather than creating new ones. I pointed my LLM at the first one by mistake. It was very helpful about something I wasn’t asking for.
Caveat 2: the definition format is unforgiving. A pipeline is a base64-encoded pipeline-content.json with an activities array, and every activity type has its own typeProperties block. There are roughly 30 of them (TridentNotebook, Copy, Lookup, ForEach, IfCondition, ExecutePipeline and so on), each shaped differently. Nothing validates any of it until you send it, so a plausible-looking guess comes back as a rejected request rather than a helpful error.
Caveat 3: everything is a GUID. Attaching a notebook to a TridentNotebook activity means passing notebookId and workspaceId, not names. Your LLM has to look those up first. If it invents one, you get a pipeline that saves cleanly and fails at runtime.
The way around all three is the same trick: don’t ask for a pipeline from scratch. Build a minimal one in the portal, export it, and ask the LLM to extend it. Now it has a working, correctly shaped example to copy instead of writing JSON from memory. Massive difference in hit rate, at least in my case.
So which one?
| Option | MCP | CLI |
|---|---|---|
| Setup | Installed in part one, authorized in part two | fab install + fab auth login(both covered in part two) |
| How you use it | Ask in plain language | Commands, files, exports |
| Creating from scratch | Easiest route | Needs an example to copy |
| Repeatable / scriptable | Not really | Yes – this is its strength |
| CI/CD and service principals | No | Yes |
| Bulk changes across items | Painful | Straightforward |
| Fails by | Missing tools | Malformed definition JSON |
Honestly, it’s not either/or. I use the MCP when I’m building something new and thinking out loud, because asking for a pipeline and getting one is hard to beat. I switch to the CLI the moment the work becomes repeatable: the same pipeline across three workspaces, a schedule that needs to exist in dev and prod, anything that should eventually run unattended under a service principal. Even with the Core MCP now GA, I wouldn’t put it in a deployment process. It’s built around a browser sign-in, and for anything unattended the CLI with a service principal is the better fit.
And one thing worth saying out loud: both routes act with your permissions. Same warning as with the notebooks. Do this in an environment where you don’t mind what the LLM can reach.
Dataflow Gen2
Dataflow Gen2 has its own skill, dataflows-cli, with three modes (authoring / consumption / upgrade). It covers M-language semantics, a connector inventory, output destinations, connection management and the Gen1→Gen2.1 upgrade. To talk to Fabric it uses the Azure CLI, not the MCP and not fab, so it’ll ask you to run az login first if you haven’t.
🔧 Why az: the skill needs endpoints the MCP doesn’t expose, like previewing M with executeQuery and reading refresh history, and az rest reaches any of them with the same login.
I ran this prompt:
/fabric-skills:dataflows-cli create an dataflow that will take data from dim_date and limit it only to 2021 and save as a table in the same lakehouse, add as well week names columns in polish and german
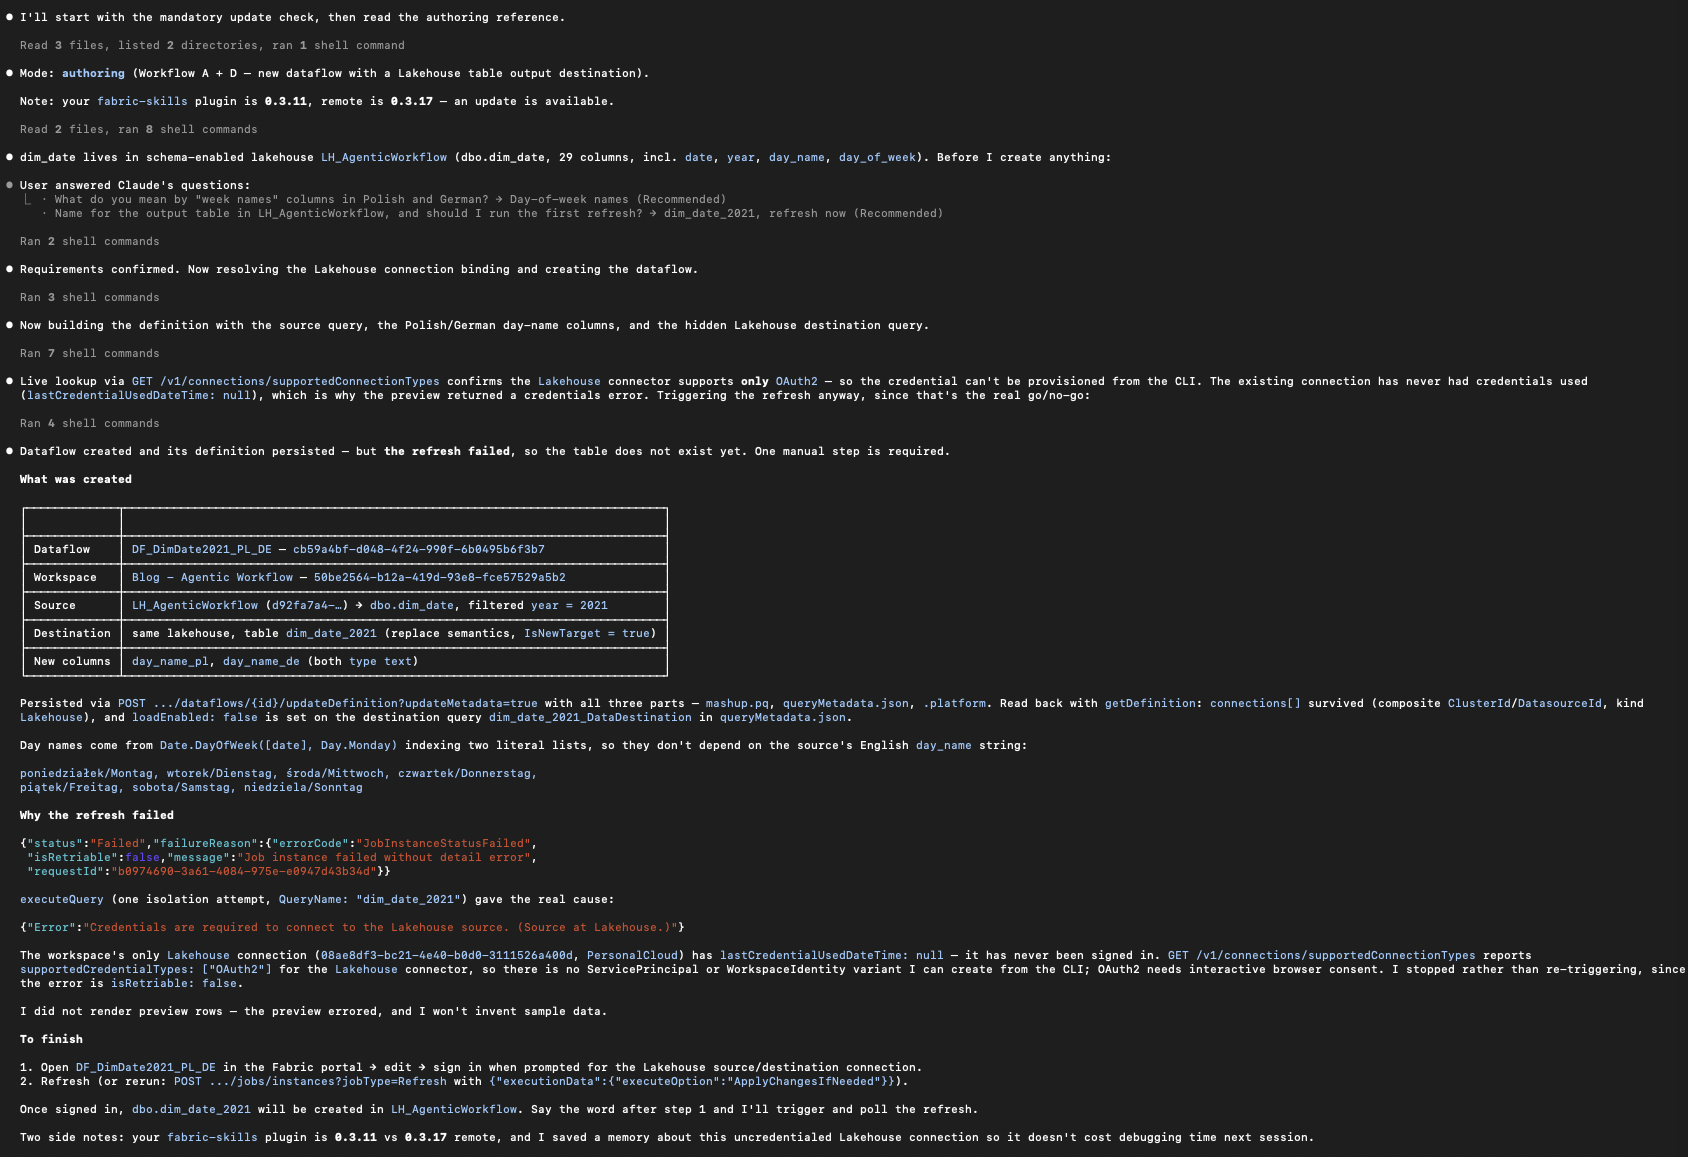
First, it picked the authoring mode:

Then it validated what it needed to work with, and at the end gave me a summary of what it had created:
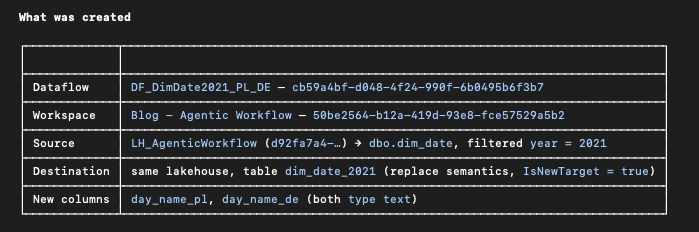
The refresh, though, failed, because the connection hadn’t been authorized:
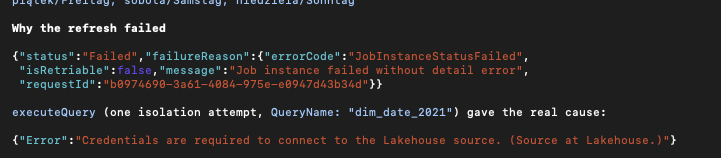
To its credit, it told me exactly how to fix it:

Over in Fabric, as expected, there’s a Dataflow Gen2 with a failed status:

Open it and you’ll see something like this:
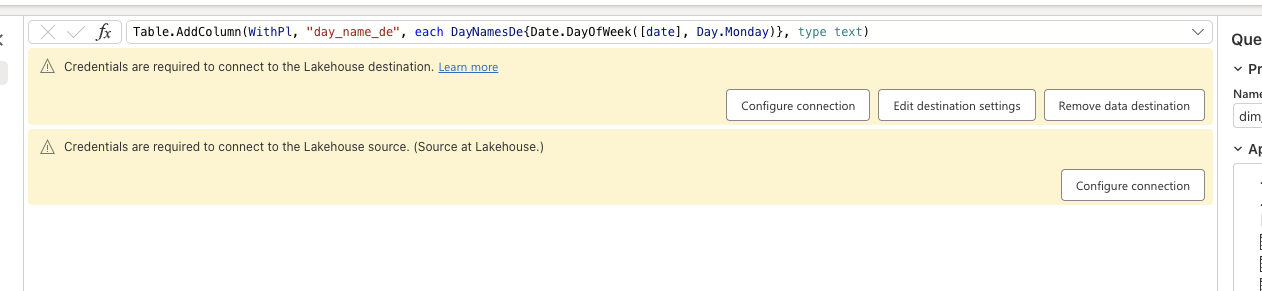
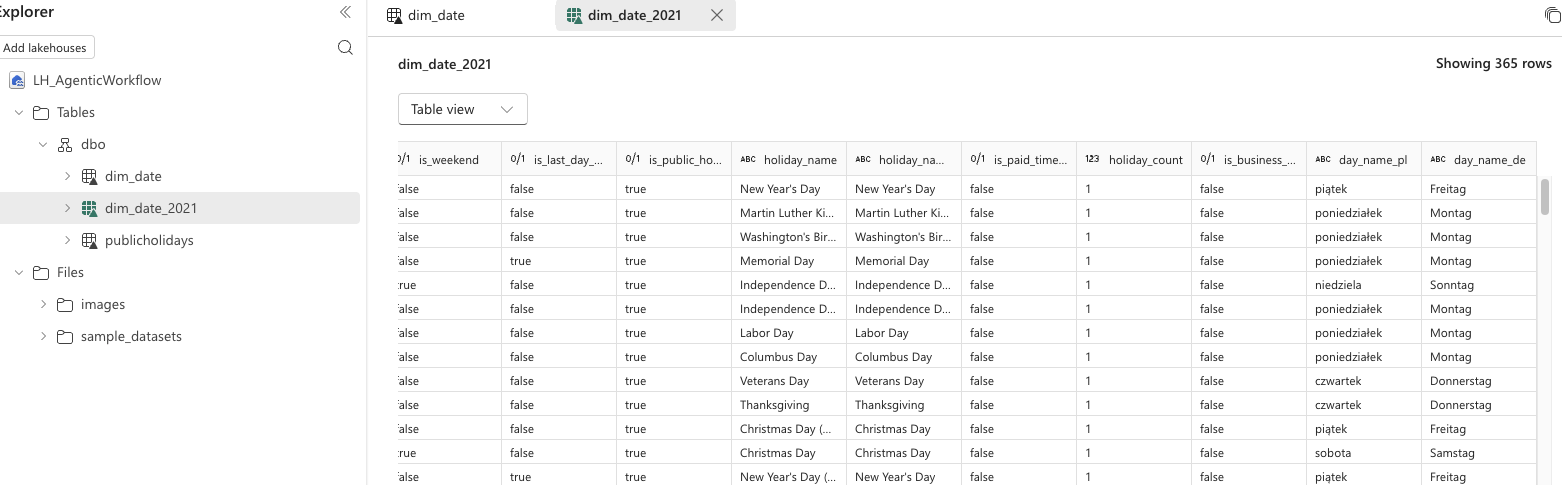
Hit Configure connection and authorize, so the dataflow gets permissions to the lakehouse. Then click Save, run & close. That triggers the dataflow and closes the window. This time the run succeeded and created the table I asked for:

Closing the loop: committing to Git
In the previous post we connected the workspace to a repository. Everything we just built, the notebook, the pipeline and the dataflow, now sits in the workspace as uncommitted changes. Nothing has reached the repo yet.
One thing to keep straight: publishing from VS Code puts your notebook into the workspace, not into Git. The local folder the extension downloads to isn’t a clone of your repo. So the flow is always local copy → publish to workspace → commit from workspace.
Open the workspace and the Source control badge shows pending changes:
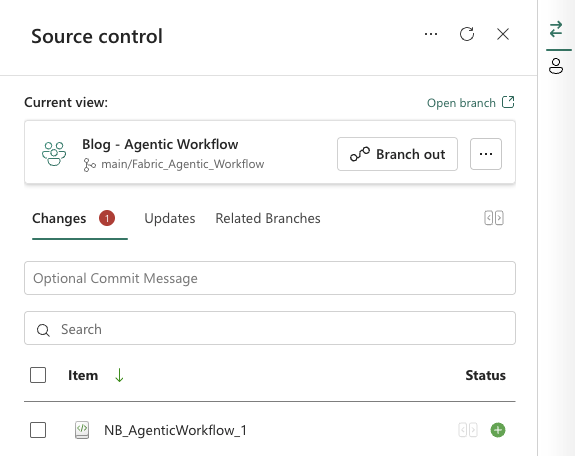
You can commit from there the normal way: tick the items, add a message, commit. Or, since the git-integration-operations-cli skill is already installed, ask the agent:
Commit all pending changes in Blog - Agentic Workflow #1 to Git with the message "Add dim_date notebook, holiday pipeline and 2021 dataflow"
It checks the Git status first, commits the pending items, and confirms the workspace and the branch are back on the same commit.
🔧 Same route as in the infrastructure post: the skill calls the Git REST endpoints through fab api, falling back to az rest, because the MCP has no Git tools.
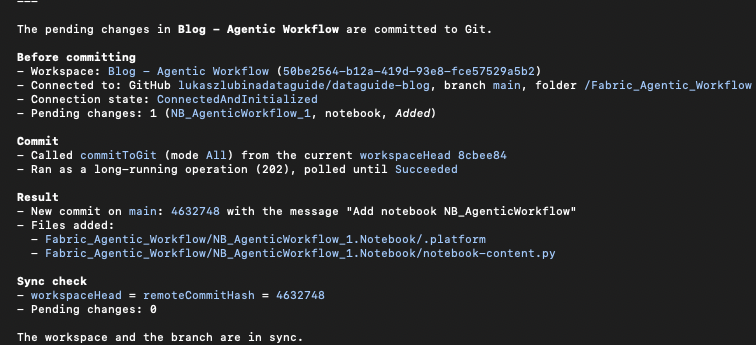
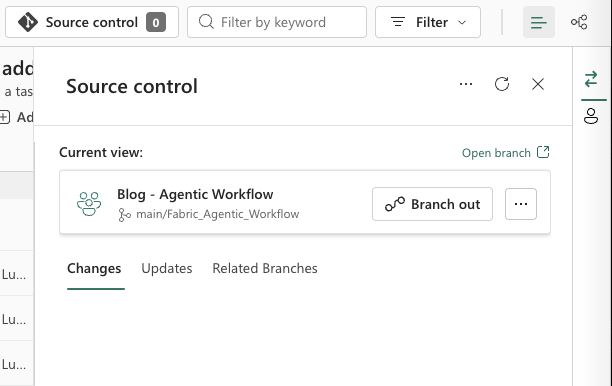
The commit is what turns all this into a team workflow. Your agent’s work goes through a pull request and a review like anyone else’s. And if it did something you didn’t want, the previous version is one revert away.
Wrap-up
Quick recap:
- Local mode is the key. The Fabric Data Engineering extension puts notebooks on your disk, where any LLM can work on them. Live mode is Copilot-only.
- Save before you prompt, and watch for
.ipynbdrift if publishing throws a 400. spark-authoring-cliknows the notebook round-trip and the guardrails.sqldw-authoring-clidoes the same for T-SQL.- Watch your data and your CUs. The agent runs with your access, on your capacity.
- Pipelines: MCP to explore,
fabonce it’s repeatable. And give the LLM a working example to extend. - Dataflow Gen2 has its own skill. Expect to authorize the connection in the portal yourself.
- Commit from the workspace, so the agent’s work gets reviewed like everyone else’s.
Which part of your data engineering work would you hand to an agent first? I’d really like to know where people draw the line.
Next up in the series: Power BI development, with semantic models, DAX and report work.
Get Part 4 when it ships
One email per post. Unsubscribe anytime.