One Prompt, One Workspace: Agentic Microsoft Fabric Admin

Status check, verified October 2026. The Fabric Core MCP Server is out of preview: Microsoft listed it as generally available in the September 2026 Fabric update. The tool set is still growing, though. At the time of writing it has no tools for capacity assignment, Git or Spark settings, which is why
fabandazshow up below, and the Fabric skills and the Fabric CLI ship updates often. If something here doesn’t behave the way I describe, check the Microsoft Learn docs before assuming your setup is broken. I date-stamp every post in this series and update them when things move.
If you’re a Fabric admin, you know this message by heart: “Hey, can I get a new workspace?”
For the person asking, it’s one workspace. For you, it’s a workspace, a repository, a capacity assignment, the Git connection, security groups, sometimes a custom Spark pool, and quite often a lakehouse and an environment on top. All the stuff nobody else cares about. They just want it ready by tomorrow.
In this post I’ll show how to hand that whole routine over to an LLM, with Claude Code doing the work through the Fabric MCP, the Fabric CLI and the Azure CLI. By the end, the full sequence is a single prompt.
One prerequisite: the tool setup from my previous post, Agentic Development in Microsoft Fabric, Part 1: The Setup. If you haven’t configured it yet, go there first. Everything below builds on it.
Before you start
On top of the setup from part one, this post needs a few more things:
- Azure CLI (
az). Used by the second auth option below, by the Fabric skills, which call the Fabric REST API throughaz rest, and for anything outside Fabric itself, like looking up a security group in Entra. Install steps are in the AZ CLI approach section. - Fabric CLI (
fab). The MCP can’t assign a capacity or create a Spark pool yet, so the agent falls back tofabfor those steps. The Git skill uses it under the hood too. It’s a Python package and needs Python 3.10 or newer:pip install ms-fabric-cli
fab auth loginConfirm it landed with
fab --version. - A Git repository in Azure DevOps or GitHub that you can push to. More on that in the repository part.
Then permissions. The agent acts as you, so it can only do what your account can do. Miss one of these and the agent will look broken when it isn’t:
- Creating workspaces needs the Create workspaces tenant setting to include you (Admin portal → Tenant settings → Workspace settings). Many organisations restrict it to a security group.
- Assigning a capacity needs Contributor permissions on that capacity, or capacity admin. Being admin of the workspace isn’t enough.
- Adding groups to a workspace and connecting Git need the Admin role on the workspace. You get that automatically on anything you create yourself.
- Registering an Entra app (only for the first auth option below) needs either the Users can register applications setting or the Application Developer role. Some tenants also require an Entra admin to grant consent for the permissions you add.
Signing in to the Fabric MCP
First things first: the agent needs to log in to the Fabric MCP. That sounds trivial. It isn’t, at least not when OAuth is enforced and your LLM isn’t GitHub Copilot.
GitHub Copilot
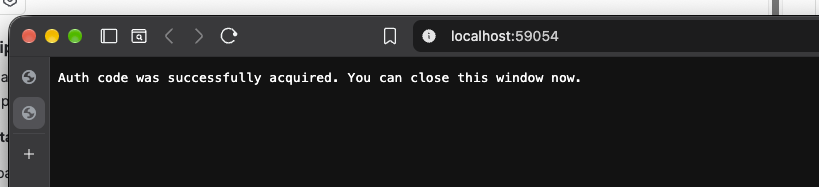
With GitHub Copilot in VS Code it’s painless. The first time the LLM tries to reach the Fabric MCP, it asks you to authorize and opens the browser. Log in to your account and you’ll see this:
Claude Code and other LLMs
External LLMs like Anthropic’s Claude are a different story. Claude asks you to authorize the same way, but the attempt ends with this error:
SDK auth failed: Incompatible auth server: does not support dynamic client registration
Here’s what’s going on. Entra only lets an app sign in on your behalf if it knows that app, and Claude Code isn’t one of them. There are two ways around it. The first one, and the one Microsoft suggests, is to register your own app in Entra and pass its client ID to the Fabric MCP in Claude Code. The second is to let the Azure CLI hand the MCP a token.
App approach
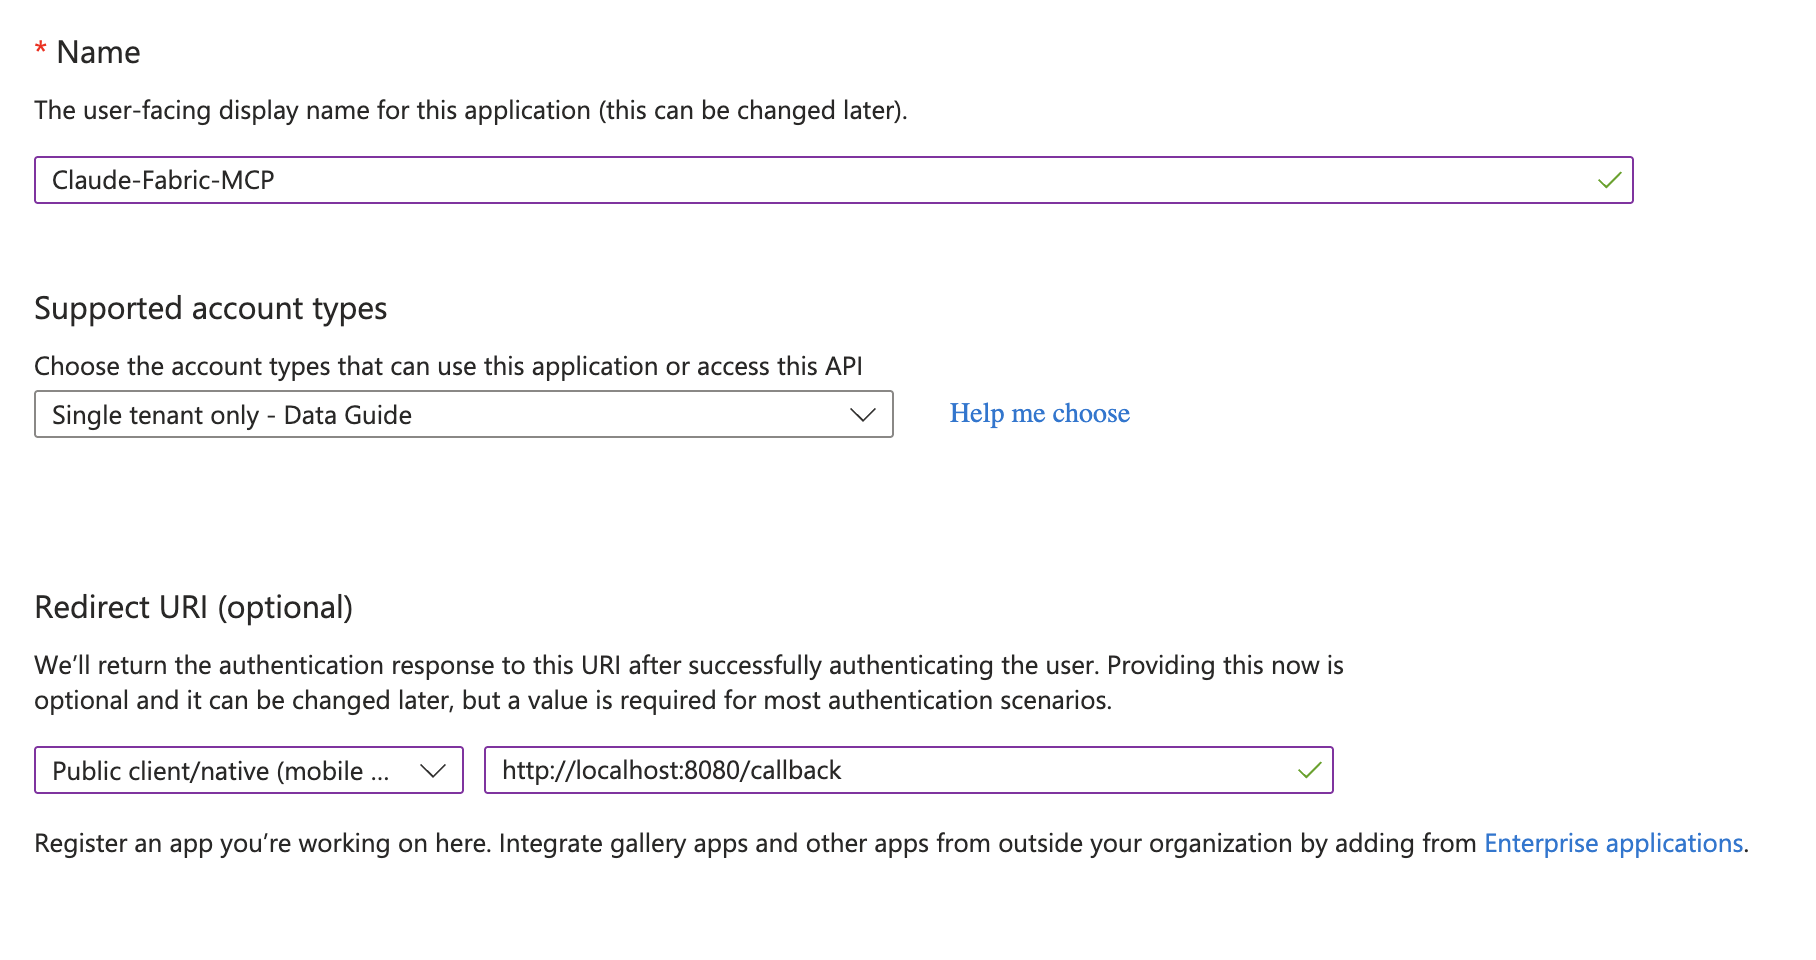
Go to portal.azure.com, navigate to Microsoft Entra ID → App registrations and click New registration. Then fill in:
- Name – whatever fits your naming conventions
- Supported account types – keep single tenant only
- Redirect URI – select Public client/native (mobile & desktop) and type
http://localhost:8080/callback
Click Register, then open API permissions from the left sidebar and go Add a permission → Microsoft APIs → Power BI Service → Delegated permissions. Which permissions you pick is up to you. The usual rule applies: least privilege. I added quite a few, but that’s my demo workspace with nothing sensitive in it:
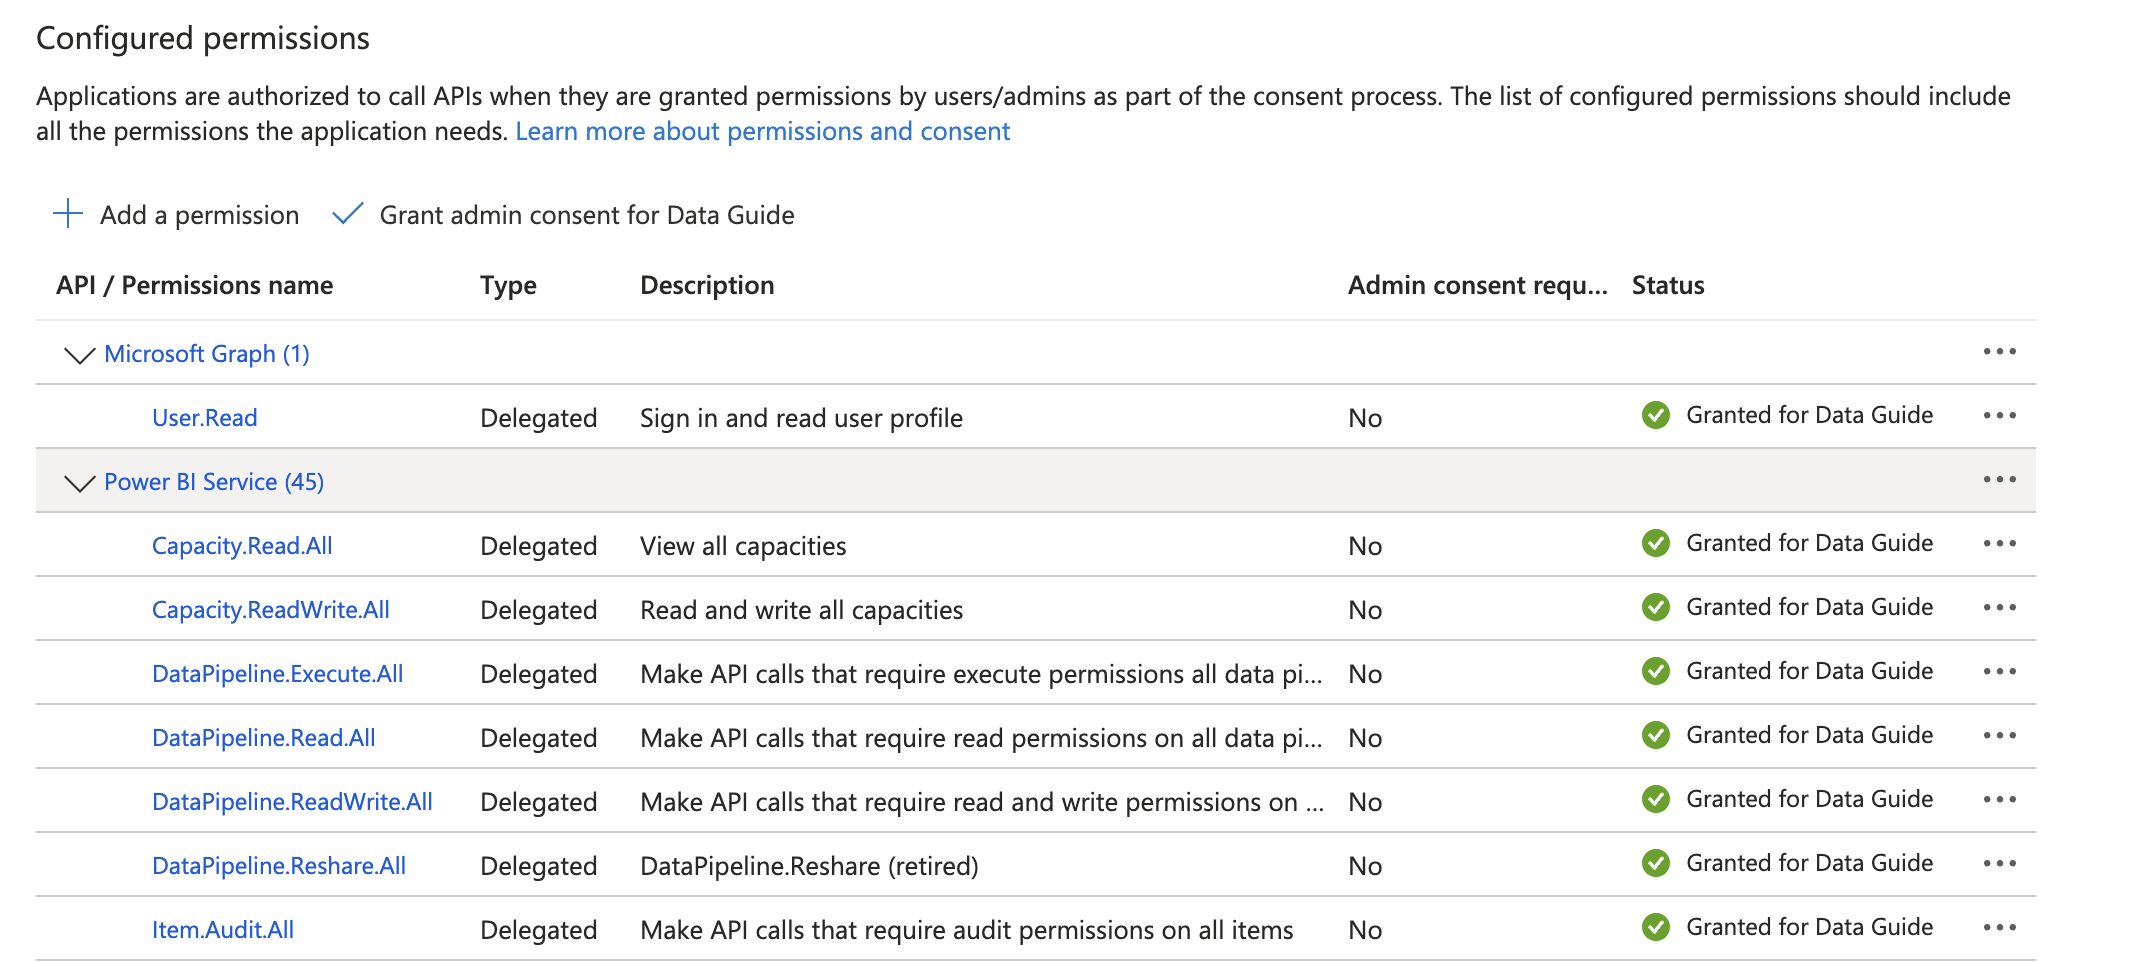
If you want a starting point, this is the minimum for what we do in this post (all under Power BI Service → Delegated permissions):
Workspace.ReadWrite.All– create workspaces, manage role assignments, connect GitCapacity.Read.All– list capacities (the assignment itself goes throughfab, which has its own login)Connection.Read.All– find the GitHub connection we create laterItem.ReadWrite.All– create items such as lakehouses or environments
Every page of the Fabric REST API reference lists the scope that call needs under Required Delegated Scopes. So if the agent gets a 401 or 403 back, that’s the first place to look. Also check the Status column after adding the permissions: Not granted means your tenant requires admin consent, and you’ll need your Entra admin to click Grant admin consent.
With the permissions in place, the MCP needs to know which app to use for sign-in. Copy the Client ID from the app’s Overview page:
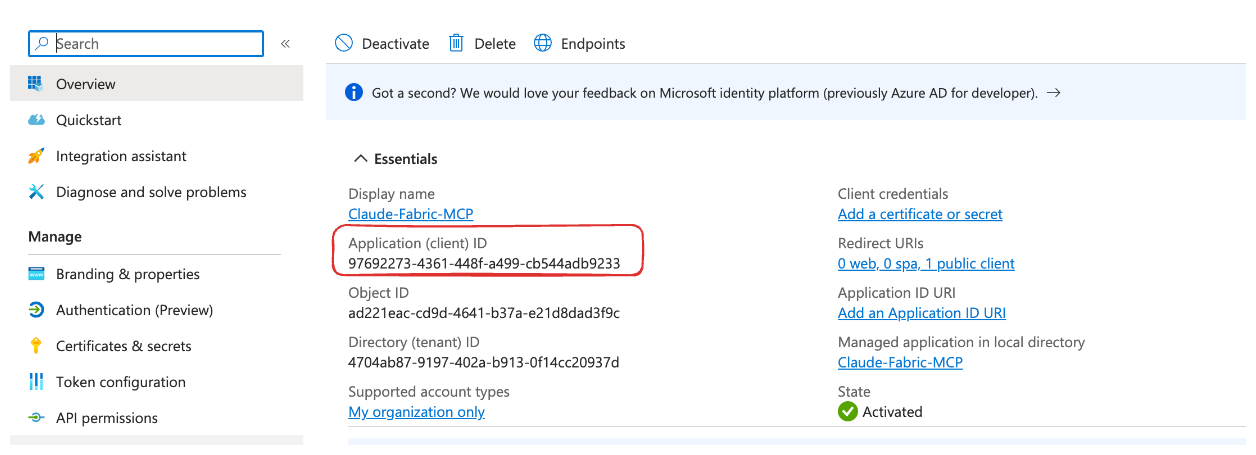
You have three ways to add it. The quickest is a single command in the terminal:
claude mcp add --transport http --client-id <YOUR-ENTRA-APP-CLIENT-ID> --callback-port 8080 -s user fabric https://api.fabric.microsoft.com/v1/mcp/core
No client secret needed. It’s a public client app, and the sign-in happens in your browser.
Prefer not to type it yourself? Ask Claude to add it with this prompt:
Add the Microsoft Fabric Core MCP server to my Claude Code configuration at user scope,
so it's available in every project.

- Server name: fabric
- Transport: HTTP
- URL: https://api.fabric.microsoft.com/v1/mcp/core
- OAuth client ID: <YOUR-ENTRA-APP-CLIENT-ID>
- OAuth callback port: 8080

Use `claude mcp add` instead of editing ~/.claude.json by hand. Don't add a client secret;
this is a public client app. Once it's added, run `claude mcp list` and show me the entry.
Then tell me to run /mcp and choose Authenticate to finish the Entra ID sign-in.
Or open the .claude.json file and add the configuration by hand:
"mcpServers": {
  "fabric": {
    "type": "http",
    "url": "https://api.fabric.microsoft.com/v1/mcp/core",
    "oauth": {
      "clientId": "<YOUR-ENTRA-APP-CLIENT-ID>",
      "callbackPort": 8080
    }
  }
}
Whichever way you go, do it at user level, not folder level. Unless, of course, you only want the MCP available inside one folder.
There’s also a second Fabric MCP server worth knowing about: https://api.fabric.microsoft.com/v1/mcp/dataPlane/sqlEndpoint, which lets the agent run queries against lakehouse SQL endpoints and warehouses. We don’t need it for infrastructure work. If you want it anyway, add it the same way under its own name (I use fabric-sql), with the same client ID and callback port.
Once it’s added, type /mcp, pick the fabric MCP from the list and click Authenticate. A browser window opens and asks you to sign in with your Microsoft account:
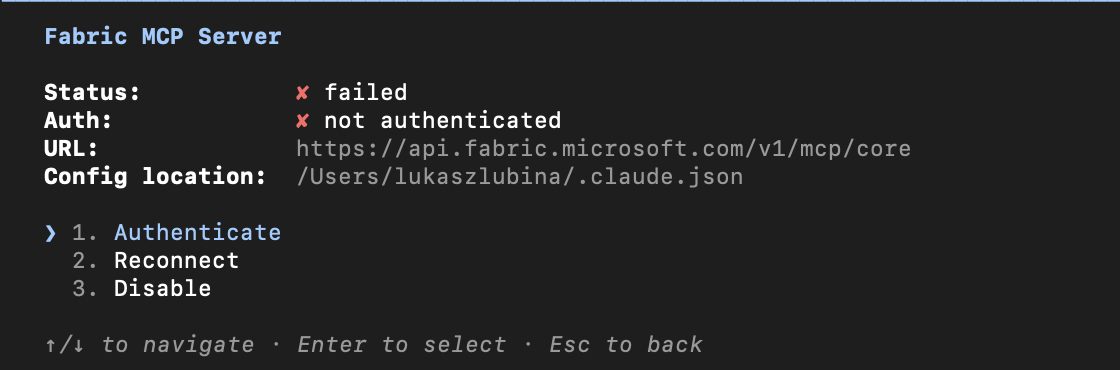
and you should get this message:

A quick test prompt to confirm it works:

AZ CLI approach
The other option is to give Claude the OAuth token. More precisely, you tell the MCP how to get one, and it gets it from the Azure CLI. So you’ll need az installed. If you don’t have it yet:
- Windows:
winget install -e --id Microsoft.AzureCLI
- macOS:
brew install azure-cli
Next, sign in to your tenant:
az login --tenant <your_tenant_id>
You can grab the tenant ID from the Fabric UI. Click the help icon in the top right corner, then About Fabric at the bottom of the pane, and you’ll get this screen:
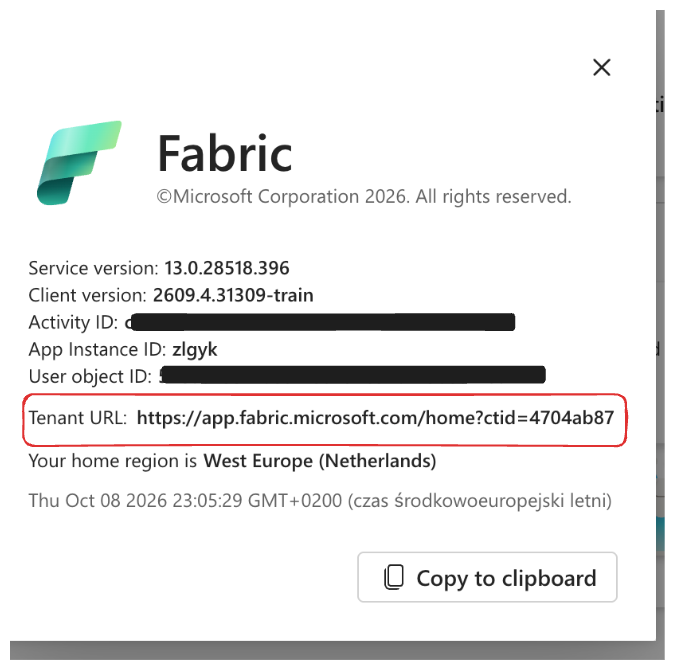
In the tenant URL, the GUID after ctid= is your tenant ID. Or skip the UI entirely: run az login without the tenant flag, pick your account, and az account show --query tenantId -o tsv prints the GUID.
Now check that az can actually get a token:
az account get-access-token --resource https://api.fabric.microsoft.com --query expiresOn -o tsv
You should get the token’s expiration date back:

Last step: add it to the MCP configuration. Open .claude.json, which usually lives here:
- Windows:
%USERPROFILE%\.claude.json(e.g.C:\Users\<you>\.claude.json) - macOS:
~/.claude.json(open it withopen -e ~/.claude.json)
Inside the top-level "mcpServers" block, add the following. The JSON is the same on both systems; create the block if it isn’t there:
"fabric": {
  "type": "http",
  "url": "https://api.fabric.microsoft.com/v1/mcp/core",
  "headersHelper": "az account get-access-token --resource https://api.fabric.microsoft.com --query \"{Authorization: join(' ', ['Bearer', accessToken])}\" --output json --only-show-errors"
}
Same as before, Claude can do it for you:
Add the Microsoft Fabric MCP server to my user-scope Claude Code config using `claude mcp add-json` (do not hand-edit ~/.claude.json).

- Server name: fabric
- Scope: user (-s user)
- JSON config:
  {
    "type": "http",
    "url": "https://api.fabric.microsoft.com/v1/mcp/core",
    "headersHelper": "az account get-access-token --resource https://api.fabric.microsoft.com --query \"{Authorization: join(' ', ['Bearer', accessToken])}\" --output json --only-show-errors"
  }
Heads up: know what expires and when. Claude Code runs the headersHelper command when it connects to the server, and the token it gets back is valid for about an hour. If a long session outlives it, type /mcp and reconnect fabric. az refreshes tokens silently, so that’s usually all it takes. What eventually expires is your az login session itself, after a period of inactivity, or sooner if your organisation has a conditional access policy that forces you to sign in again. When that happens the helper fails and the server shows as failed in /mcp. Run az login --tenant <your_tenant_id> again, then reconnect from /mcp.
MCP, fab or az: who does what
One more thing before the actual work. The agent switches between three tools, and from the outside it’s not obvious why.
- Fabric MCP is the first choice. It gives the agent ready-made tools like create workspace or add role, so there’s no shell command to build, no JSON to guess, and every call runs as you through Entra ID. The catch: it covers only part of what Fabric can do. No capacity assignment, no Git, no Spark settings.
- Fabric CLI (
fab) fills those gaps. It covers far more of the Fabric API and treats your tenant like a filesystem (ws.Workspace/item.Lakehouse). Its own login (fab auth login) also supports service principals, which makes it the tool for anything you’ll later want to script or run in a pipeline. There’sfab apifor raw REST calls too, and that’s what the Git skill uses. - Azure CLI (
az) does two jobs. It can hand the MCP a token (the second auth option above), and it’s the generic way to call any REST API withaz rest, which is why most of the Microsoft Fabric skills rely on it. It’s also the only one of the three that reaches outside Fabric. Entra groups live in Microsoft Graph, not in Fabric, so a group lookup goes throughaz ad group show.
You don’t pick the tool yourself. The agent tries the MCP first and falls back when it has to. Here’s what to expect in this post:
| Step | Tool | Why this one |
|---|---|---|
| Create workspace, list capacities | Fabric MCP | Built-in tools, plain prompt |
| Assign capacity | fab assign | No MCP tool for it yet |
| Add a group to the workspace | Fabric MCP | Built-in role tool |
| Look up a group’s object ID | az ad group show | Entra is Microsoft Graph, not Fabric |
| Create the repo (optional) | az repos / gh | It’s Azure DevOps or GitHub, not Fabric |
| Connect, disconnect, list Git connections | git-integration-operations-cli skill → fab api (falls back to az rest) | No Git tools in the MCP |
| Create a lakehouse, environment | Fabric MCP | Generic create item tool |
| Create a Spark pool, set defaults | fab | Spark settings aren’t in the MCP |
| Publish an environment | az rest / fab api | Staging and publish are separate API calls |
Since the agent decides on its own, your run may take a different route for one step or another. If you care which tool it uses, say so in the prompt (“using fab, …”).
Building the workspace
Ok, configuration done. Now for the fun part. We’ll set up the whole workspace, with capacity, security and a repository, using nothing but prompts.
Workspace and capacity
Start with the workspace itself. Just prompt the agent, for example:
using Fabric MCP create a workspace named Blog - Agentic Workflow #1<br>🔧 Fabric MCP (create_workspace). A built-in tool, so this is a plain prompt and nothing else.
Here’s what you should get back:
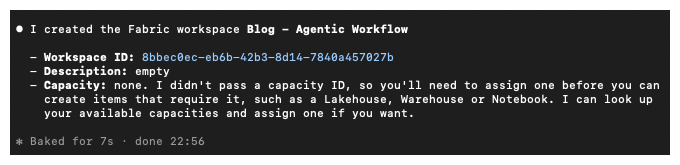
Next, the capacity. You’ll need its ID, and you don’t have to go looking for it: ask the LLM to list the capacities and it shows everything available to you:
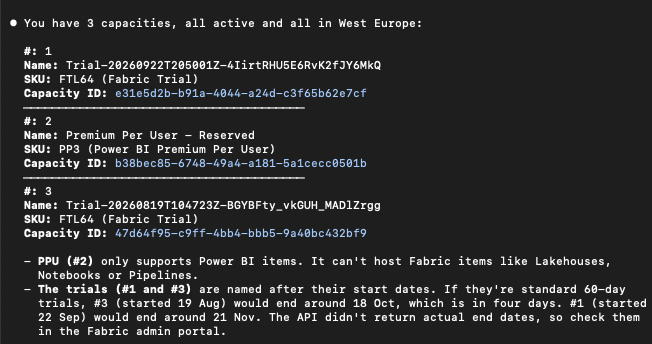
🔧 Fabric MCP (list_capacities). It only shows capacities your account has access to.
Assigning the capacity is where the first caveat shows up. As of now, the MCP doesn’t support capacity assignment, so the Fabric CLI steps in. You don’t even have to tell the LLM. It figures that out on its own:
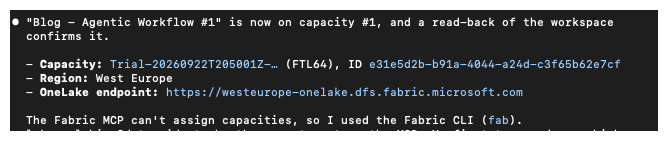
🔧 Fabric CLI: fab assign .capacities/<capacity>.Capacity -W "<workspace>.Workspace". The MCP has no capacity assignment tool, and fab does, so the agent falls back to it. It uses your fab auth login session, not the MCP’s.
Over on the Fabric side:
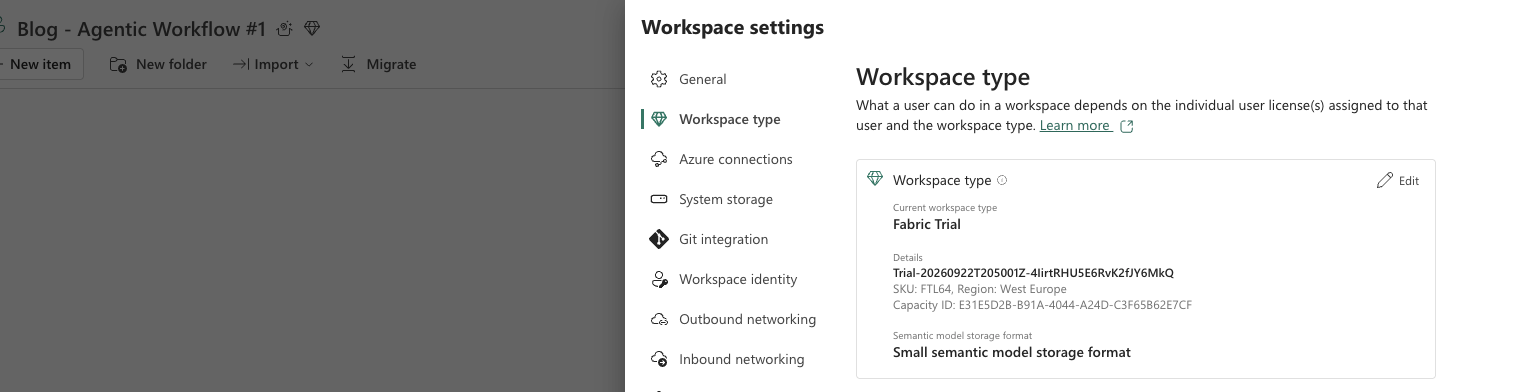
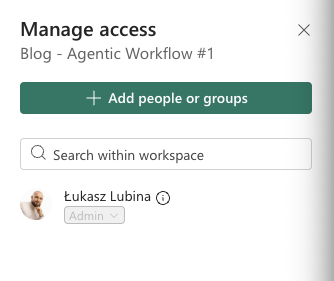
Exactly what we expected. Workspace created, Fabric Trial capacity assigned. And since everything ran under my account, I’m the owner and the one assigned to the workspace:
Security groups
Adding a security group is one prompt too. Name the user or group and the role you want:
add Sec-Fabric-Developers (<group-object-id>) security group to Blog - Agentic Workflow #1 workspace as a contributor
Please note: the agent needs the group’s object ID. Either give it in the prompt or let the agent look it up in Entra on its own. Either way, the job gets done:
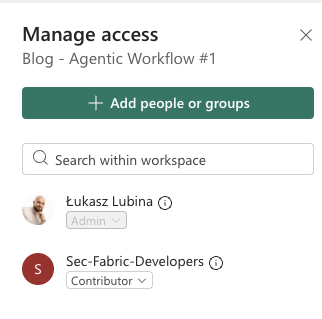
🔧 Fabric MCP (add_workspace_role) for the assignment. If you give only the group name, the agent looks up the ID with Azure CLI (az ad group show --group Sec-Fabric-Developers). Groups live in Entra, which is Microsoft Graph, not Fabric, so neither the MCP nor fab can find them.
Connecting Azure DevOps
Now the part I always miss when someone else sets up a workspace: the repository. Azure Repos is the easier of the two options, because the connection can authorize through SSO instead of the PAT (Personal Access Token) GitHub requires.
The repository has to exist before you start. If it doesn’t, the agent can create it too, just ask. For Azure DevOps it uses Azure CLI (az repos create, from the azure-devops extension). For GitHub it uses the GitHub CLI (gh repo create). Neither is a Fabric operation, which is why the Fabric tools can’t do it.
What you need to provide:
- Workspace
- Azure DevOps organization name
- Azure DevOps project name
- Azure DevOps repo name
- Branch name
- Folder name (optional)
So your prompt might look like this:
Connect Blog - Agentic Workflow #1 to Azure DevOps: org data-guide, project Blog, repo Blog-AgenticWorkflow, branch main, folder /agentic-workflow-1
If you configured everything from my previous post, the agent picks up the git-integration-operations-cli skill here, so it has exact instructions for what to do:
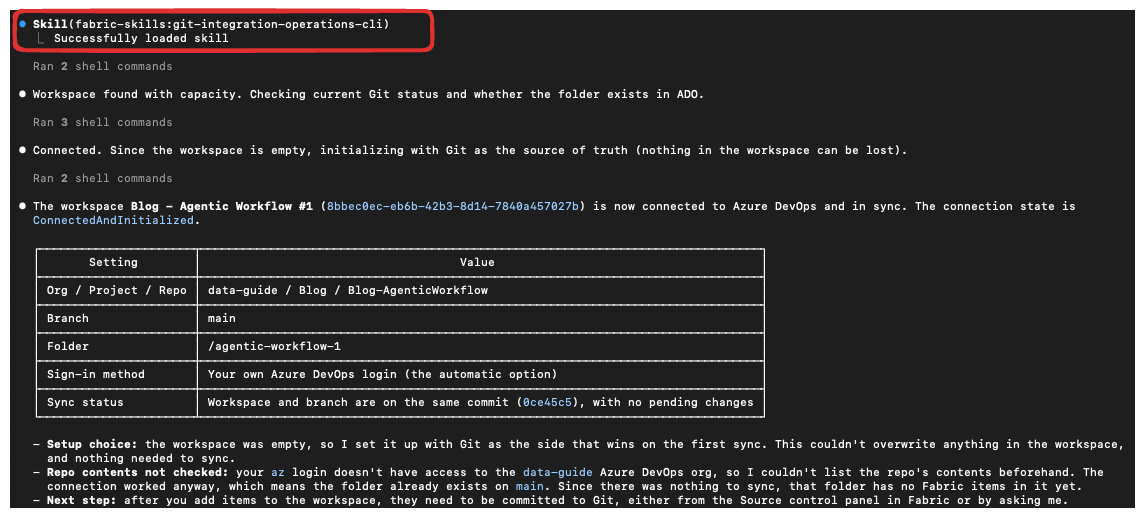
🔧 Skill → Fabric CLI (fab api, falling back to az rest). The MCP has no Git tools, so the skill calls the Git REST endpoints directly. The same applies to every Git step below: listing connections, disconnecting, connecting to GitHub.
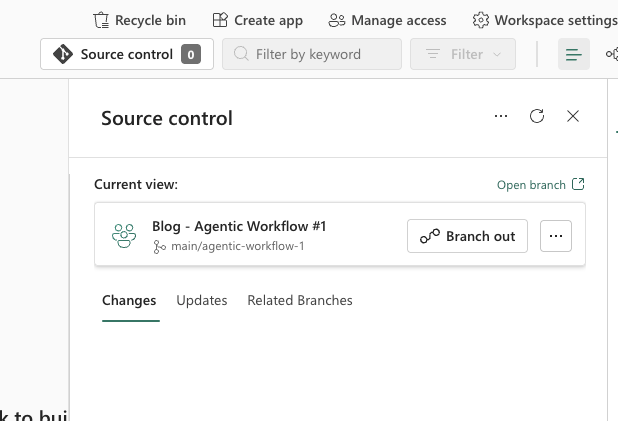
And the proof, in the Source control tab:
Connecting GitHub
GitHub works almost the same way, with one big difference: no SSO. Fabric can’t reuse your Microsoft login, so you have to give it a Personal Access Token. The token isn’t passed in the request directly. It’s kept in a Fabric connection, and the workspace points to that connection. Quick comparison:
| Azure DevOps | GitHub | |
|---|---|---|
| Authentication | SSO (automatic) or a connection | PAT stored in a Fabric connection, always required |
| Repo identified by | organization + project + repo | owner + repo |
| Tenant setting | on by default | off by default |
Step 1: Check the tenant setting
This one catches a lot of people. In the Fabric Admin portal → Tenant settings → Git integration, the Users can sync workspace items with GitHub repositories setting is disabled by default. If you aren’t a Fabric admin, ask yours to enable it before you start. Otherwise the connection fails, and the error won’t tell you why.
Step 2: Prepare the repository
Same as with Azure DevOps, the repository and branch have to exist already. Create the folder you want to connect to as well, for example by adding a simple README.md to it. Oddly enough, the Fabric UI creates a missing folder for you, but the API (and so the LLM) doesn’t. You’ll get 404 GitProviderResourceNotFound instead.
Step 3: Create a Personal Access Token
In GitHub, go to Settings → Developer settings → Personal access tokens → Fine-grained tokens → Generate new token, then:
a. Under Repository access, select Only select repositories and pick your repo.
b. Under Repository permissions → Contents, set Read and write. Read is enough to update the workspace from Git, but committing from Fabric needs write.
c. Set an expiration date you’re comfortable with. When it expires, the sync stops working.
Prefer a classic token? It needs the repo scope.
Step 4: Store the token in a Fabric connection
You could paste the PAT into the chat and let the LLM create the connection through the API. I don’t recommend it. The token would end up in your chat history and logs. Create the connection in the UI instead: Settings (gear icon) → Manage connections and gateways → New → Cloud, choose GitHub – Source control, provide the repository URL (e.g. https://github.com/<owner>/<repo>) and paste your PAT.
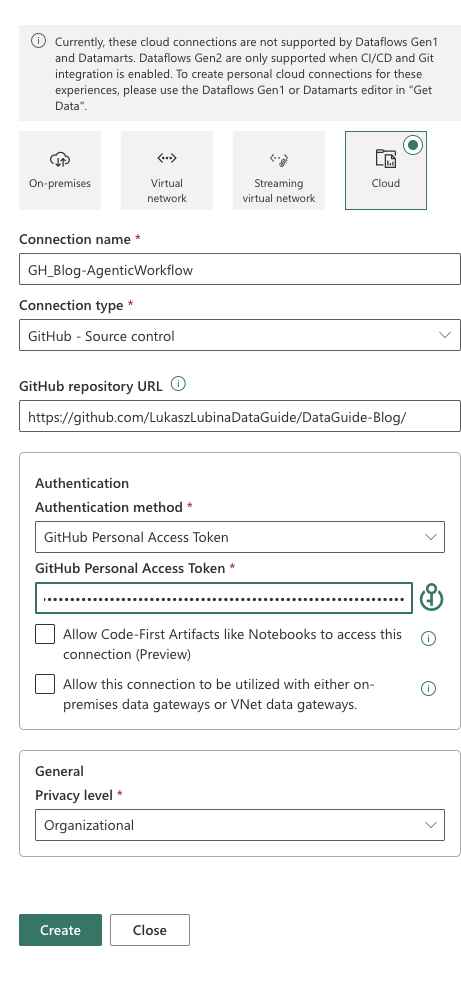
Heads up: if you put a repo URL in the connection, it works for that one repo only. Skip the URL and the connection works for every repo the token can access. Choose based on how many workspaces you’ll connect.
Already have a connection? Skip this step and ask the LLM to find it:
List my Fabric connections of type GitHub source control
Step 5: Disconnect the existing connection (if there is one)
A workspace can be connected to only one repository at a time. If you followed the Azure DevOps part above, disconnect it first. Your workspace items stay as they are:
Disconnect Blog - Agentic Workflow #1 from Git
Step 6: Prompt the agent
Now the actual connection. What you need to provide:
- Workspace
- GitHub owner (your user or organization)
- Repository name
- Branch name
- Folder name (optional)
- Fabric connection name
Your prompt might look like this:
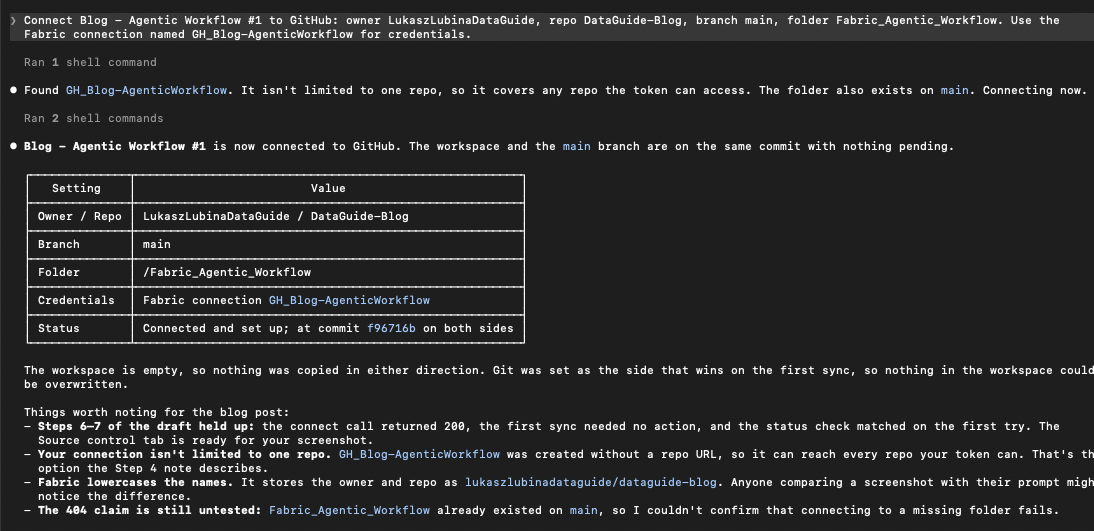
Connect Blog - Agentic Workflow #1 to GitHub: owner LukaszLubinaDataGuide, repo DataGuide-Blog, branch main, folder Fabric_Agentic_Workflow. Use the Fabric connection named GH_Blog-AgenticWorkflow for credentials.Behind the scenes, the skill:
- finds the workspace ID and the connection ID,
- calls the git/connect API with gitProviderType: GitHub, ownerName, and myGitCredentials pointing to your connection,
- initializes the connection and decides which side wins. For an empty workspace, Git is the source,
- checks git/status to confirm the workspace and the branch are on the same commit.
Step 7: Verify
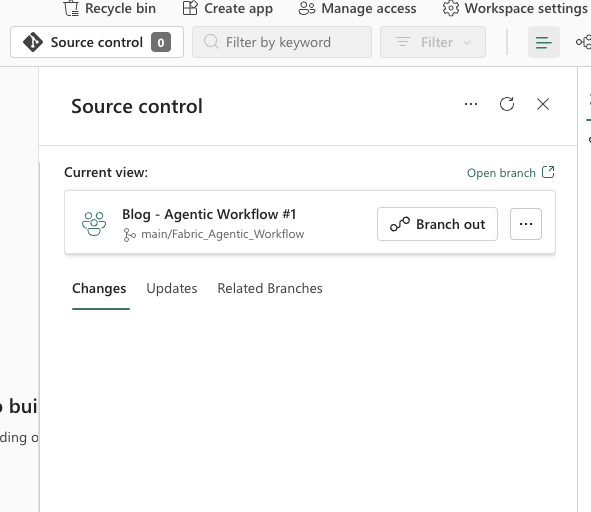
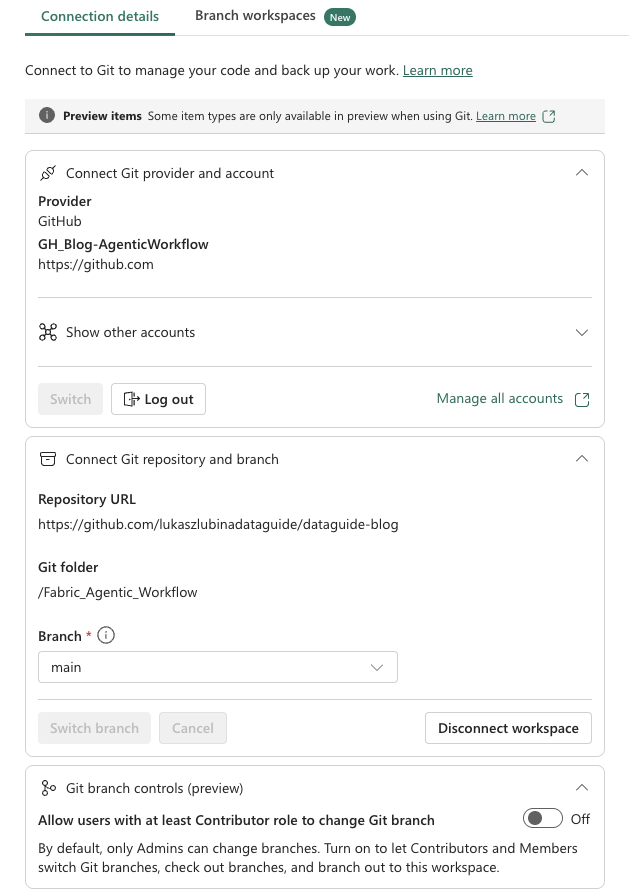
Same as before: open the workspace → Source control, or Workspace settings → Git integration. Your GitHub repo, branch and folder should be there.
Lakehouse, Spark pool and environment
An empty workspace with Git connected is where most admins stop. But from what I’ve seen, the first thing a data engineering team asks for in a new workspace is a lakehouse, a Spark pool sized for their jobs, and an environment with their libraries. The agent can do all three. Each one uses a different tool, which makes it a nice live example of the table above.
Lakehouse
Create a lakehouse named LH_AgenticWorkflow with schemas enabled in Blog - Agentic Workflow #1
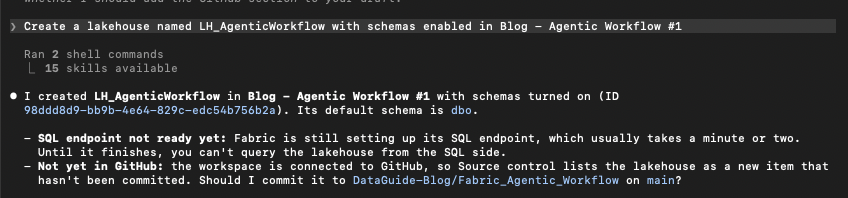
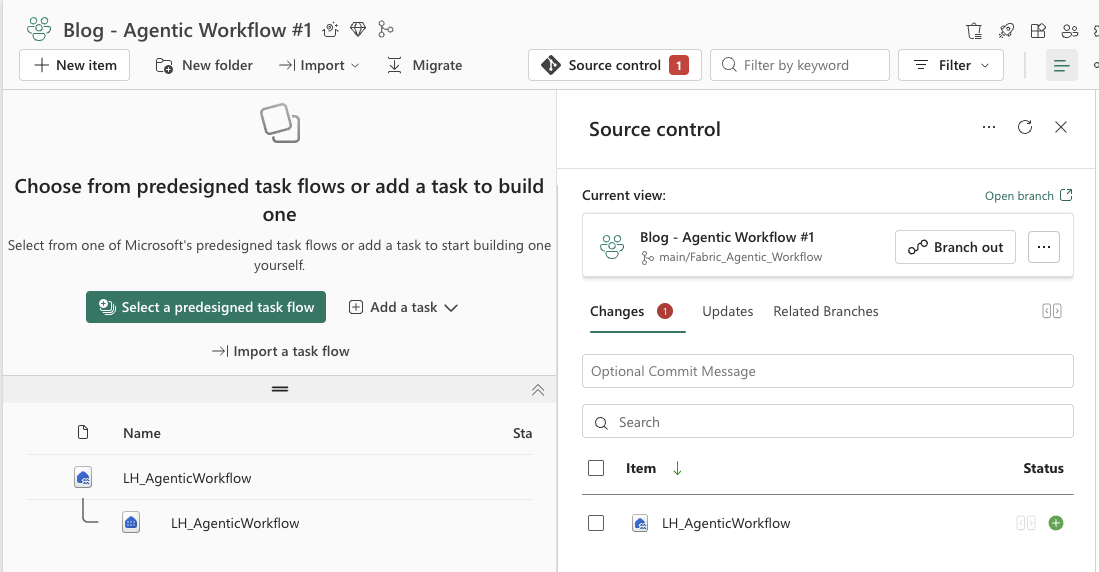
🔧 Fabric MCP (create_item). A lakehouse is just another Fabric item, so the generic create tool handles it. Check that the result has schemas enabled: that option is set only at creation and can’t be switched on later. If the MCP can’t pass it, the agent falls back to az rest through the spark-authoring-cli skill, which covers schema-enabled lakehouses explicitly.
Custom Spark pool
The starter pool is fine for experiments. For real jobs you usually want a pool sized for them:
Create a custom Spark pool named SP_Small in Blog - Agentic Workflow #1: node size Small, autoscale 1 to 3 nodes, dynamic executor allocation on. Then make it the default pool for the workspace.
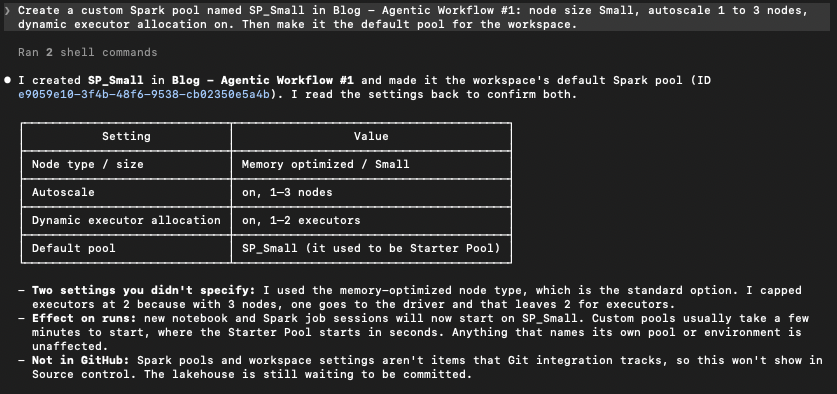
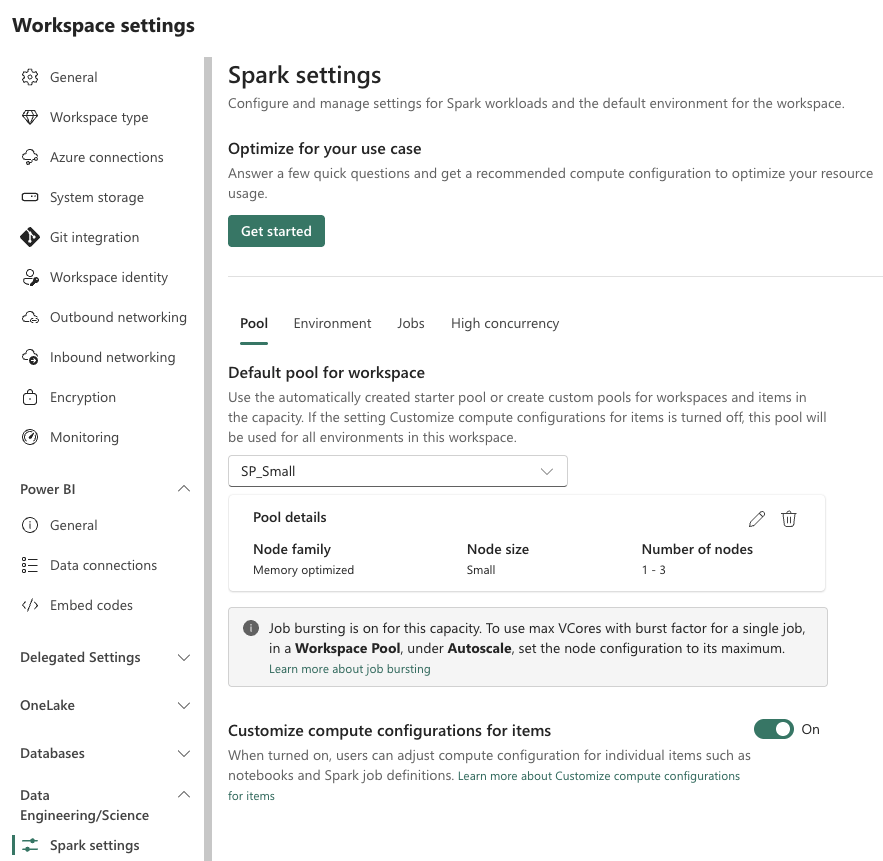
🔧 Fabric CLI. Spark settings aren’t in the MCP at all. In fab, custom pools sit in a hidden .sparkpools folder inside the workspace, and the default pool is a workspace setting (fab set ... -q sparkSettings.pool.defaultPool). How many nodes you can give a pool depends on your capacity SKU, so if the agent reports a limit error, that’s why.
Environment
Create an environment named ENV_AgenticWorkflow in Blog - Agentic Workflow #1, attach the SP_Small pool, add the holidays library from PyPI, publish it and wait until publishing finishes.
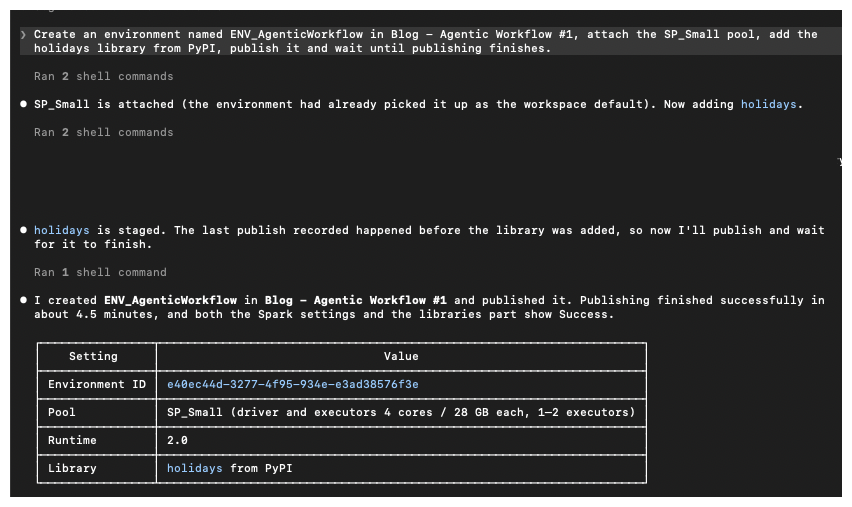
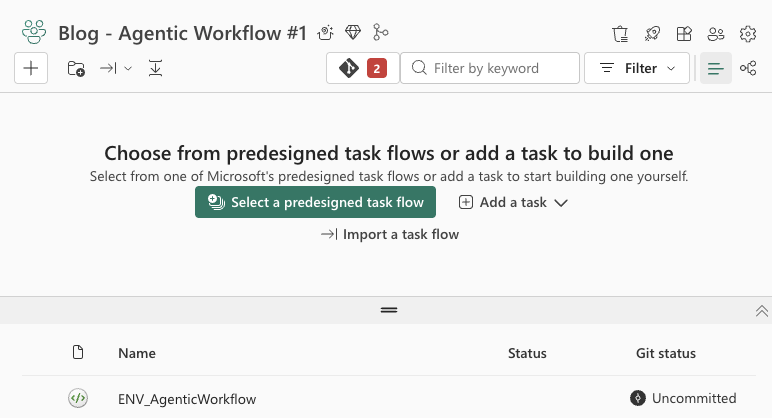
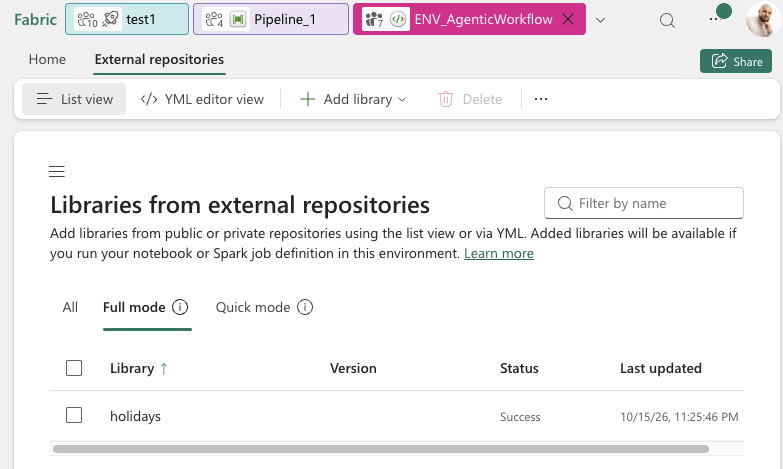
🔧 Fabric MCP creates the empty item. Adding a library and publishing goes through az rest or fab api. An environment has a staging state and a published state, and those are separate API calls the MCP doesn’t have. Publishing takes a few minutes, which is why the prompt says wait. Without it, the agent reports success while the environment is still publishing, and the first notebook that uses it can’t find the library.
Now the workspace is actually ready for the team. Keep that lakehouse in mind, we’ll use it in the next post.
One request, one skill
Each step above was one prompt. That’s already faster than clicking through the portal. But you’re still the one remembering the order, the naming convention, which groups get which role, and which capacity goes with which environment. The real win comes when the whole sequence becomes one request.
That’s what a custom skill is for. Same idea as the Microsoft skills from part one, a markdown file with instructions, except you write it and it holds your rules. Create ~/.claude/skills/provision-fabric-workspace/SKILL.md:
---
name: provision-fabric-workspace
description: Provision a new Microsoft Fabric workspace end to end - create it, assign capacity, add security groups, connect Git. Use when asked to create, set up or provision a Fabric workspace for a team or project.
---

# Provision a Fabric workspace

Before starting, ask for anything missing: project name, environment
(DEV / TEST / PROD), Git provider and repository.

## Naming
The project name is written three ways. Derive all three from the name the
user gives, e.g. `Sales Analytics`:

| Form | Rule | Example |
|---|---|---|
| `<Project>` | as given, spaces kept | `Sales Analytics` |
| `<project-kebab>` | lowercase, spaces → hyphens | `sales-analytics` |
| `<ProjectPascal>` | spaces removed, each word capitalised | `SalesAnalytics` |

- Workspace: `<Project> [<ENV>]`, e.g. `Sales Analytics [DEV]`
- Git folder: `/<project-kebab>`, e.g. `/sales-analytics`
- Security groups: `Sec-Fabric-<ProjectPascal>-<Role>`, e.g.
  `Sec-Fabric-SalesAnalytics-Developers`. Hyphens separate the parts, so the
  project part never contains a hyphen or a space.
- Lakehouse: `LH_<ProjectPascal>`, e.g. `LH_SalesAnalytics` (lakehouse names
  can't contain spaces)

## Steps
1. Check the workspace doesn't already exist. If it does, stop and ask.
2. Create the workspace with the Fabric MCP.
3. Assign the capacity with `fab`: DEV and TEST go to <dev-capacity-name>,
   PROD goes to <prod-capacity-name>.
4. Add access, groups only, never individual users:
   - Sec-Fabric-<ProjectPascal>-Admins → Admin
   - Sec-Fabric-<ProjectPascal>-Developers → Contributor
   - Sec-Fabric-<ProjectPascal>-Readers → Viewer
   Look up each group's object ID with `az ad group show --group <name>`.
   Never guess an ID.
5. Connect Git with the git-integration-operations-cli skill. Azure DevOps
   uses SSO. GitHub uses the Fabric connection named in the request.
   Never ask for a PAT in chat.
6. Create the lakehouse `LH_<ProjectPascal>` with schemas enabled (Fabric MCP).
7. Report back: workspace ID, capacity, role assignments, Git status, lakehouse.

## Rules
- Never delete, unassign or overwrite anything. If a step fails, report it and stop.
The next “can I get a new workspace?” message now costs you one line:
/provision-fabric-workspace Sales Analytics, DEV, GitHub repo DataGuide-Blog, connection GH_Blog-AgenticWorkflow
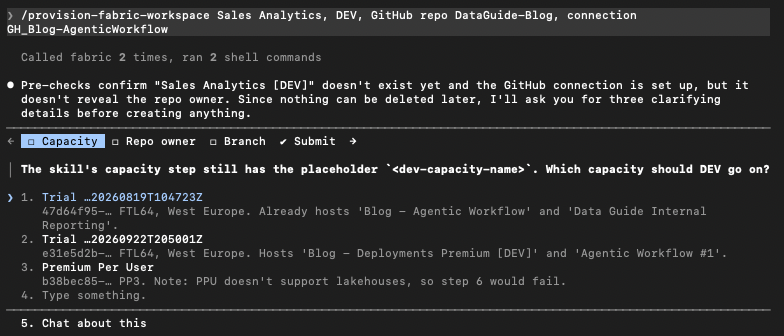
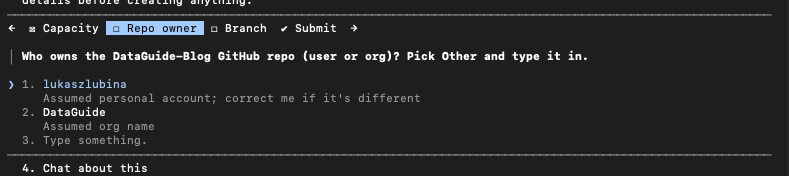
The skill doesn’t just run blindly. It asks for whatever is missing before it touches anything:
Pre-check one – the skill asks for the capacity
Pre-check two – the skill asks for the repository owner
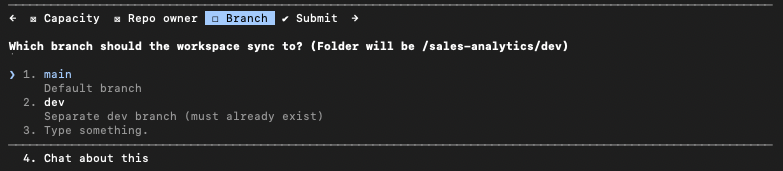
Pre-check three – the skill asks about the branch
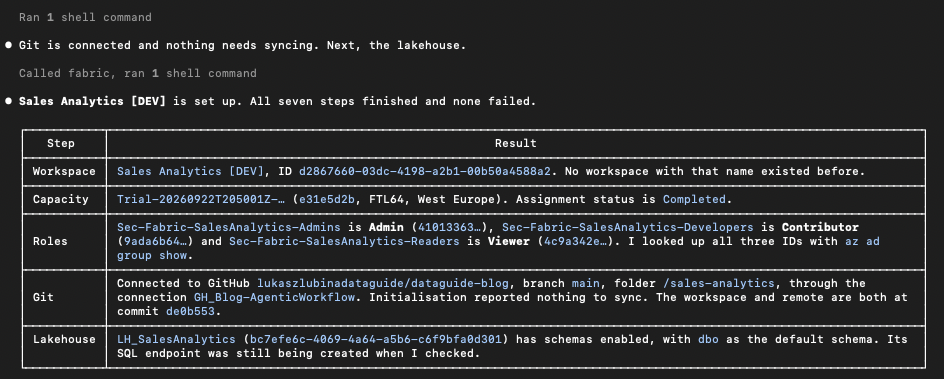
Final response
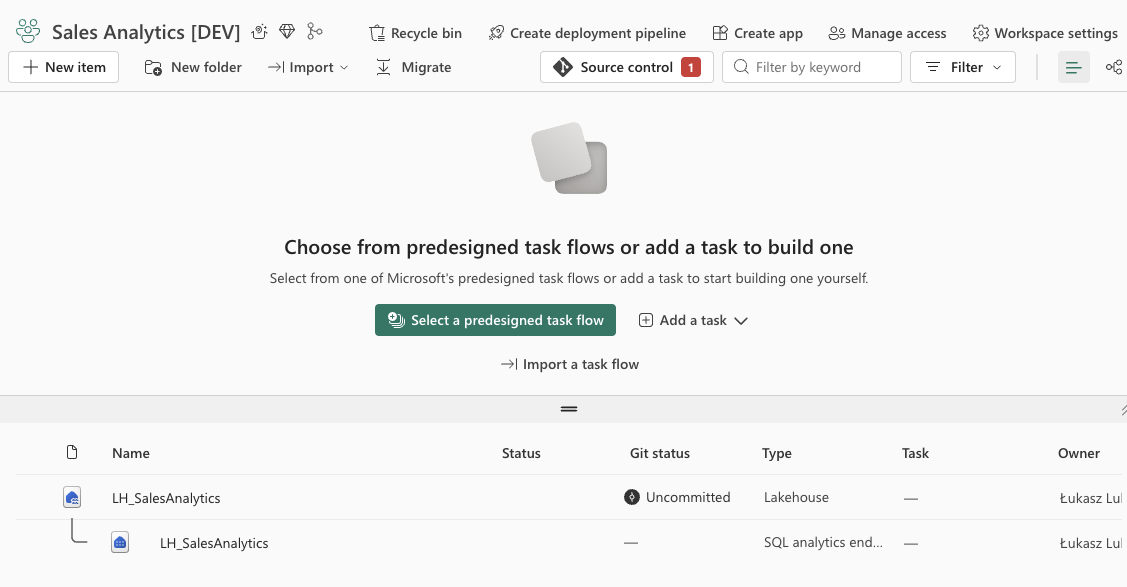
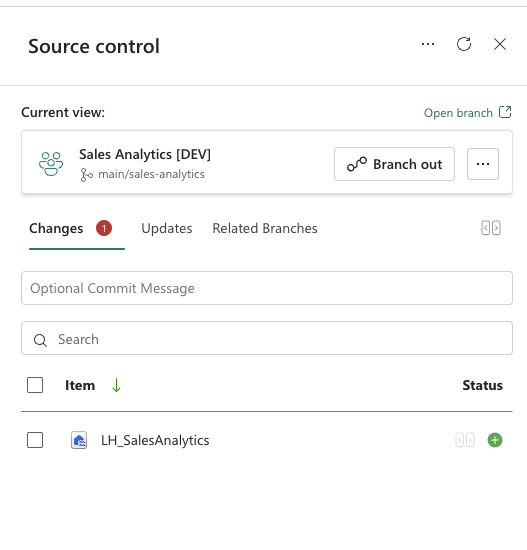
And the result in Fabric:
Two things I like about this beyond the speed. The naming convention no longer depends on who handled the request. And the skill file is plain text, so you can put it in a repo, review changes to it like code, and share it with the rest of the admin team. I’d also tag release versions of the skill, so you always know which version someone has installed.
A word on destructive tools
The Fabric MCP doesn’t only create things. It also has delete_workspace, delete_item and a tool for removing role assignments, and fab has fab rm. By default Claude asks before calling any of them. Keep it that way. And if you ever click “don’t ask again” on a create tool, double-check it wasn’t one of these.
Want a hard stop instead of a prompt? Deny them outright in ~/.claude/settings.json:
{
  "permissions": {
    "deny": [
      "mcp__fabric__delete_workspace",
      "mcp__fabric__delete_item",
      "mcp__fabric__delete_workspace_role",
      "Bash(fab rm:*)"
    ]
  }
}
The tool names follow the pattern mcp__<server name>__<tool>, so if you named your server something other than fabric, adjust the prefix. When you genuinely need to delete something, do it in the portal. It’s one click, and you see exactly what you’re removing.
Wrap-up
That’s the admin side covered, from an empty tenant to a workspace a team can actually use.
Quick recap:
- Auth first. Copilot signs in on its own. For Claude Code, register your own Entra app (preferred) or let
azhand the MCP a token. - Workspace, roles and Git are plain prompts, through the MCP and the
git-integration-operations-cliskill. - Capacity assignment isn’t in the MCP yet, so
fabtakes over. - Three tools, one rule: MCP first,
fabfor what the MCP doesn’t cover (capacity, Spark pools, Git),azfor the skills’ REST calls and anything outside Fabric, like Entra groups. - Lakehouse, Spark pool and environment – three more prompts.
- GitHub needs more prep than Azure DevOps: the tenant setting, an existing folder, and a PAT that lives in a Fabric connection, never in the chat.
- Wrap the sequence in a skill, and keep delete tools behind a prompt or a deny rule.
What does your workspace request process look like today? I’m curious how many steps people would actually hand over to an agent.
Next up in the series: Data Engineering. We take the workspace we just built and put it to work, with notebooks, pipelines and dataflows written by the agent.
New posts by email
One email per post. Unsubscribe anytime.