

Custom Environment – what’s that, what is the reason
If you’re working with Microsoft Fabric and running complex workloads – multiple notebooks executing at the same time, or needing Python libraries that aren’t built-in – you’ve probably asked yourself: “How do I manage this properly?”
The answer is Fabric Environments. In this post, I’ll walk you through what they are, how to configure them, and how to use them in your notebooks. For the full official reference, you can check the Microsoft documentation on Fabric Environments. Let’s get started.
What Is a Fabric Environment?
An Environment in Microsoft Fabric lets you manage and reconfigure both hardware and software settings for your Spark workloads. Think of it as a centralized configuration layer where you can control:
- Spark runtimes – Choose your runtime version
- Compute resources – Adjust driver/executor cores and memory
- Libraries – Install additional packages (from public repos or your own custom ones)
Instead of scattering pip install commands across your notebooks, you define everything once in the Environment and it’s available wherever you need it.
Creating and Configuring Your Environment
The Environment is a standard Fabric item. To create one:
- Navigate to the workspace where you want to create it
- Click New Item and search for Environment
- Give it a meaningful name (e.g.,
ENV_DataEngineering) and hit Create
You should see the following screen:
On the top menu, you can choose the Runtime – with details about Spark and Delta release versions. Need a newer or older version? You can switch it right there.
On the left pane, you’ll find three sections: Libraries, Spark Compute, and Storage. Let’s walk through each one.
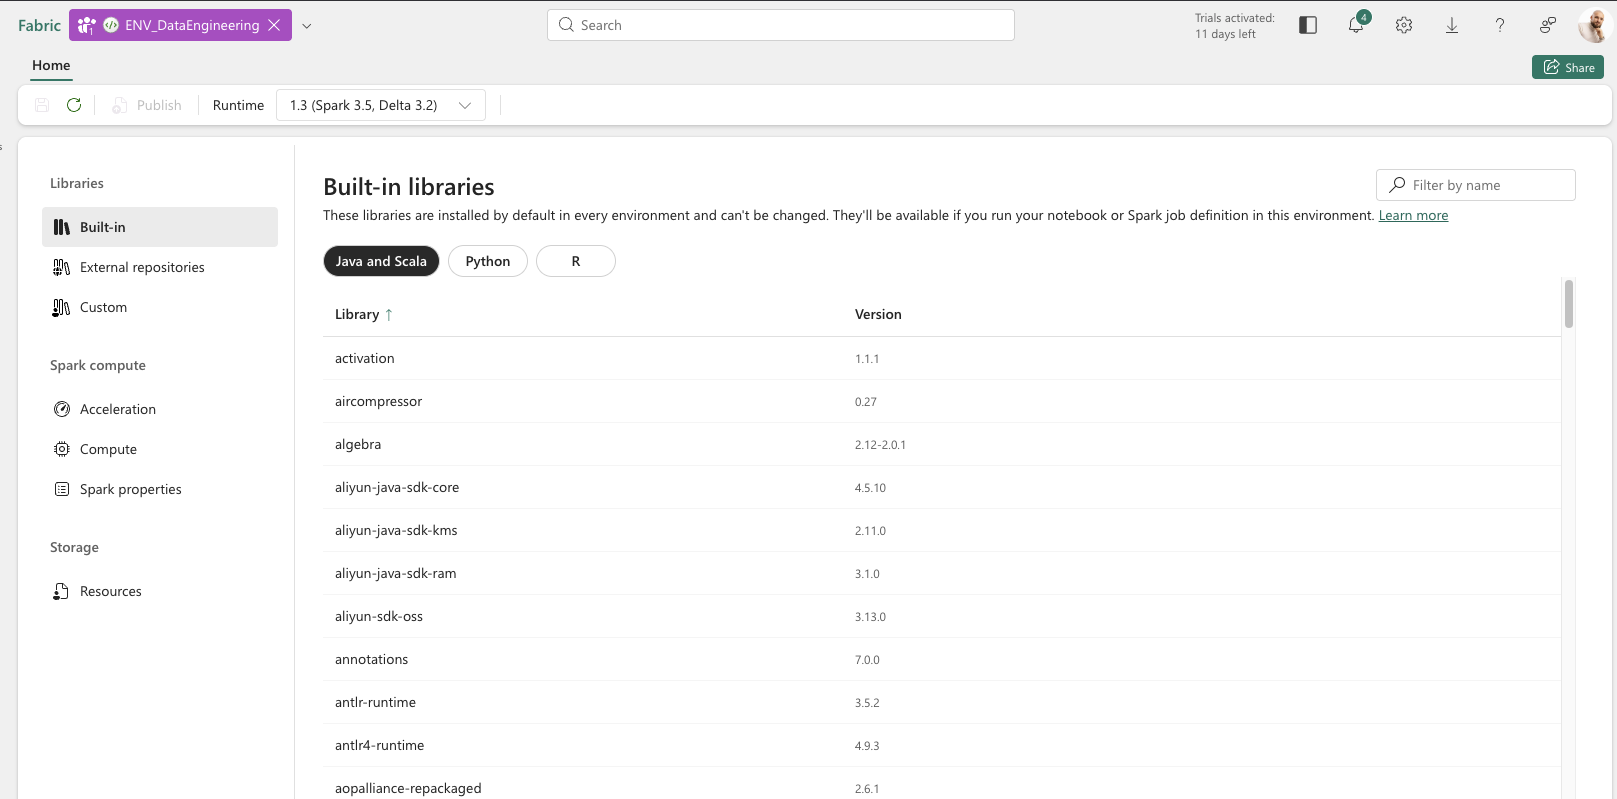
Libraries
The Libraries section has three tabs:
- Built-in – Check what libraries are installed by default with your runtime
- External repositories – Install libraries from pip or conda repositories (the process is the same for both). You can add them through the UI or via a YML file
- Custom – Upload your own libraries in
.jar,.whl, or.tar.gzformat
Once published, chosen libraries are available during the Spark session in any connected notebook right away – no more pip install cluttering your code.
Spark Compute
Spark Compute contains three tabs:
- Acceleration – Enable Spark Native Execution Engine, which is particularly helpful for larger data processing workloads
- Compute – Adjust your Spark compute configuration: driver and executor cores, memory allocation, dynamic allocation, and executor instances
- Spark properties – Customize Spark job definitions and set properties like resource profiles to optimize compute for your workload
Storage
Within Storage, you can add Resources – additional files you’d like to have available during a Spark session. Think of it as a shared folder across your team’s notebooks, unlike the notebook’s built-in resources folder which is scoped to a single notebook.
To access these files from your notebook code, use the following utility:
resource_dir = mssparkutils.env.getResourceDir()
This returns the path to the Resources directory, so you can read any uploaded file during the session.
Configuration and Publishing
Now let’s dive into the details of configuring each section.
Libraries Configuration
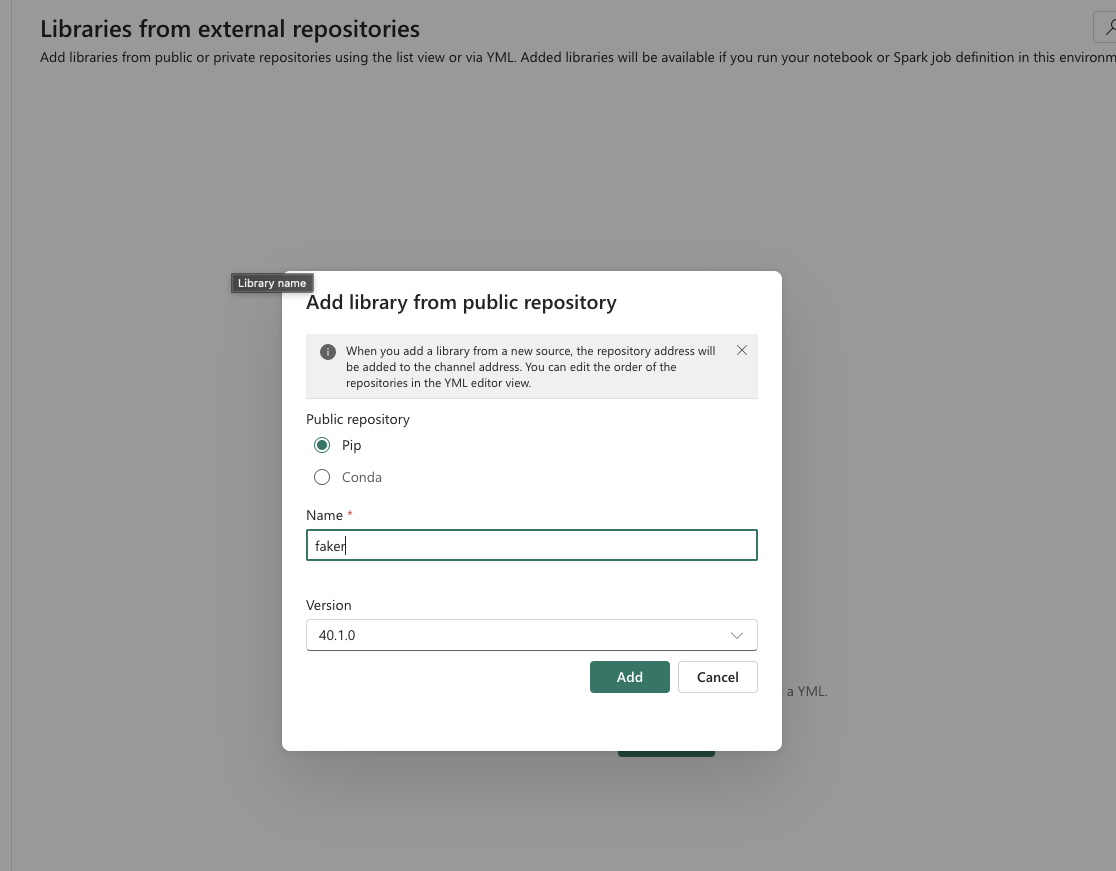
External Repositories
To add a library from a public repository:
- Navigate to Libraries → External repositories
- Click Add Library on the top bar
- Select Add library from public repository
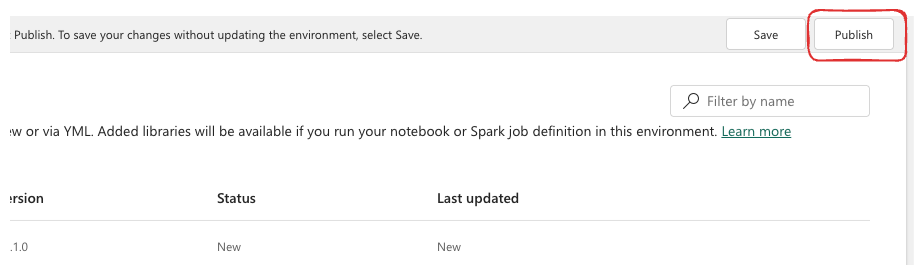
Once you’ve set up your environment (I just added a new library, but you can adjust other properties as well), click the Publish button to apply your changes.
Heads up: Publishing takes several minutes. I’ve noticed it tends to go a bit faster when you keep the browser window active.
All properties can also be managed through YML files:
- Libraries configuration:

- Spark properties:

The Environment is also stored in your GitHub repository (if your workspace is connected to a repo) as a YML file. This means you can maintain it with an “as code” approach – which is great for version control and CI/CD workflows.
Custom Libraries
In the Custom libraries tab, you can upload your own libraries in supported formats (.jar, .whl, or .tar.gz). I’ll cover how to create custom libraries in a future post.
To upload your own library:
- Navigate to Custom under the Libraries section
- Click Upload and choose the file from your desktop
- Click Publish to make it available in your notebooks
Spark Compute Configuration
Acceleration
The Native Execution Engine for Spark was introduced by Microsoft to boost performance. It’s really useful when you have larger amounts of data to process – that’s where you’ll see the biggest benefit.
To enable it:
- Navigate to Acceleration under Spark Compute
- Check the Enable native execution engine box
- Publish the environment to apply the changes
Compute
This is where you adjust your Spark compute configuration to match the power your workload actually needs.
Within the Environment itself, you can manage:
- Driver Cores
- Driver Memory
- Executor Cores
- Executor Memory
- Enable/Disable dynamic allocation
- Number of Spark executor instances
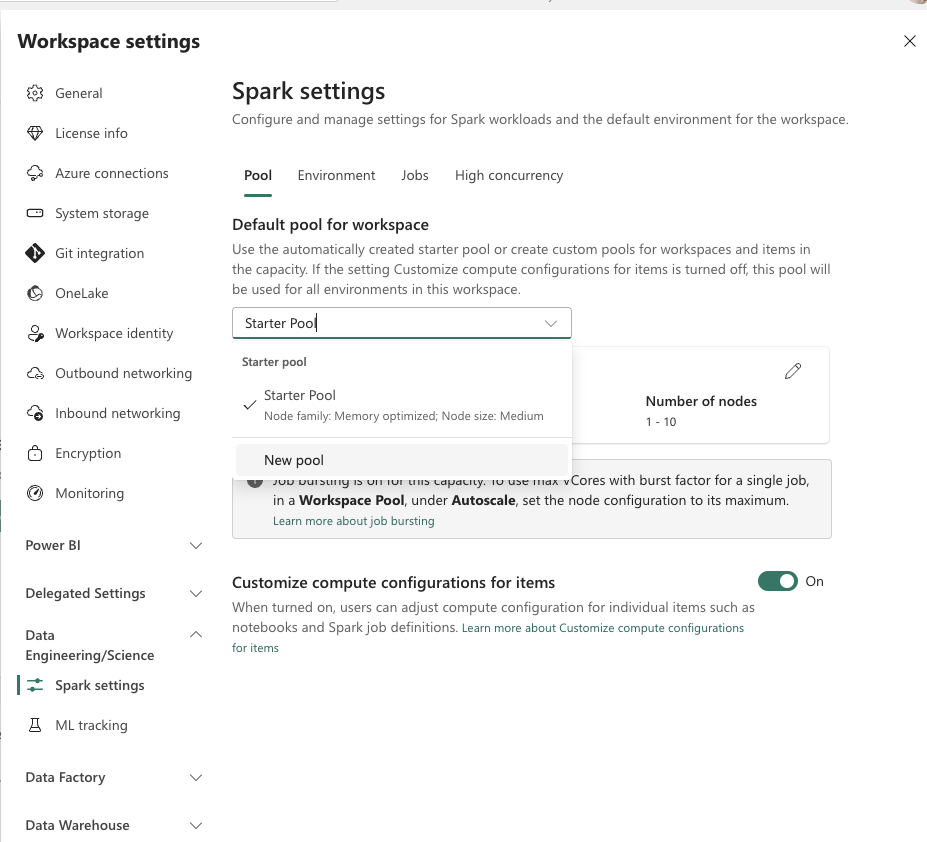
However, some settings aren’t configurable at the Environment level:
- Node family
- Node size
- Autoscaling
These settings are configured at the pool level, defined in workspace settings. To configure a new Spark pool, navigate to Workspace → Workspace Settings → Data Engineering/Science → Spark settings. Here you can create a custom Spark pool:
Once you have your custom pool created (or you can adjust the default Starter Pool as well), go back to your Environment, open the Compute tab under Spark Compute, and select the pool you just created. From there, adjust the driver/executor settings as needed and publish the changes.
Spark Properties
If your workload requires custom adjustment of default Spark properties, this is the place. For example, you can set spark.fabric.resourceProfile to switch between predefined optimization profiles like writeHeavy, readHeavyForPBI, or readHeavyForSpark, depending on whether your workload prioritizes ingestion throughput or query performance.
To add a property:
- Navigate to Spark properties under Spark Compute
- Click Add properties
- Select a property from the dropdown and specify its value
Heads up: Not all properties appear in the dropdown, but you can still use them by typing the property name directly.
Storage Configuration
Resources
To add files to your Environment’s shared storage (up to 100MB per file):
- Go to the Resources tab in the Storage section
- Click Upload and choose your file
- Publish the environment
How to Use It in Your Notebooks
Assigning an Environment to a Single Notebook
To use your custom Environment in a specific notebook:
- Open the notebook and look for the environment selector:
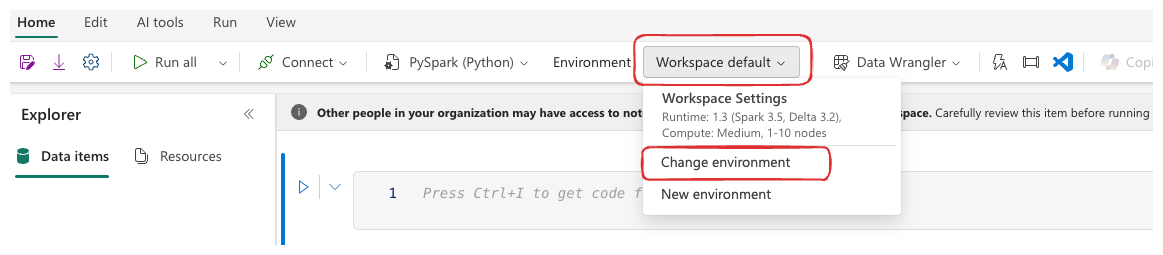
- You’ll see all environments you have access to. Select the one you need and hit Connect:
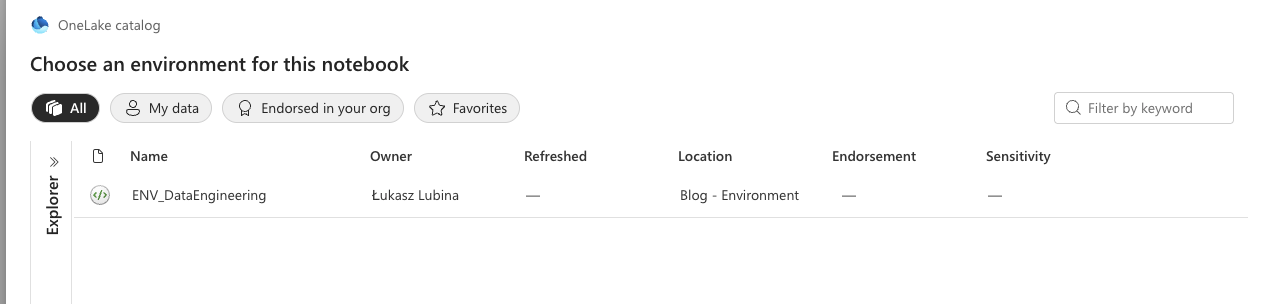
- Once connected, you’ll see it displayed at the top:
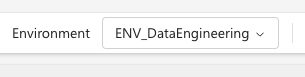
Starting a new session will now include all settings from your Environment.
Please note: Sessions using a custom Environment take a bit longer to start than the default one.
To verify everything works, just try importing a library you configured. In my case, I ran the faker library without any prior pip install:

Setting a Default Environment for the Workspace
You can also make your Environment the default for every notebook in the workspace. Navigate to Workspace → Workspace Settings → Data Engineering/Science → Spark settings, then:
- Select Environment
- Enable Set default environment
- Choose your Environment from the dropdown
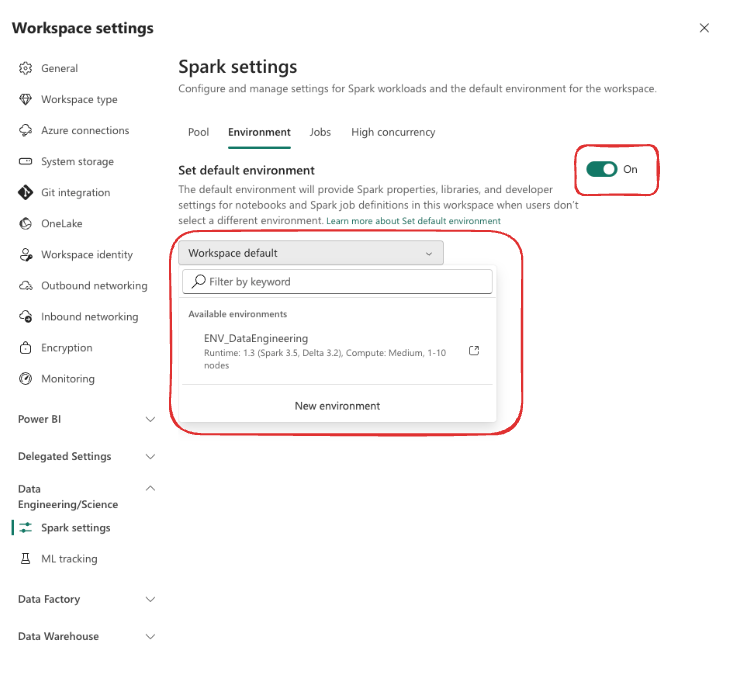
This way, every new notebook created in the workspace will automatically use your custom Environment.
Using Environments in Data Pipelines
Environments aren’t limited to notebooks. You can also reference them in Data Pipeline Spark activities. When configuring a Spark notebook activity in a pipeline, you’ll find an option to select the Environment – so your pipelines can benefit from the same centralized configuration.
Things to Keep in Mind
Before you go all-in on Environments, here are a few gotchas I’ve encountered:
- Publishing takes time – Depending on the number of libraries, publishing can take several minutes. Plan for this during development sprints.
- Environments can be shared across workspaces – While Environments are created within a workspace, they can be shared and used by other workspaces. This opens up interesting strategies around whether you create one Environment per workspace or maintain a single generic one for your entire tenant – something I’ll cover in a dedicated post.
- Session restart required after updates – If you publish changes to an Environment while a Spark session is running, the active session won’t pick them up. Users need to stop and restart their session to get the latest configuration.
- Library version conflicts – Be careful when installing custom libraries that might conflict with built-in ones. If a built-in library has a specific version and you try to install a different version, it can lead to unexpected behavior.
- Not all Spark properties are documented – As mentioned, the dropdown doesn’t list every available property. You may need to check Spark documentation for advanced configurations.
Wrapping Up
Fabric Environments give you a clean, centralized way to manage your Spark workloads. Instead of scattering configuration across individual notebooks, you define everything once – libraries, compute settings, Spark properties, and shared resources – and it’s available wherever you need it.
Key Takeaways:
- Use Libraries to avoid repetitive
pip installcommands across notebooks - Leverage Spark Compute settings to right-size your resources and enable the Native Execution Engine for heavy workloads
- Manage your Environments as code through YML files and Git integration
- Set a default Environment at the workspace level to keep things consistent across your team
This is just the beginning of the Environments topic. I’m working on two follow-up posts:
- How to Create Your Own Custom Python Library – I’ll walk you through building your own
.whlpackage and uploading it to Fabric. - Environment Strategies for Your Fabric Tenant – Should you create one Environment per workspace, or maintain a single generic one across your entire tenant? I’ll share the scenarios and my recommendations.
Got questions about configuring Environments in your setup? Drop a comment – I’d love to hear how you’re using them!
Happy configuring!