Fabric Deployments Made Easy: Two Proven Methods
In my previous post, I walked through setting up development environments in Microsoft Fabric, connecting them to Git, and shared some best practices for collaboration and continuous development. If you haven’t read that yet, I’d recommend starting there—this post builds on those concepts and refers back to them in several places.
Here, we’ll tackle the deployment side of things. I’ll cover two approaches: one using Fabric’s built-in Deployment Pipelines, and another that relies purely on Git. I’ll also show you how to manage workspace variables effectively in both setups, so you can keep deployments smooth and consistent.
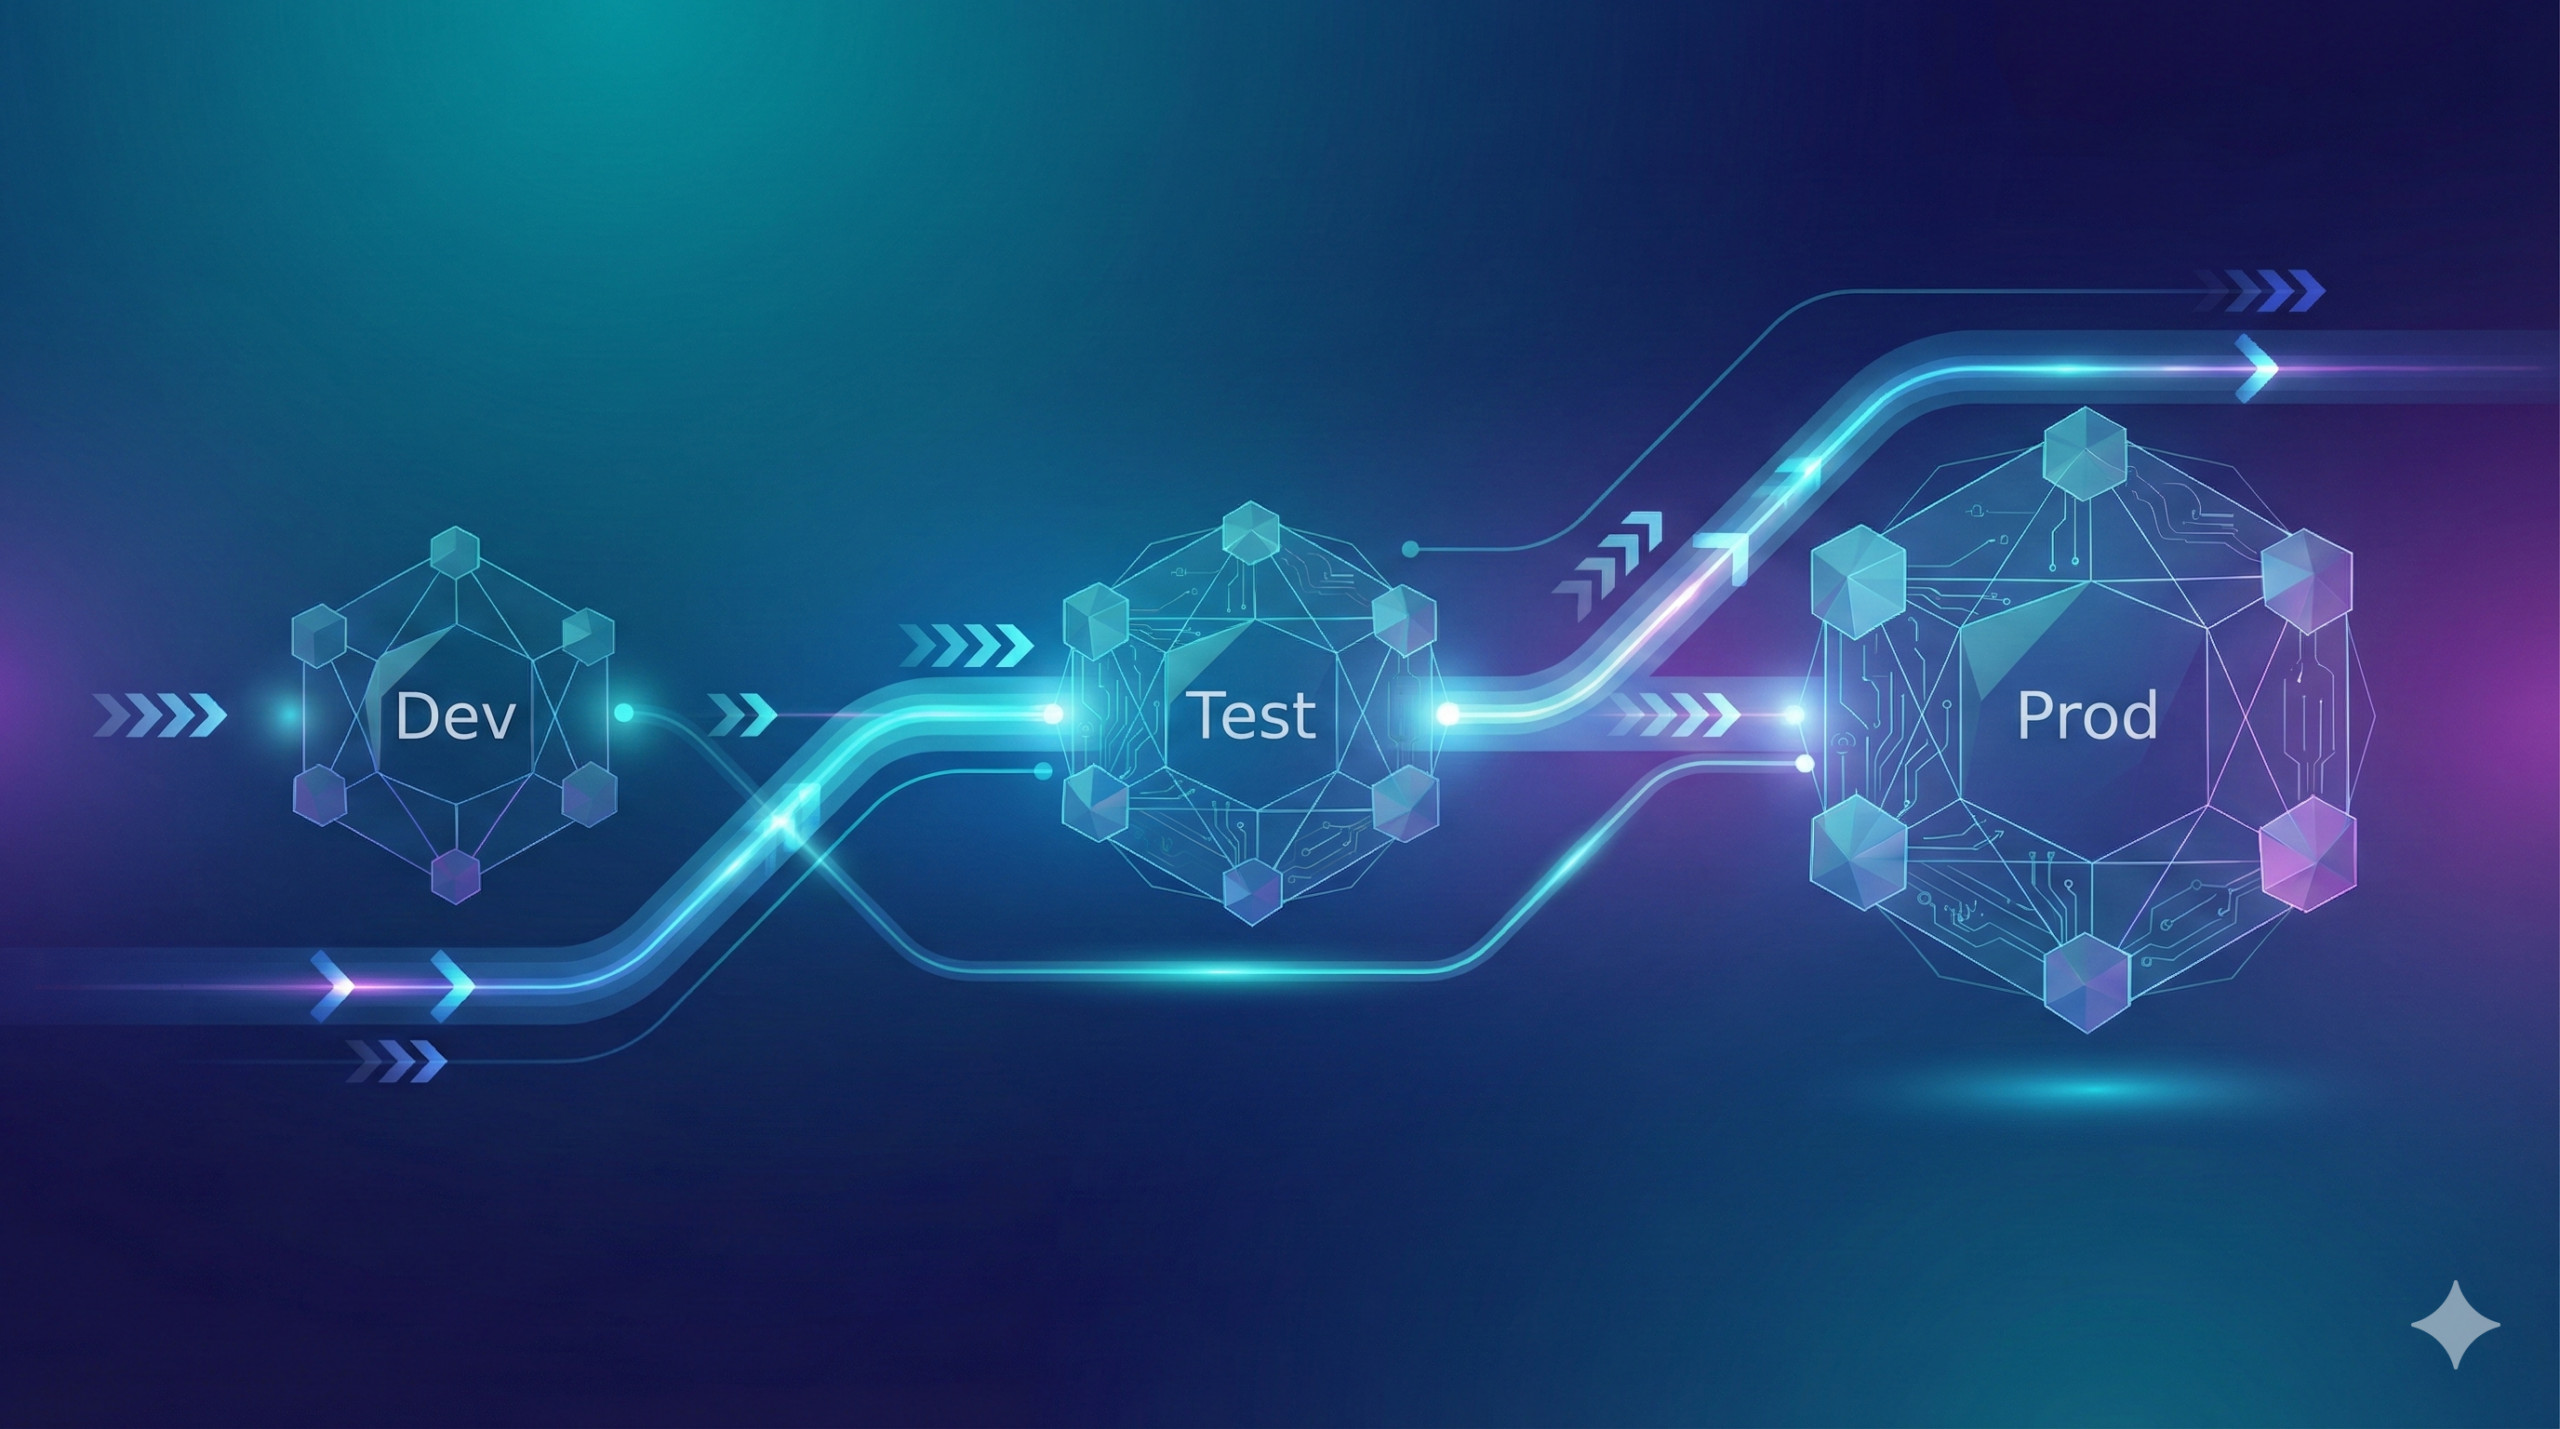
Deployment Approaches Overview
There are two main ways to handle deployments in Microsoft Fabric. The first uses Fabric’s native Deployment Pipelines. The second relies entirely on Git branching, which some teams prefer for tighter integration with their existing DevOps workflows or when they want full control over the deployment process.
Both approaches works. The choice often comes down to your team’s preferences and existing tooling.
Let’s break down both methods at a high level.
Git-Based Approach
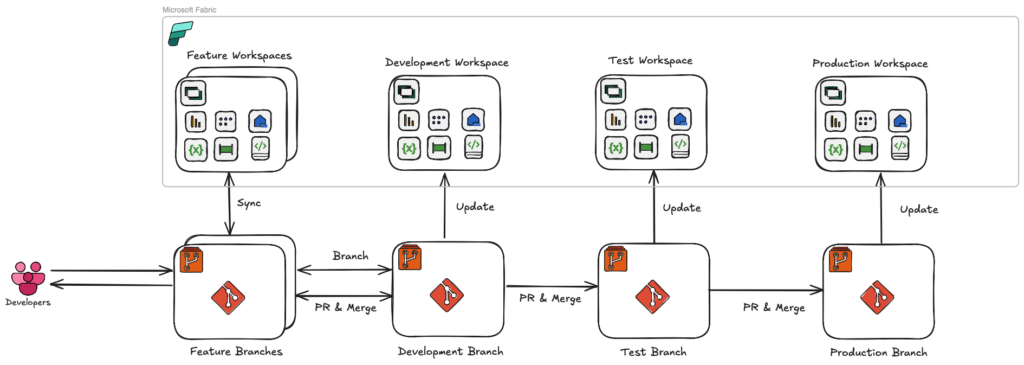
The Git-based method uses only the Git repository, with each environment mapped to its own dedicated main branch. That means you’ll have a separate branch for each stage:
- main_development — Development environment
- main_test — Test environment
- main_production — Production environment
Development starts by creating a feature branch from main_development. Once the work is complete, you merge it back into main_development via a pull request.
When you’re ready to promote to Test, you create a pull request from main_development to main_test. After successful testing, you merge from main_test to main_production for the production release.
Deployment Pipelines Approach
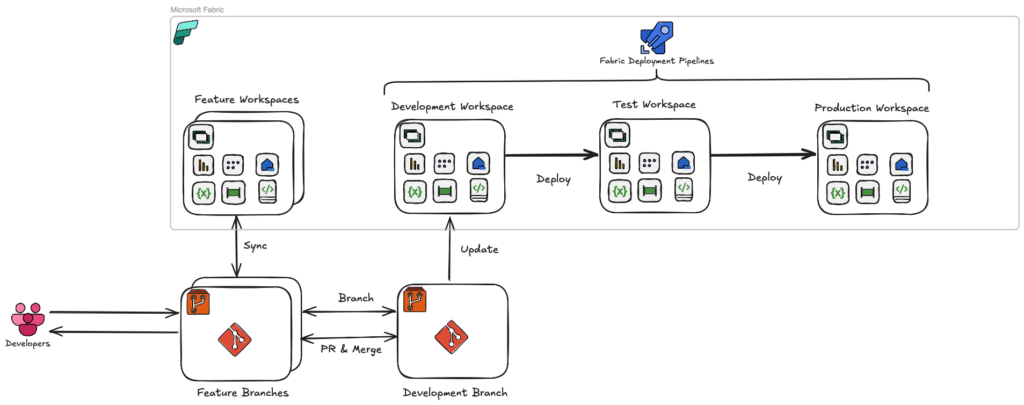
The Deployment Pipelines approach uses both the Git repository and Fabric’s native Deployment Pipeline feature. Here, you only need one main branch, linked to the Development workspace. Releases to Test and Production are handled through the Deployment Pipeline itself.
The development workflow is the same up to the point of pushing code. From there, instead of separate Git merges, the content moves directly from Development to Test, and from Test to Production, via the Fabric pipeline.
During deployment, you can choose which items to migrate and apply environment-specific changes, such as connection strings—something I’ll cover later in the configuration section.
How to Configure It
Let’s walk through configuration for both approaches so you can replicate the setup in your environment.
Git-Based Approach
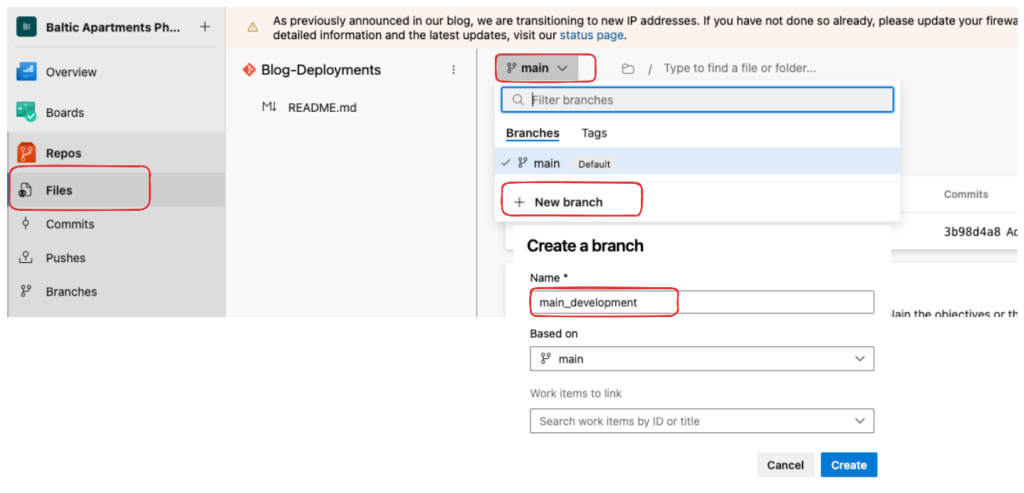
Step 1: Create Main Branches
First, create a repository (GitHub or Azure Repos) and connect it to Fabric. If you need guidance on linking Fabric to Git, refer to my previous post in the section “Configuring Your Workspaces”: CI/CD in Microsoft Fabric Part 1
Next, create your main branches for each environment:
- main_development
- main_test
- main_production
To create a branch, go to your repository (I’m using Azure Repos, but the process is similar in GitHub):
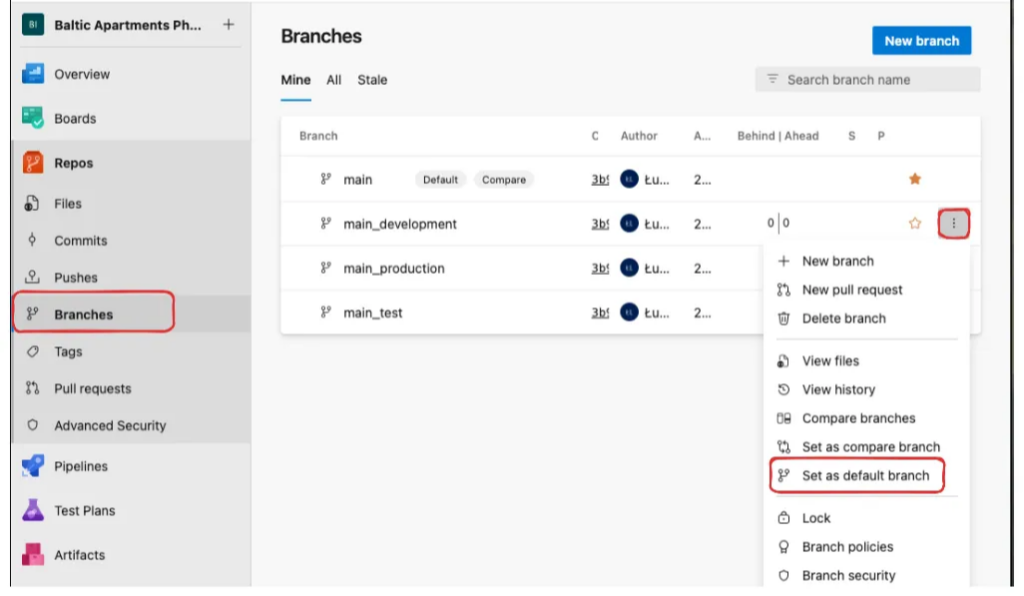
Finally, set main_development as the default branch and remove the original main branch—you can do this when creating the repo or afterwards by renaming and deleting.
Step 2: Create and Link Workspaces
Create three workspaces and link each one to the correct branch. My setup looked like this:
- Development Workspace (Blog – Deployments [DEV]) ↔ main_development
- Test Workspace (Blog – Deployments [TST]) ↔ main_test
- Production Workspace (Blog – Deployments [PRD]) ↔ main_production
You can find detailed linking steps in my previous post: CI/CD in Microsoft Fabric Part 1 (section “Configuring Your Workspaces”).
Step 3: Managing Deployments
In this approach, deployment is essentially a controlled Git merge.
If your code is already merged into main_development, you promote it to Test by creating a pull request from main_development → main_test.
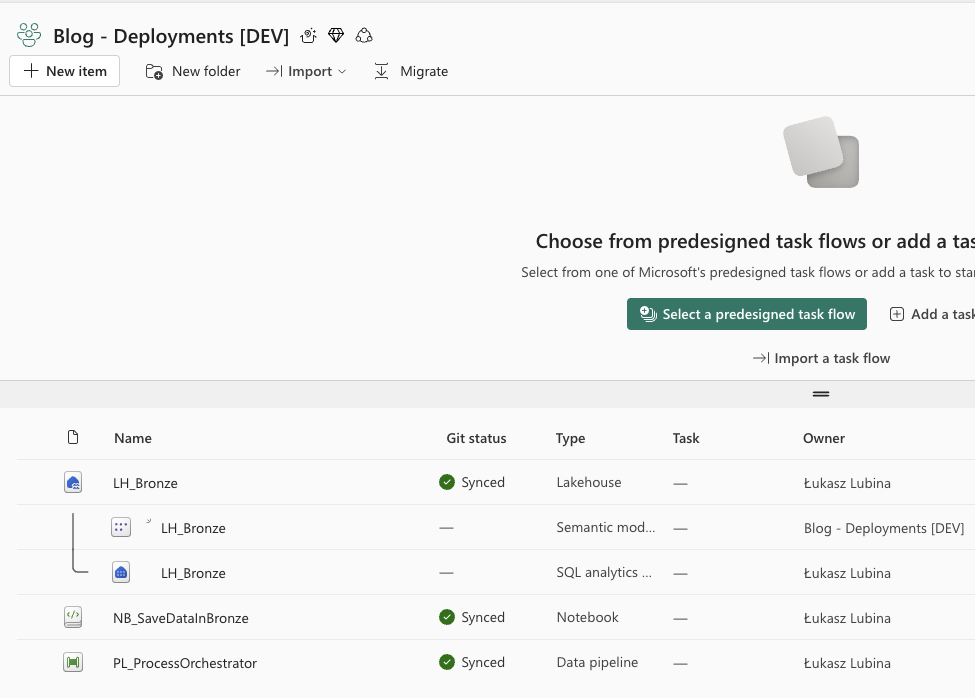
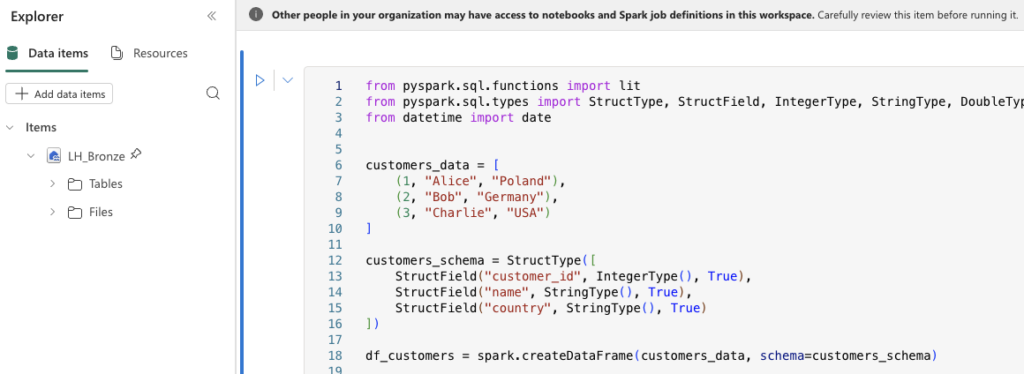
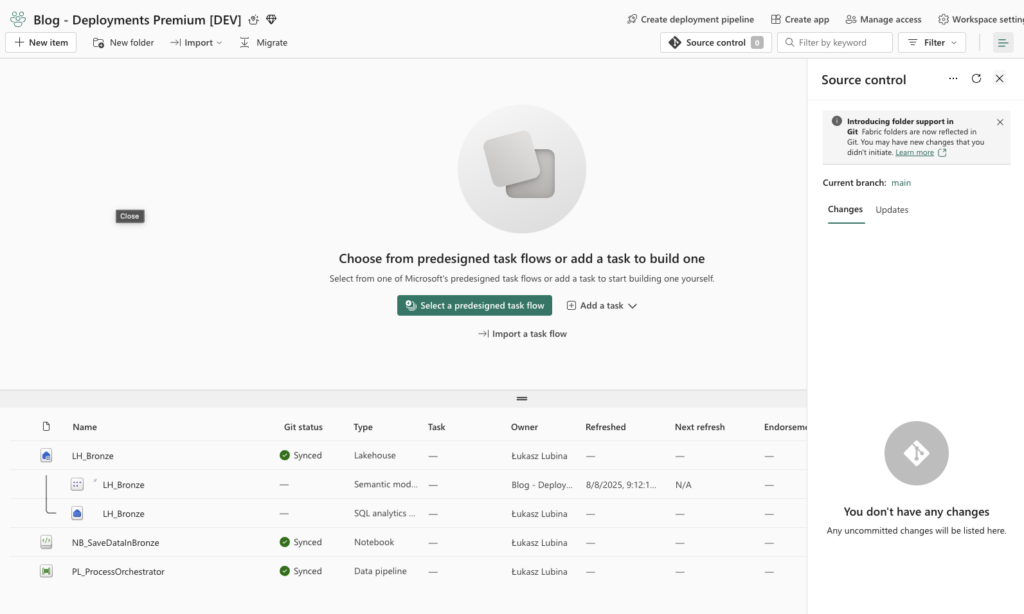
In my example, my Development workspace contains:
- LH_Bronze — Lakehouse with tables
- NB_SaveDataInBronze — Notebook that ingests data and creates tables in LH_Bronze
- PL_ProcessOrchestrator — Data pipeline orchestrating the process
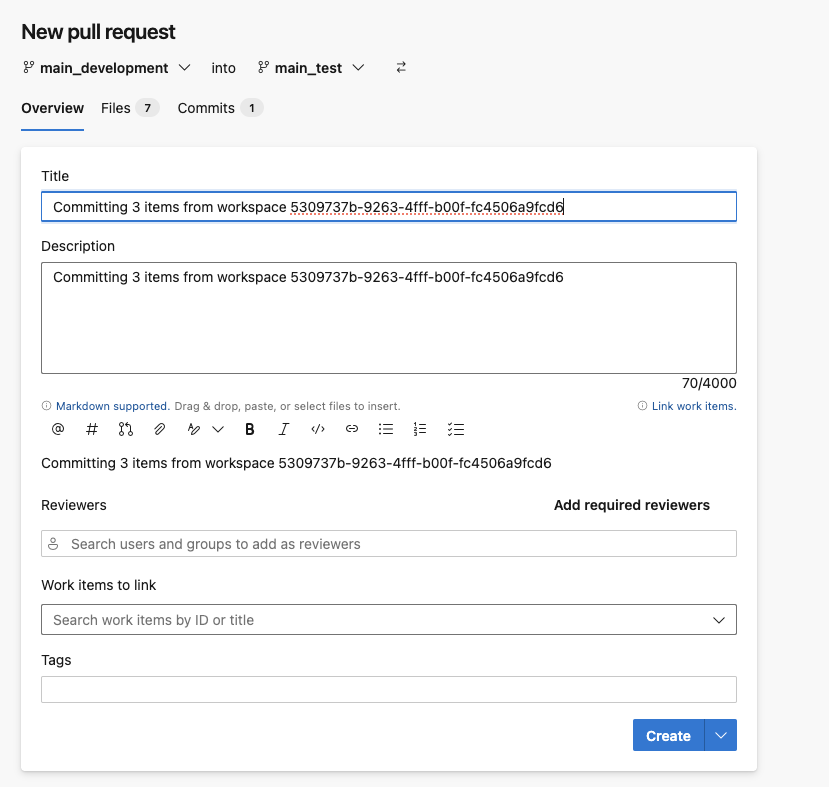
To deploy to Test, create a PR in Azure Repos:
- Go to Repos → Pull requests → New pull request
- Source: main_development | Target: main_test
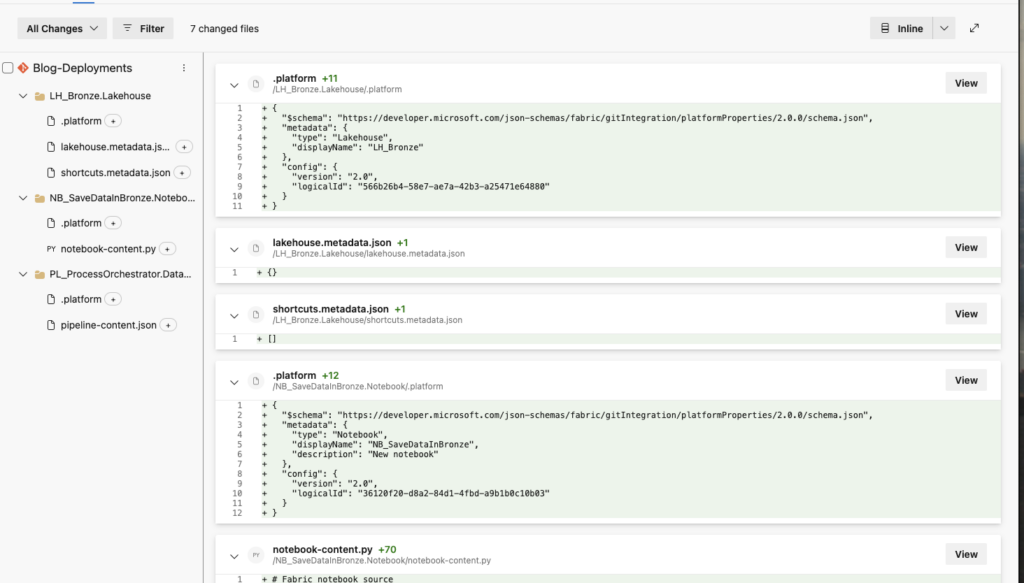
- Review changes in the “Files” tab
- Complete the merge
Once the deployment is done, go back to Microsoft Fabric and open the Test Workspace. Source control will inform you that there are incoming changes:

To pull all changes into the workspace, click on Source control and then Update all:
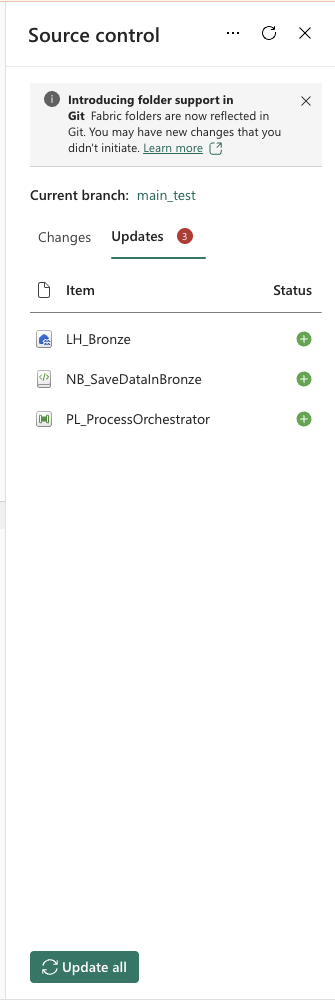
You’ll also see a list of changes that will be applied to items in the Test workspace. After a few seconds, all changes will be synced. To move from Test to Production, repeat the same steps but with main_test → main_production.
Considerations
This method works, but you lose some features that come out-of-the-box with Deployment Pipelines.
For example, in Data Pipelines, certain references automatically adjust when moved between environments—but not all.

As you can see, on the DEV workspace it’s pointing to the correct notebook, and it has been migrated correctly to the Test workspace—it automatically changed the notebook reference to TST:
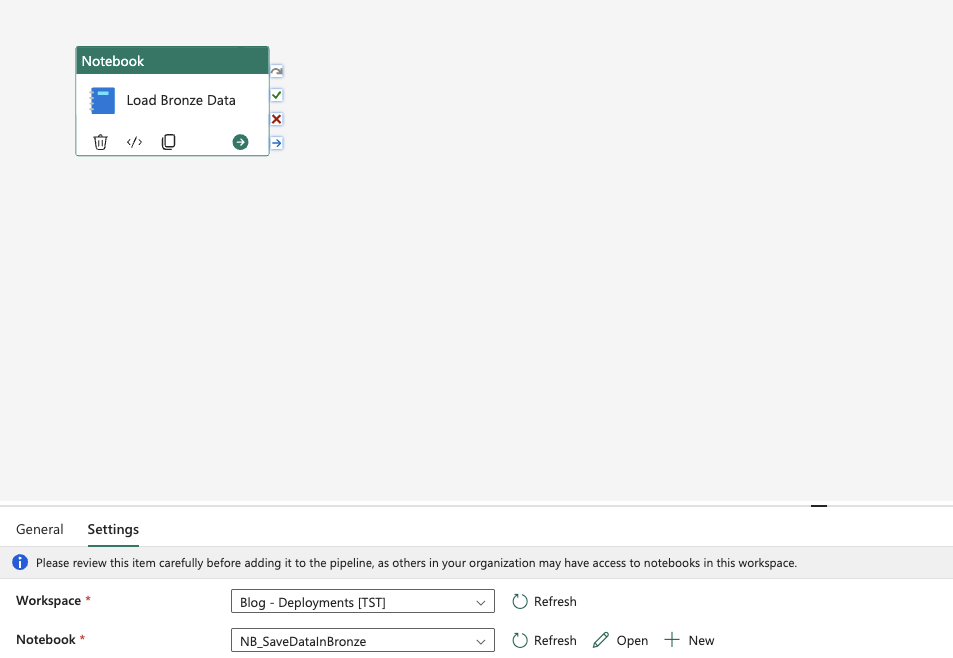
Unfortunately, this isn’t done for all items. I had a notebook with a default Lakehouse pointing to DEV_LH_Bronze. When deployed to Test, it still pointed to the Dev Lakehouse. Without custom deployment scripts, you can’t change this automatically.
Similarly, changing Semantic Model connections is straightforward in pipelines, but not in the Git-only approach—you’ll need your own scripts.
Deployment Pipelines Approach
Step 1: Create Main Branch
This starts the same way: create a repo and link your Dev workspace to the main branch. The difference here is you only keep one main branch—no separate main_test or main_production.
Step 2: Create Workspaces
Create all three workspaces, but only the Dev workspace is linked to the repo. Test and Production remain unlinked.
Your setup should look like:
- Repository with one main branch
- Dev workspace linked to main branch
- Test & Production workspaces not linked to any repo branch

Step 3: Configure Deployment Pipeline
For demonstration, I used the same components as before and committed them to the main branch.
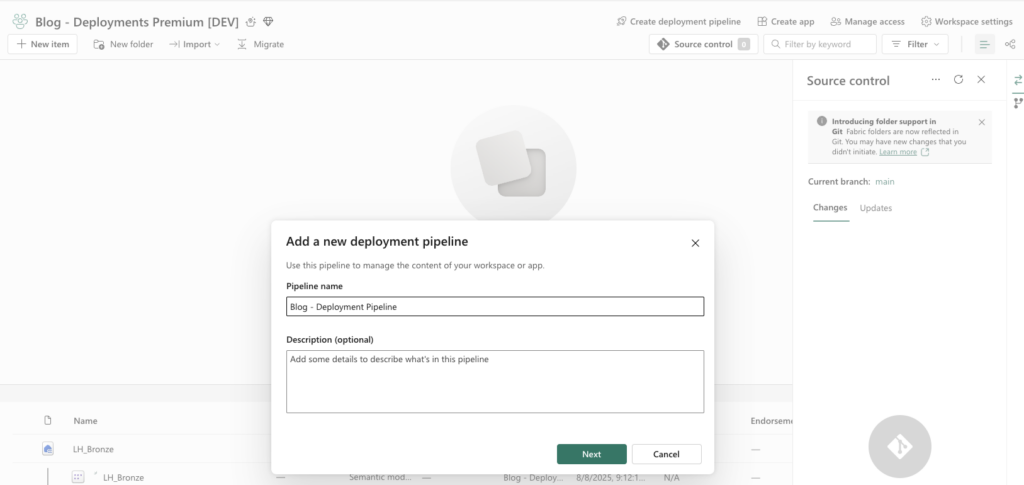
To configure a deployment pipeline in Fabric:
- Click Create deployment pipeline at the top
- Give it a name and optional description → Next
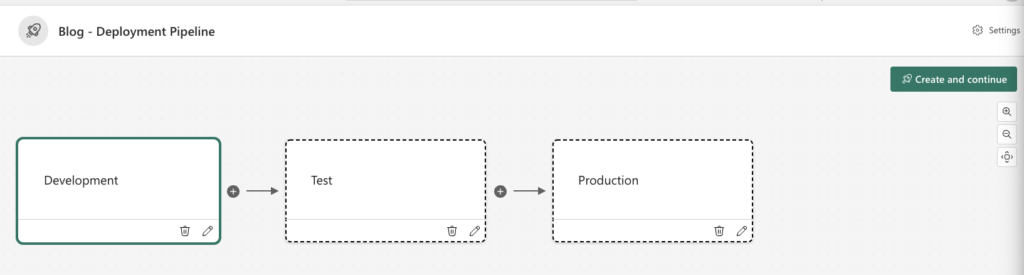
- Adjust the number and order of stages (max 10)
- For the standard three-stage flow (Development → Test → Production), assign each workspace to its stage
Heads up: You must be assigned as an administrator of the workspace. Each workspace can only be used once across all deployment pipelines.
On the screen, you’ll see if an environment has any differences from the source (marked in yellow, like Test in the screenshot) or is up-to-date (marked in green, like Production).
At the bottom, you can see all items that are changed, new, or deleted—and you can selectively choose which components to deploy. I selected all components and clicked Deploy. A window pops up with a comment section, so you can add a description for each deployment.
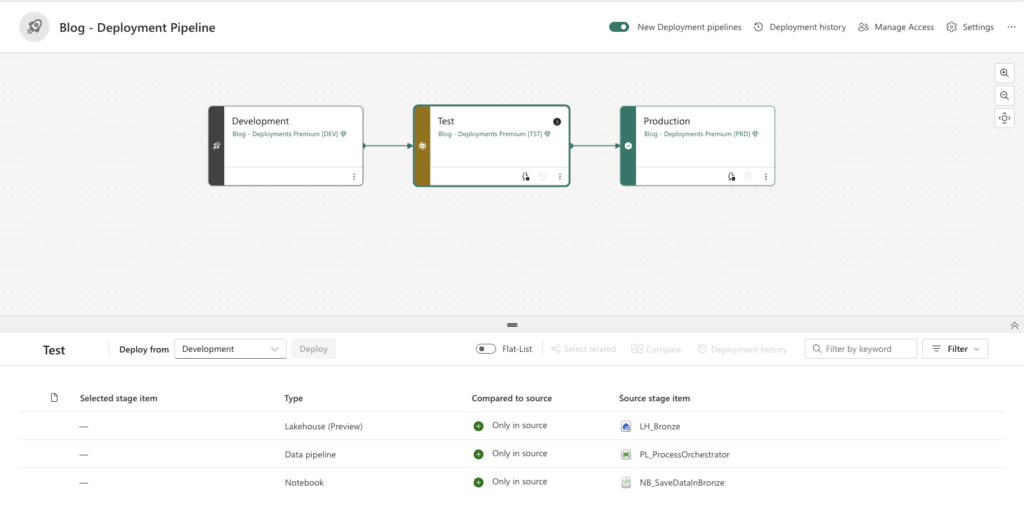
After successful deployment, all components will be available in the TEST environment. For production deployment, follow the same steps.
Additional Pipeline Features
In each stage, you have two additional icons:
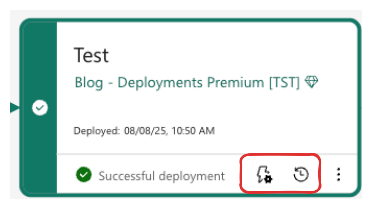
The clock icon lets you review deployment history:

Here you’ll find a list of deployments performed and the items changed during each deployment.
The lightning icon is where you configure deployment rules—for example, changing semantic model connection strings or changing the default lakehouse in a notebook. The full list of supported rules can be found here: Microsoft Docs – Deployment Pipeline Rules
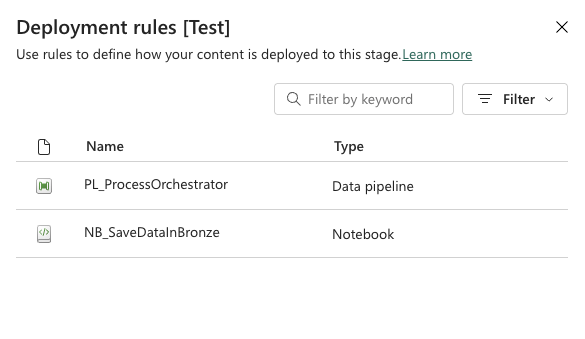

To configure the default lakehouse in deployment rules, you’ll need to provide:
- Lakehouse ID — UID of the lakehouse in the target workspace
- Lakehouse name — Lakehouse name in target workspace (usually the same as in dev)
- Lakehouse workspace ID — UID of the target workspace where the lakehouse exists
Tip: You can grab the Lakehouse ID and Workspace ID from the URL. Navigate to the target lakehouse and copy the following parts:
HTMLhttps://app.fabric.microsoft.com/groups/<workspaceid>/lakehouses/<lakehouseid>After the keyword groups, you’ll find the Workspace ID, and after lakehouses, the Lakehouse ID.
Critical Warning: Deployment rules can only be set after the initial deployment of components.
Managing Variables Across Environments
Deployment pipelines in Fabric allow you to adjust some environment-specific settings, such as changing the default Lakehouse or updating a Semantic Model connection string. While this is useful, it often falls short for larger projects where many different values need to be swapped between environments.
To cover that gap, Microsoft introduced the Variable Library. This feature works regardless of which deployment approach you follow.
Creating a Variable Library
Creating a Variable Library is similar to creating any other Fabric item:
- Go to your Development workspace
- From the item list, select Variable Library and create a new one
- Open it and start adding variables
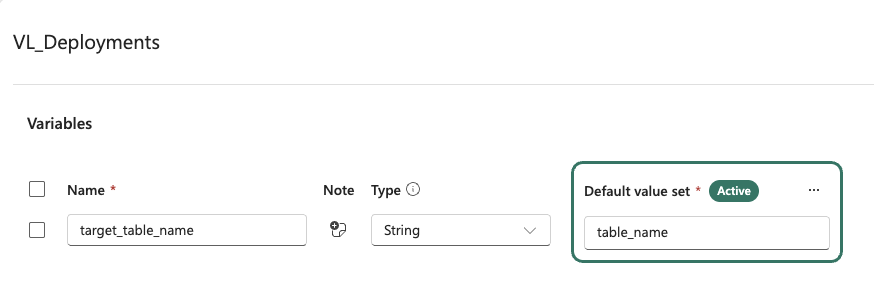
Each variable needs a name and a value. By default, variables are placed in the Default value set, but you can create additional value sets for each environment (e.g., Test, Production). Click Add value set and give it a name.
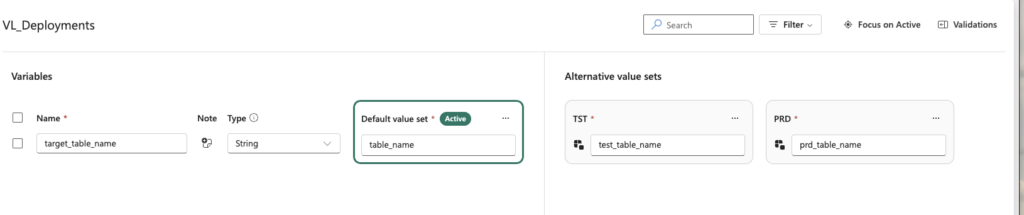
Once the variables and sets are ready, save the library, commit it to your repository, and deploy it to Test and Production like any other item. After deployment, the Variable Library will exist in the target workspaces with all defined variables.
The last step is to activate the correct value set in each workspace. Open the workspace, select the three-dot menu on the chosen value set, and click Set as active.
Key Things to Know
- If you add or edit variables in Development, those changes will flow to Test and Production during deployment
- The active value set does not get overwritten—you don’t need to reset it after each deployment
- Currently, Variable Libraries can be used in Data Pipelines, Lakehouse shortcuts, and Notebooks. Microsoft is expected to extend this list in the future
To see how to use Variable Libraries in these items, check the official documentation: Notebook Variable Library Utilities
Wrapping Up
That covers both deployment approaches in Microsoft Fabric. Each has its trade-offs:
- Git-based: Full control over the process, integrates well with existing DevOps workflows, but lacks automatic environment-specific adjustments
- Deployment Pipelines: Built-in rules, selective deployment, and deployment history—but less flexibility for custom CI/CD workflows
Variable Libraries help bridge some gaps in both approaches by giving you a clean way to manage environment-specific values without hardcoding them.
Got questions about which approach fits your setup? Or want to share how you’ve handled deployments in Fabric? Drop a comment—I’d love to hear about your experiences!
Happy deploying!